Photos Taken At f/1.2 Aperture (With Zoomed In Examples)

Lenses today have the capability to have a much lower aperture than ever before. While this is beneficial in some areas, it is detrimental in others and you don’t want to be surprised by what the detriments are! The biggest detriment is how incredibly narrow its depth of field is. If I focus on someone’s nose, their eyes will be out of focus.. and.. yes.. this has totally happened to me :p. It’s taken me awhile to get a feel for it, and even now I sometimes underestimate it. Most people don’t/won’t notice it but photographers have “trained eyes” and it’s hard for us not to notice :).
If you aren’t sure what depth of field is, sums it up perfectly. Essentially, it’s just how big the area that is in focus is. Aperture also plays a role in exposure but that’s a blog post for a different day.
Anyway, I am excited to own a lens that can go as low as f/1.2 😀 and I know people want to know what that looks like and how to work with it so I thought it would be helpful to post some images zoomed in on.
As always, I resize my images for the web which causes them to “blur” a little bit.. I am happy to post full resolution versions if it’s important to you to see the details, just let me know in the comments!

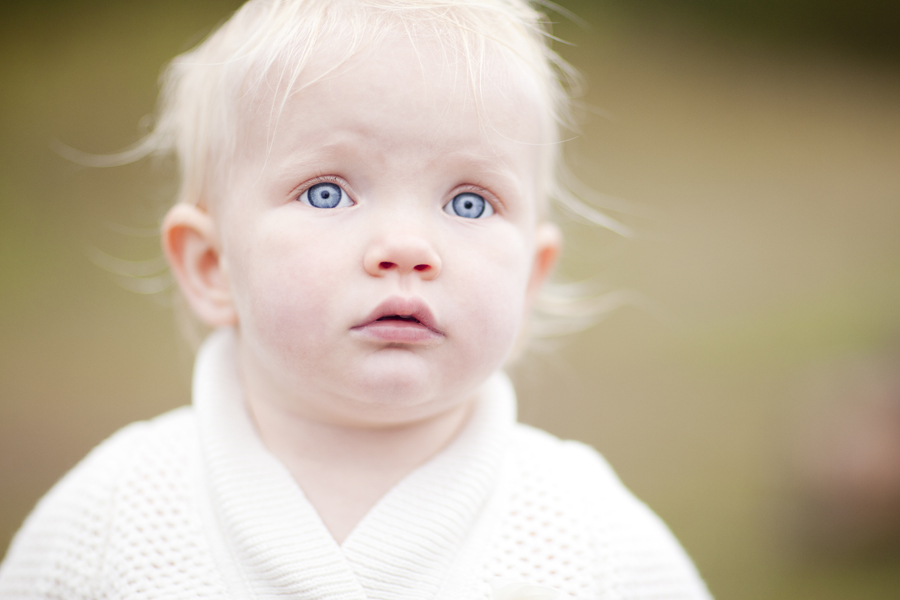
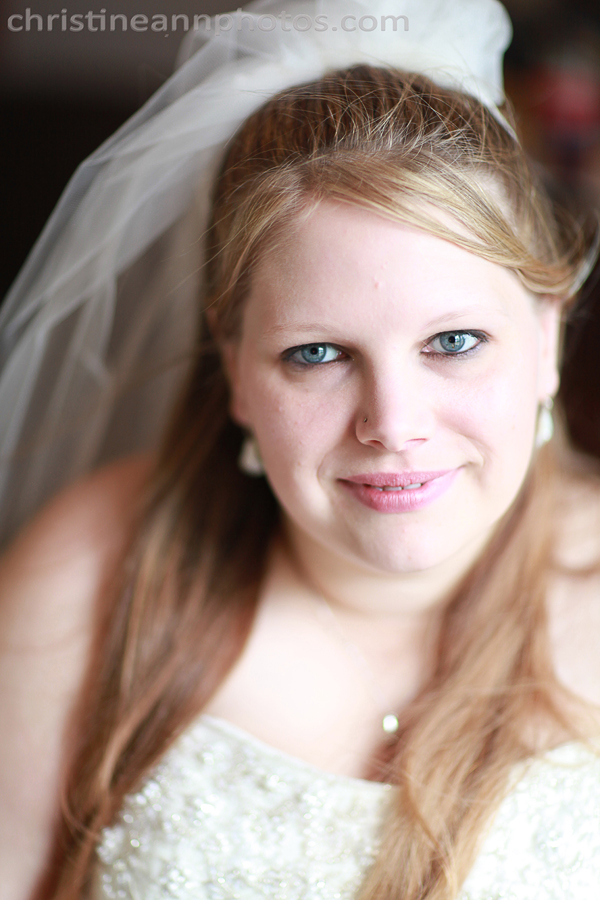
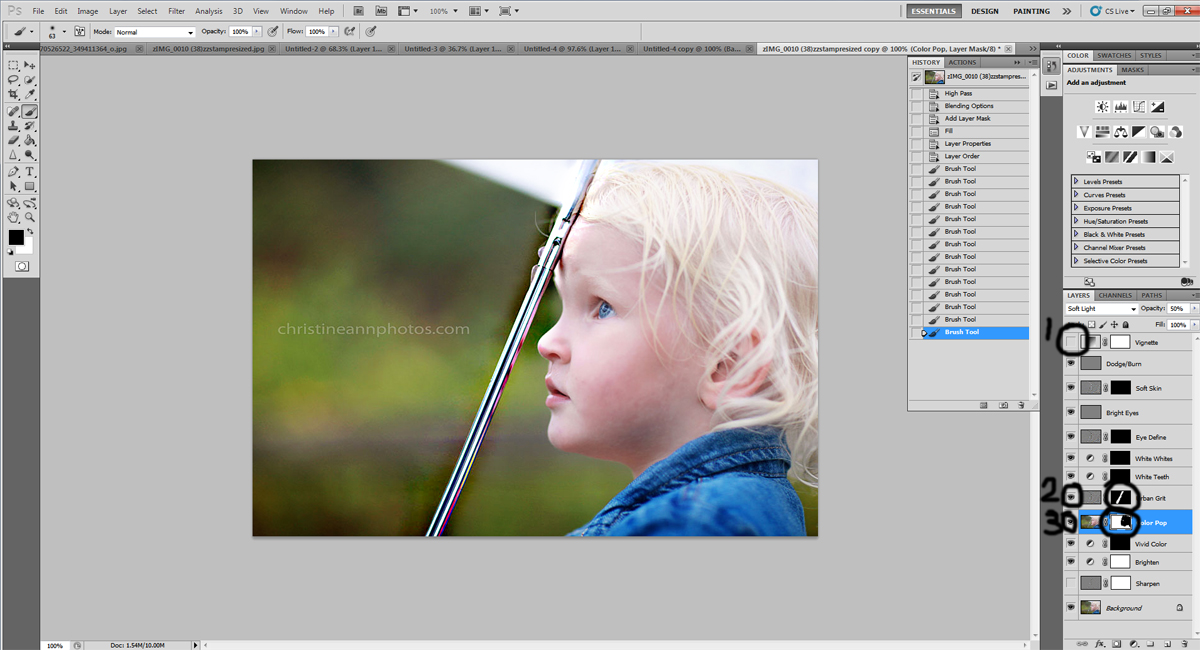
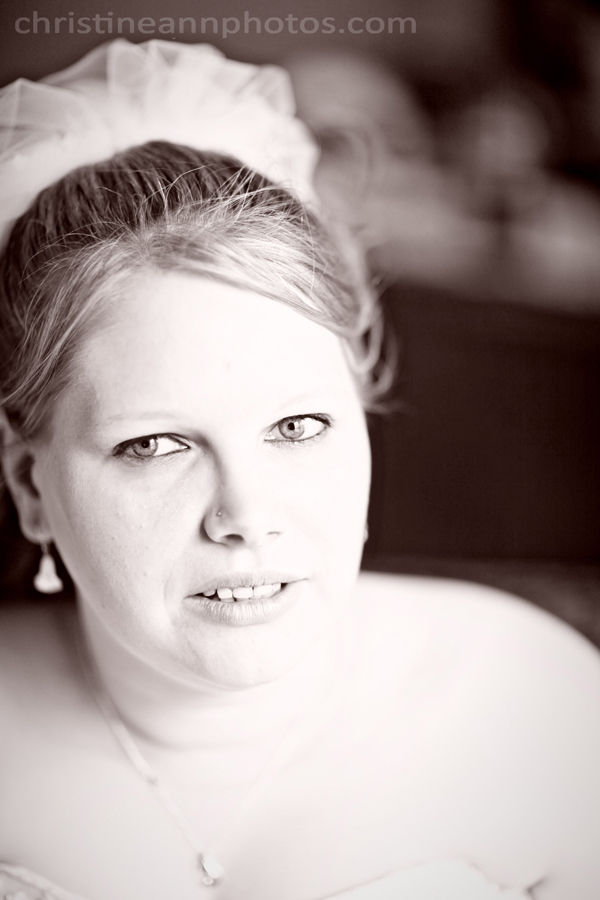
I have a couple samples to break down here. We’ll start with this bride. These photos were all taken at f/1.2 so it’s a great one to use as a sample.
bride portrait wedding photography duluth mn natural light photograph low aperture image sample
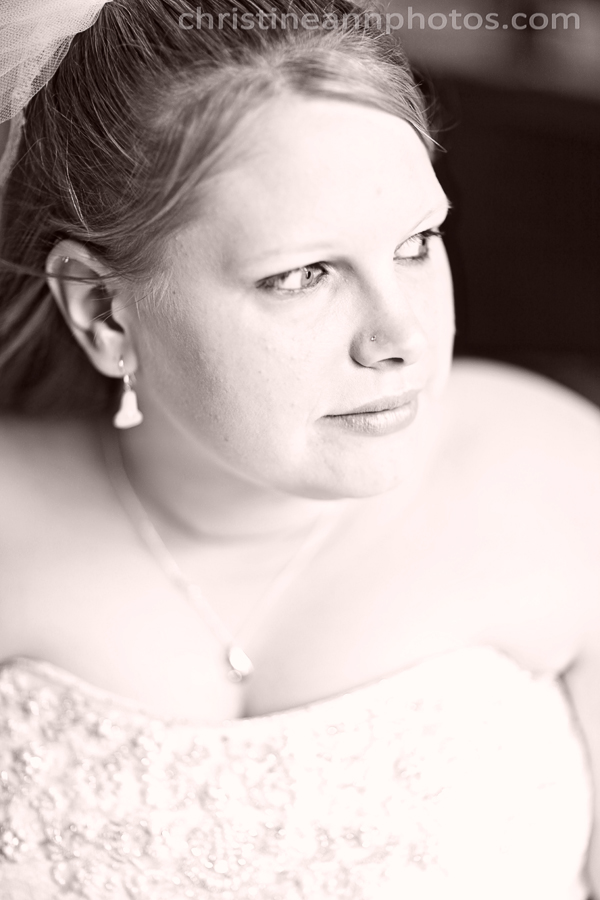
^This is the original photo.

close up of bride's face to show depth of field at f/1.2
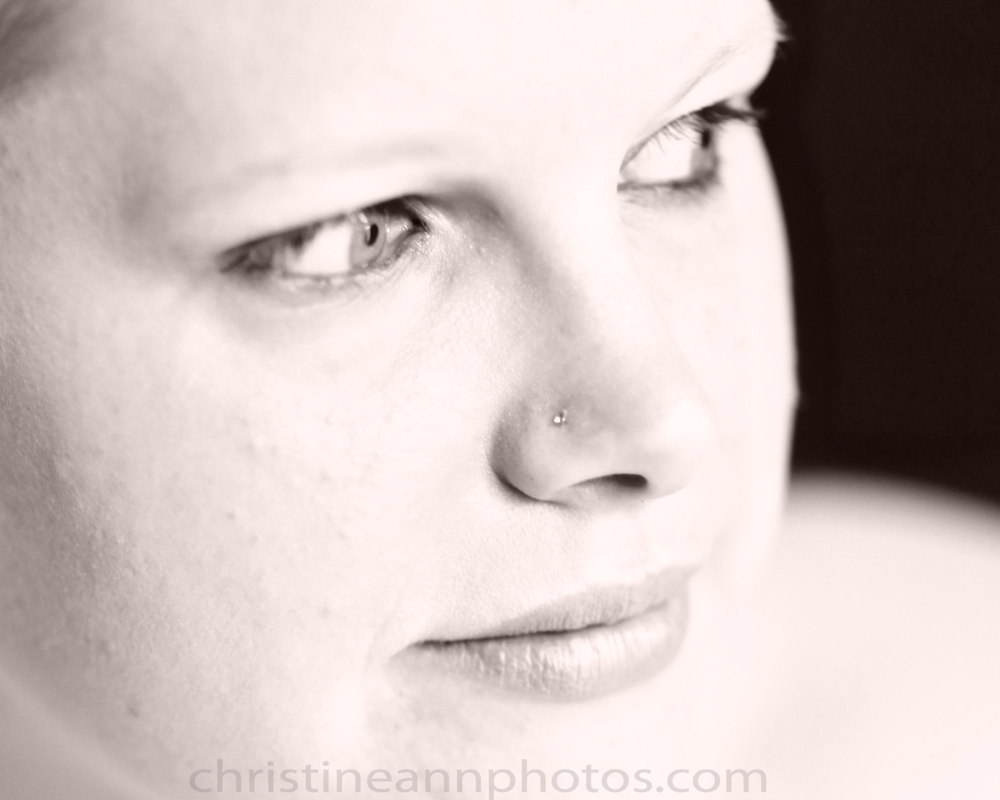
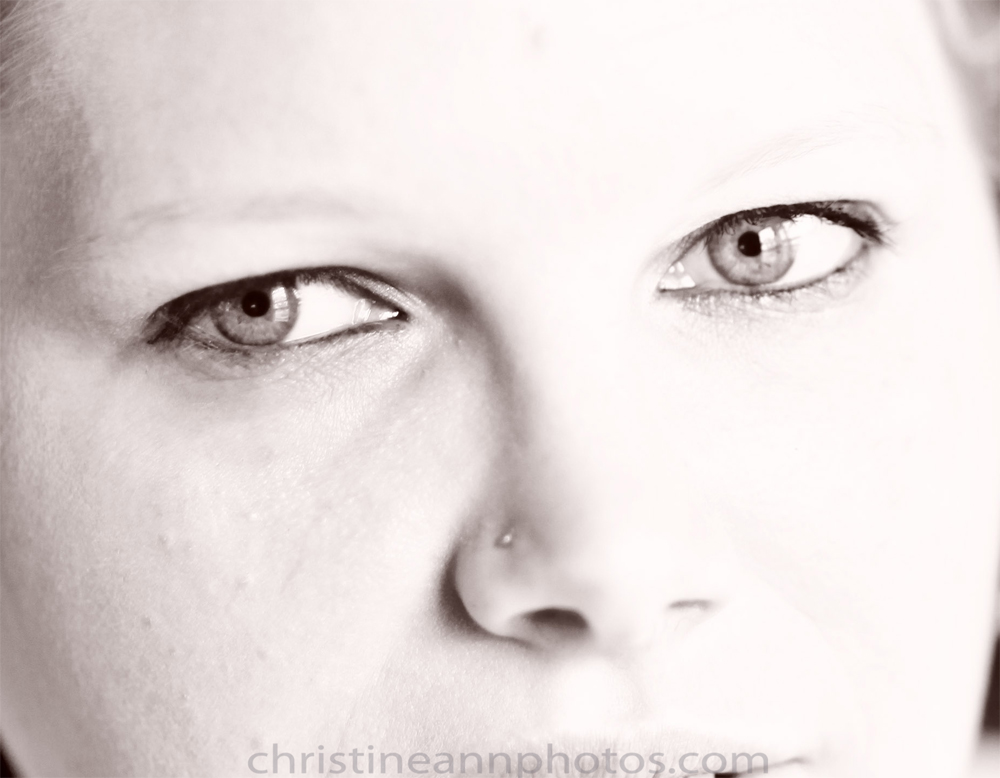
^Closeup of the photo. You can see how some spots appear in focus and some are out of focus. The eye closest to the camera is what the focus was set to. If you look up at the eyebrow above it, even that is out of focus, because f/1.2 is SO narrow.

duluth-mn-wedding-photographer-hermantown
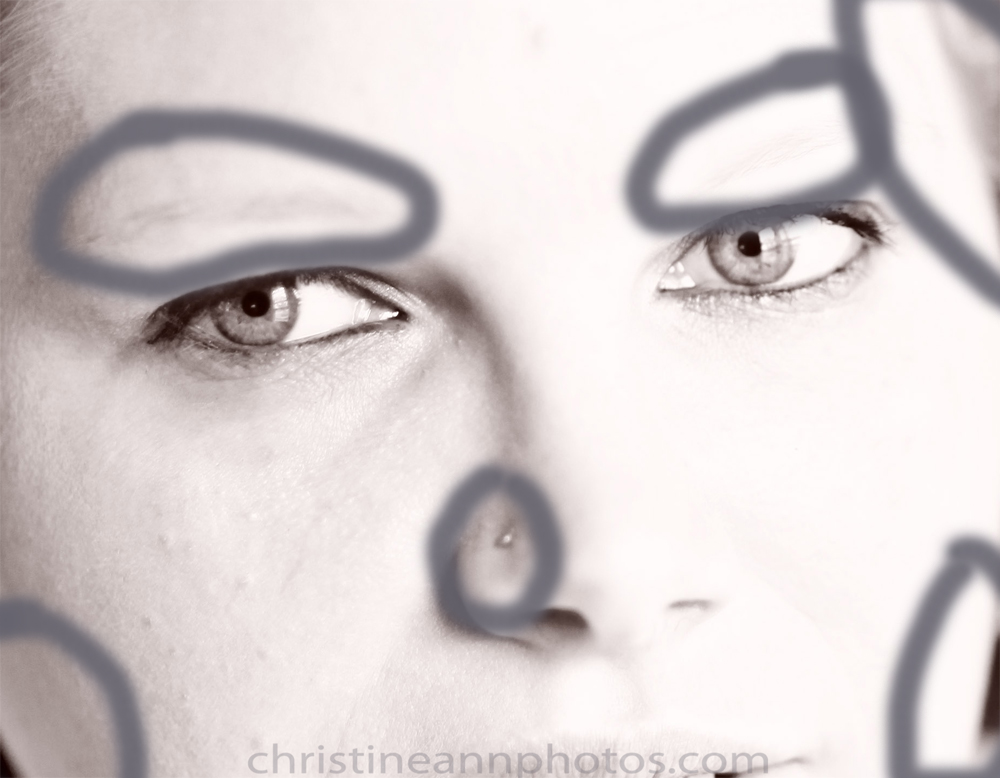
^Circled the spots that are noticably out of focus/blurred as a result of using such a lower f-stop. If I had made it more like f/4+ the entire face would be in focus.

_____

wedding photographer depth of field blog post
^Another photo of the bride at f/1.2

close up of image to show a narrow depth of field and how it effects an image
^Close up of the face.. you can see where it is in focus and out of focus.

bride wedding photography in duluth mn showing depth of field close up
^Out of focus areas are circled.

_____

cake smash in duluth MN with low aperture at f/1.2 narrow depth of field
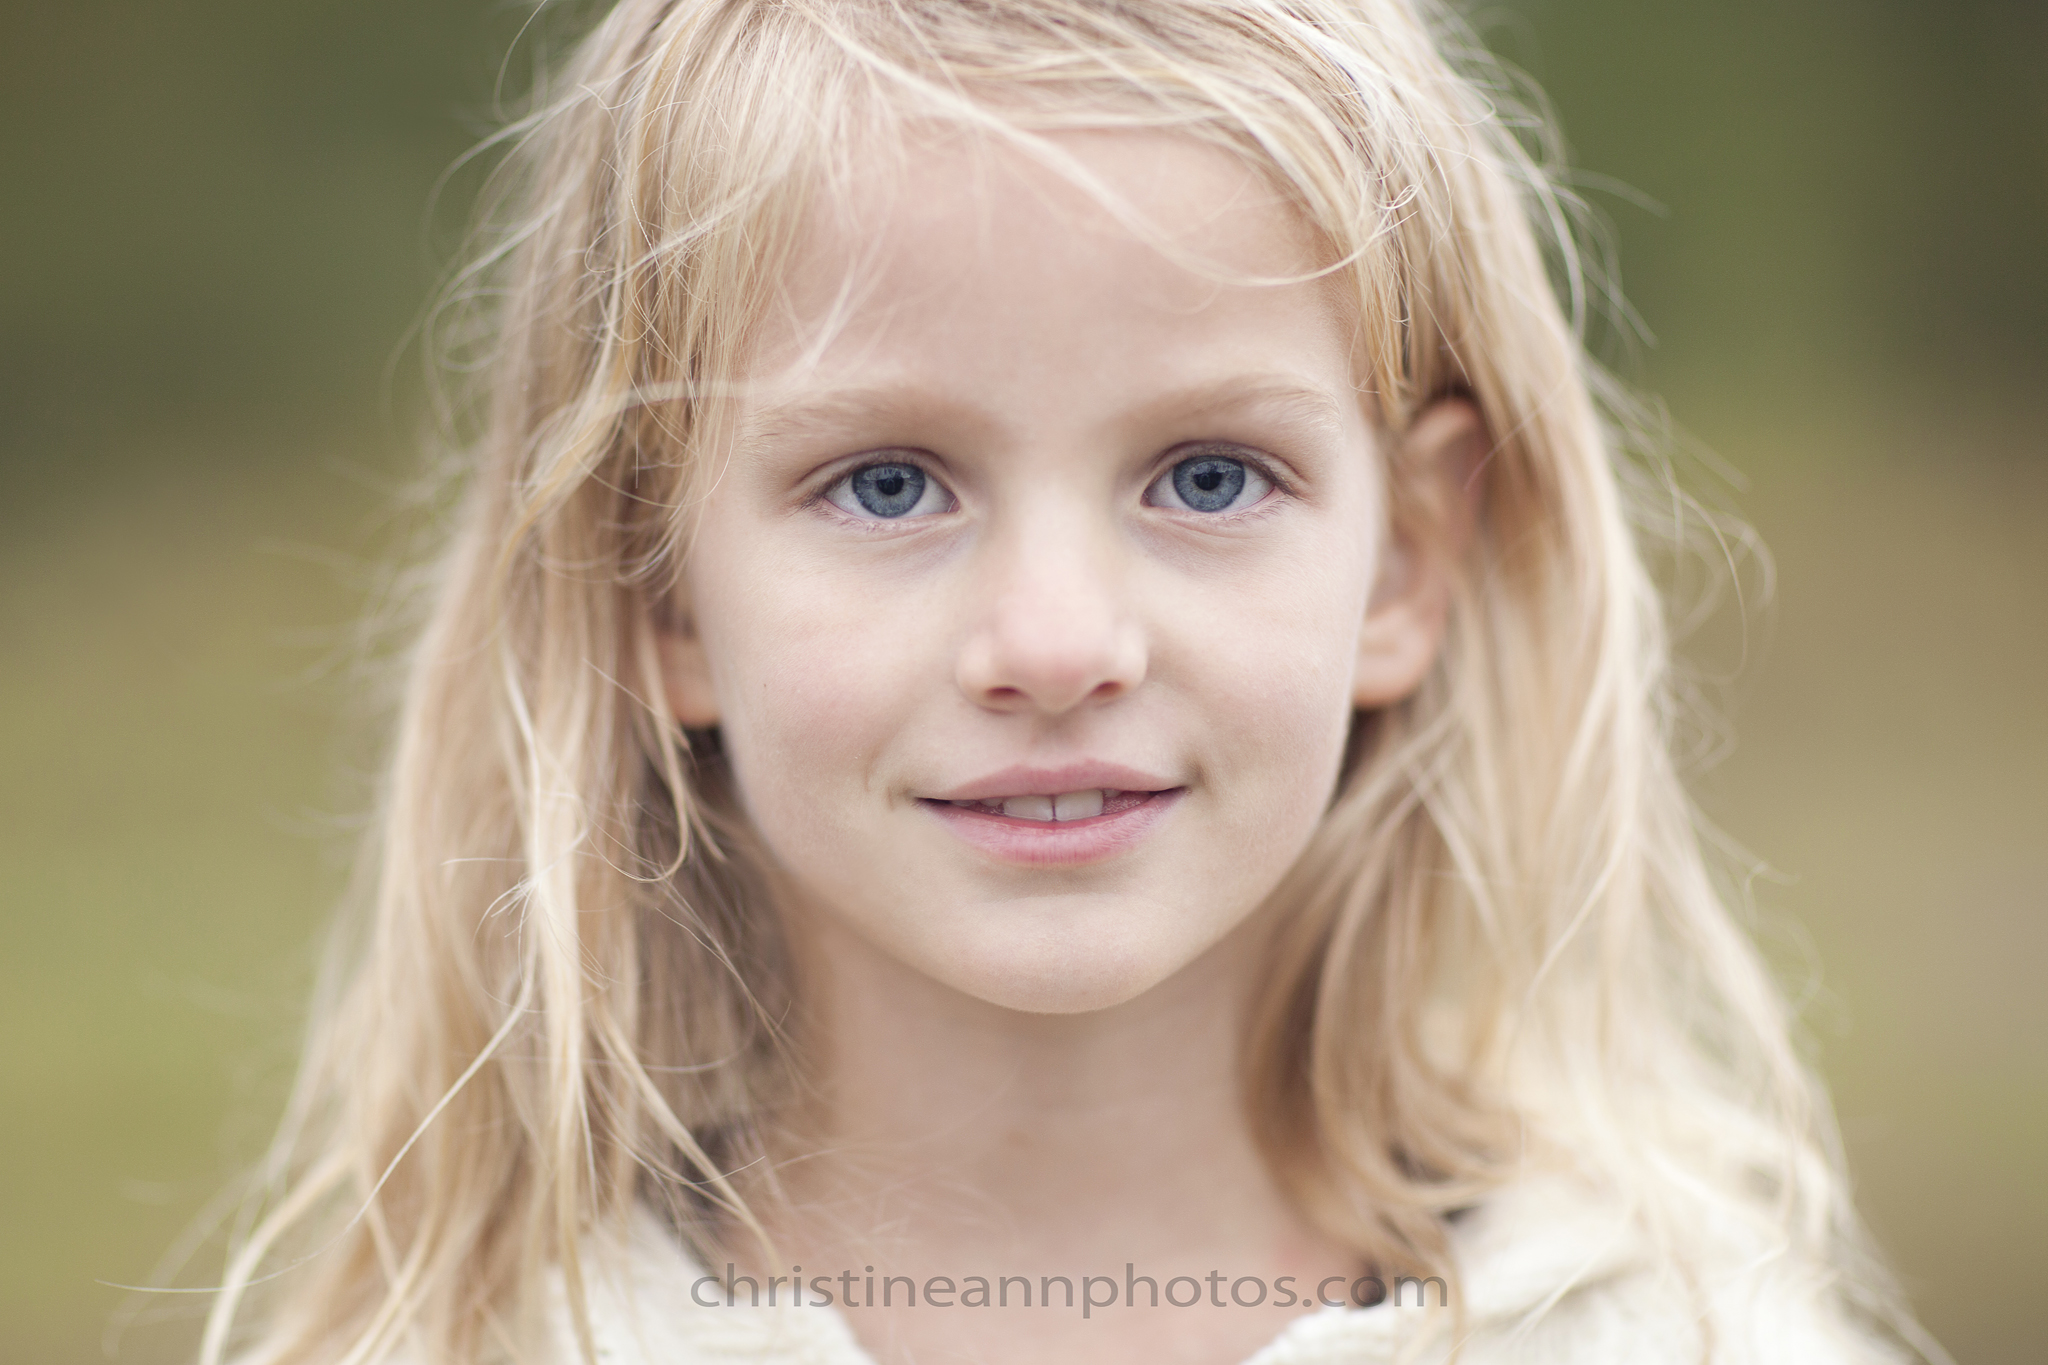
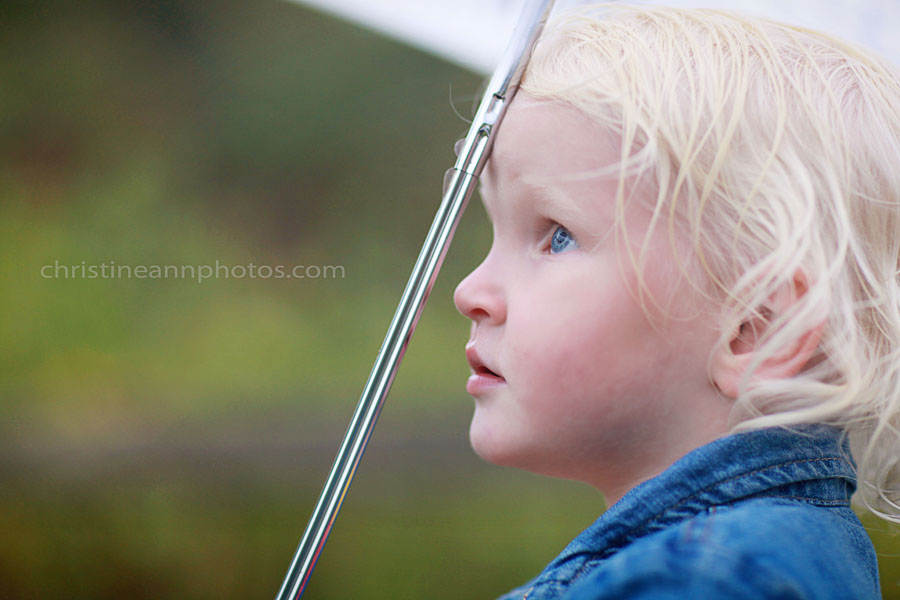
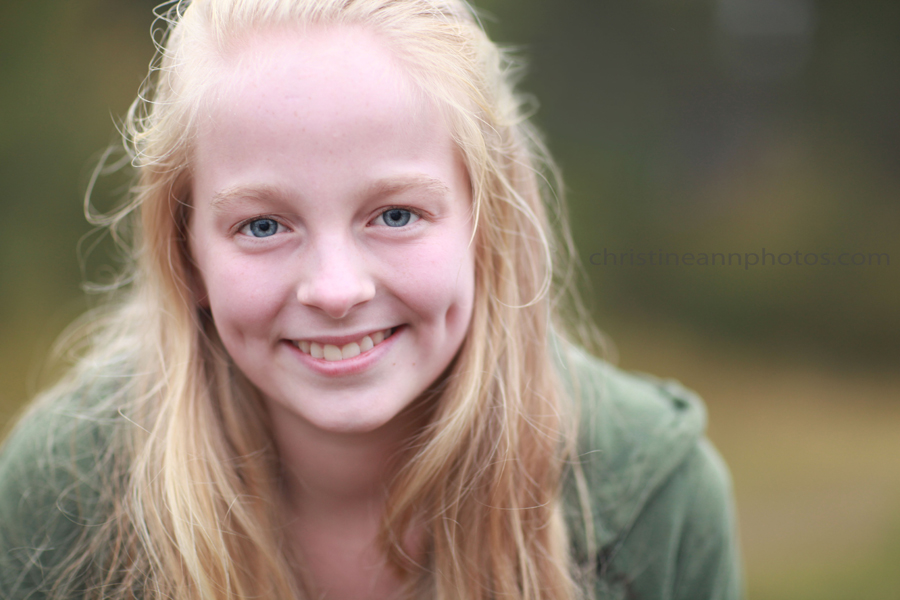
Here’s another photo taken at f/1.2. Generally you’re supposed to get the eyes in focus but on this photo the focus is landing on the lips. THe depth of field is so narrow that the lips are in focus and the eyes are out of focus.

duluth photographer cake smash depth of field image example
^Notice where the focus is landing in the photo (on the lips) and how the eyes are out of focus due to the narrow depth of field.

_____

narrow depth of field image example from family photographer Christine Ann
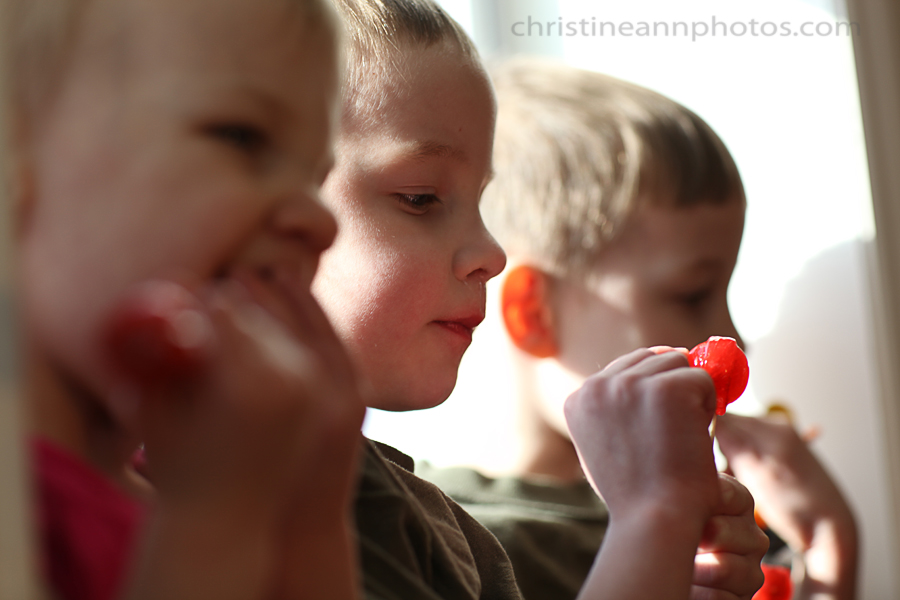
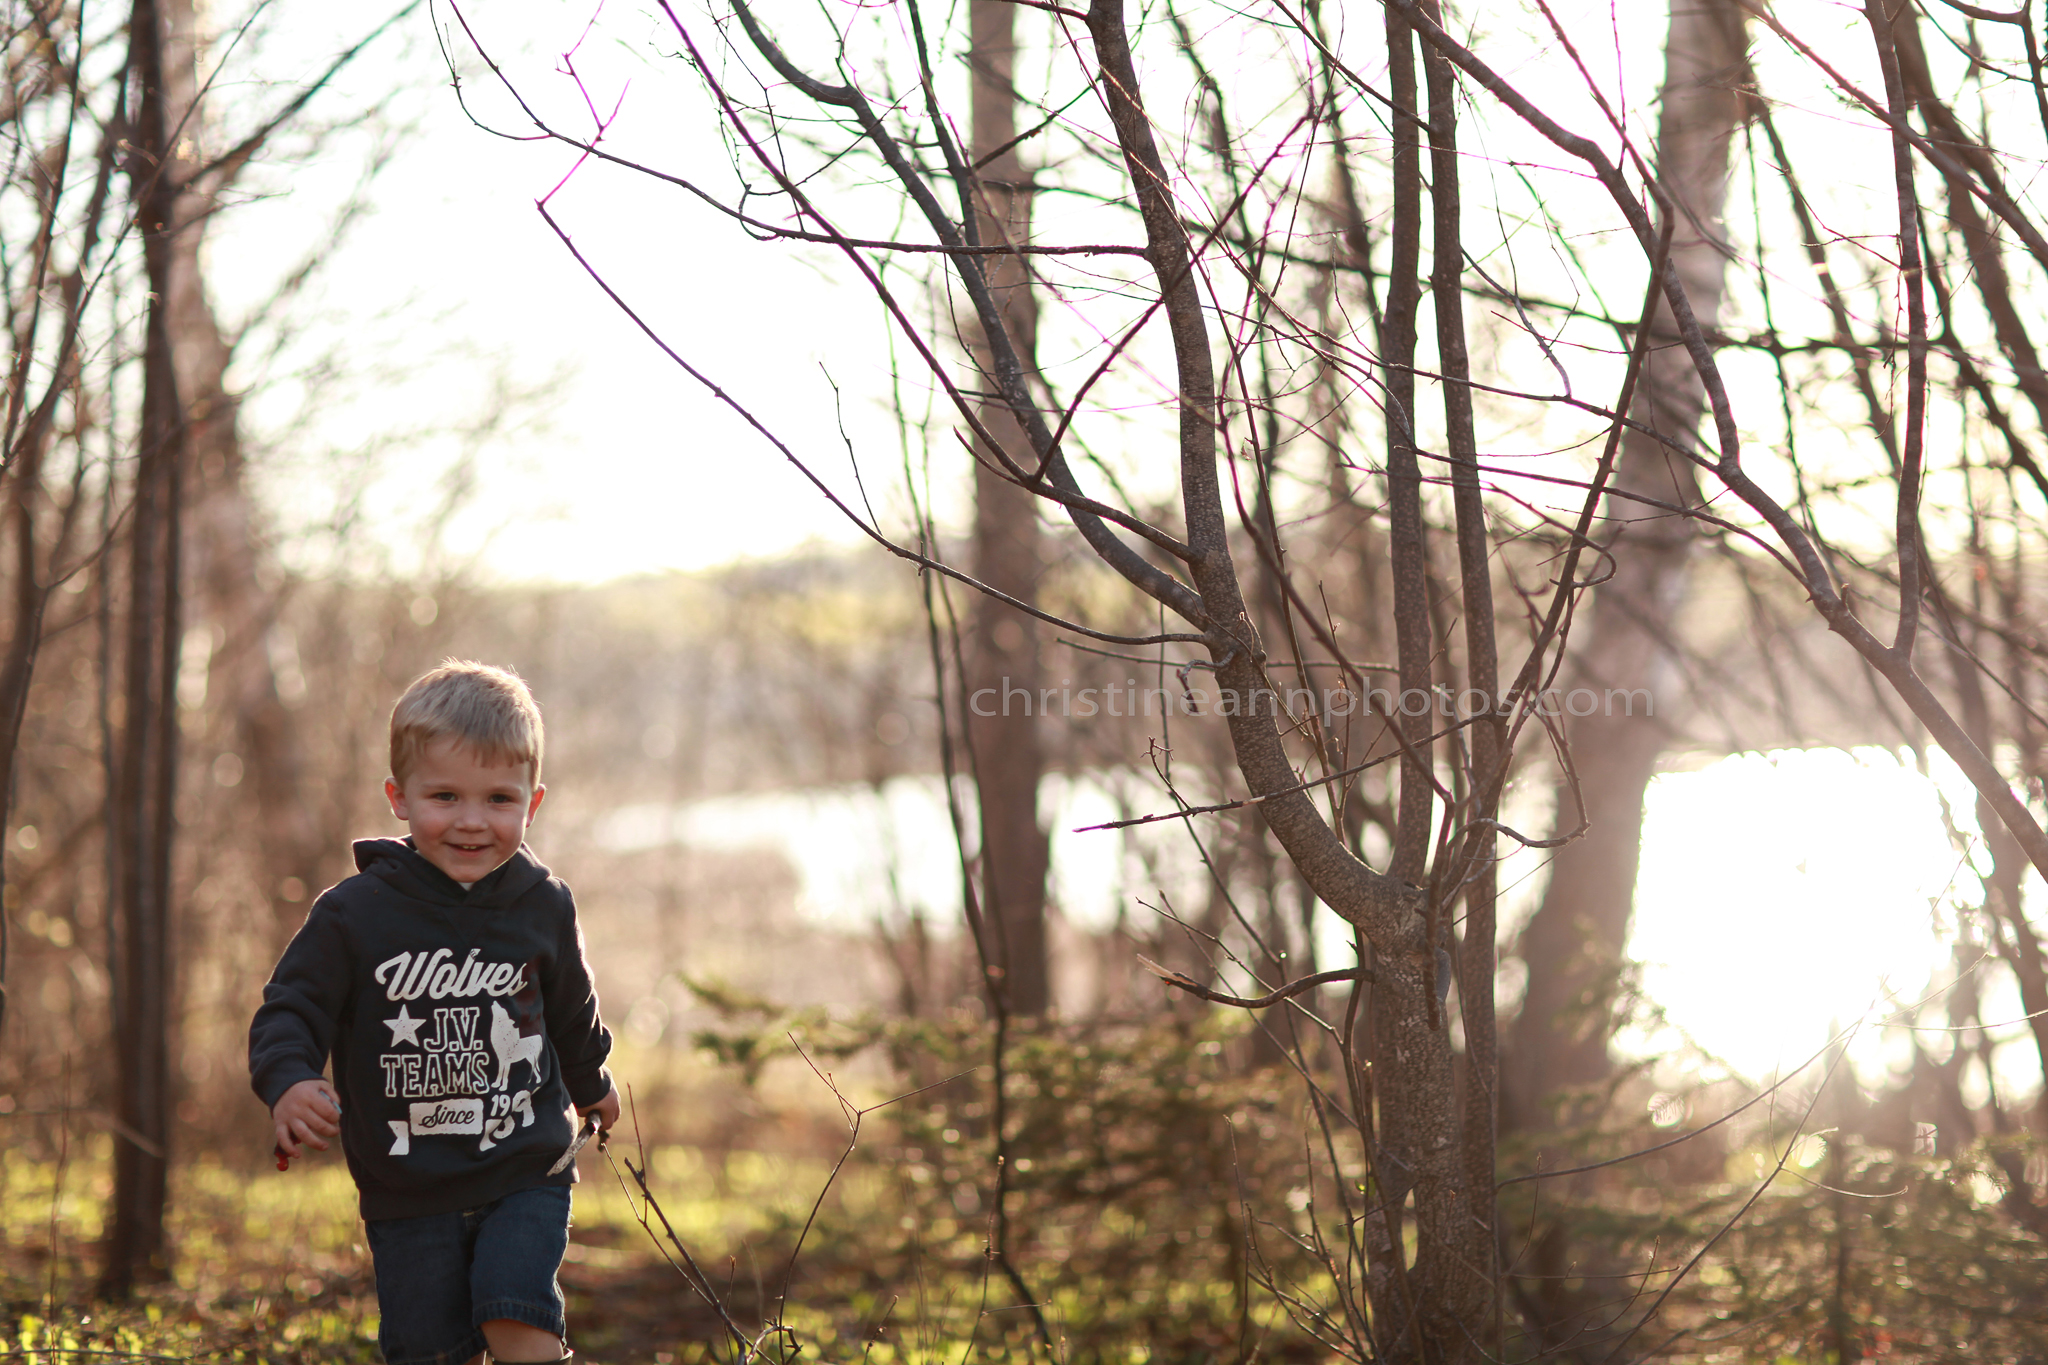
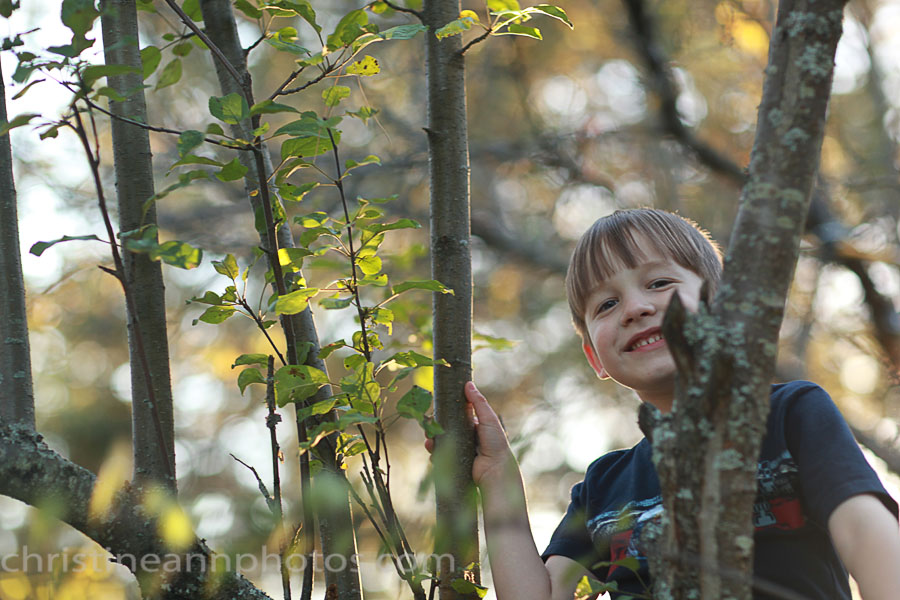
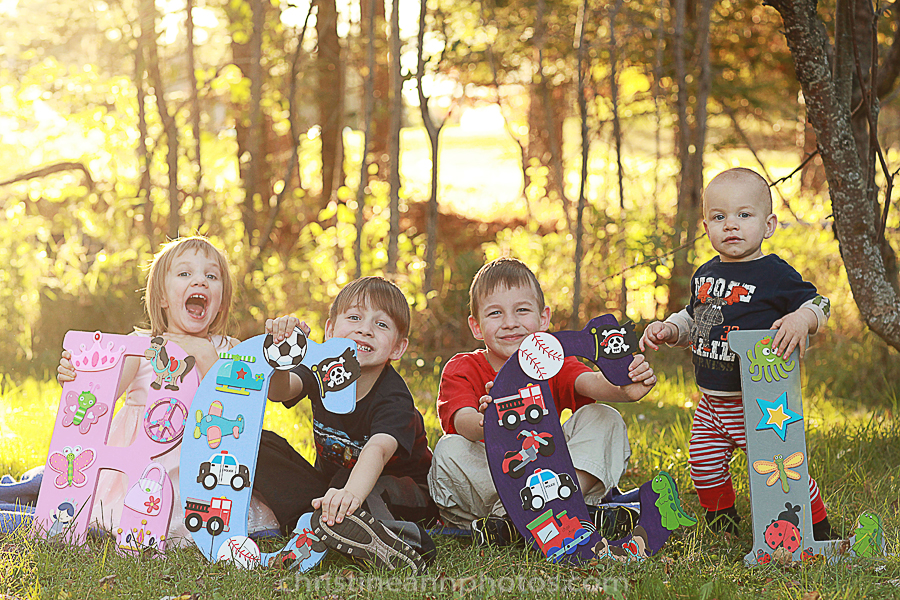
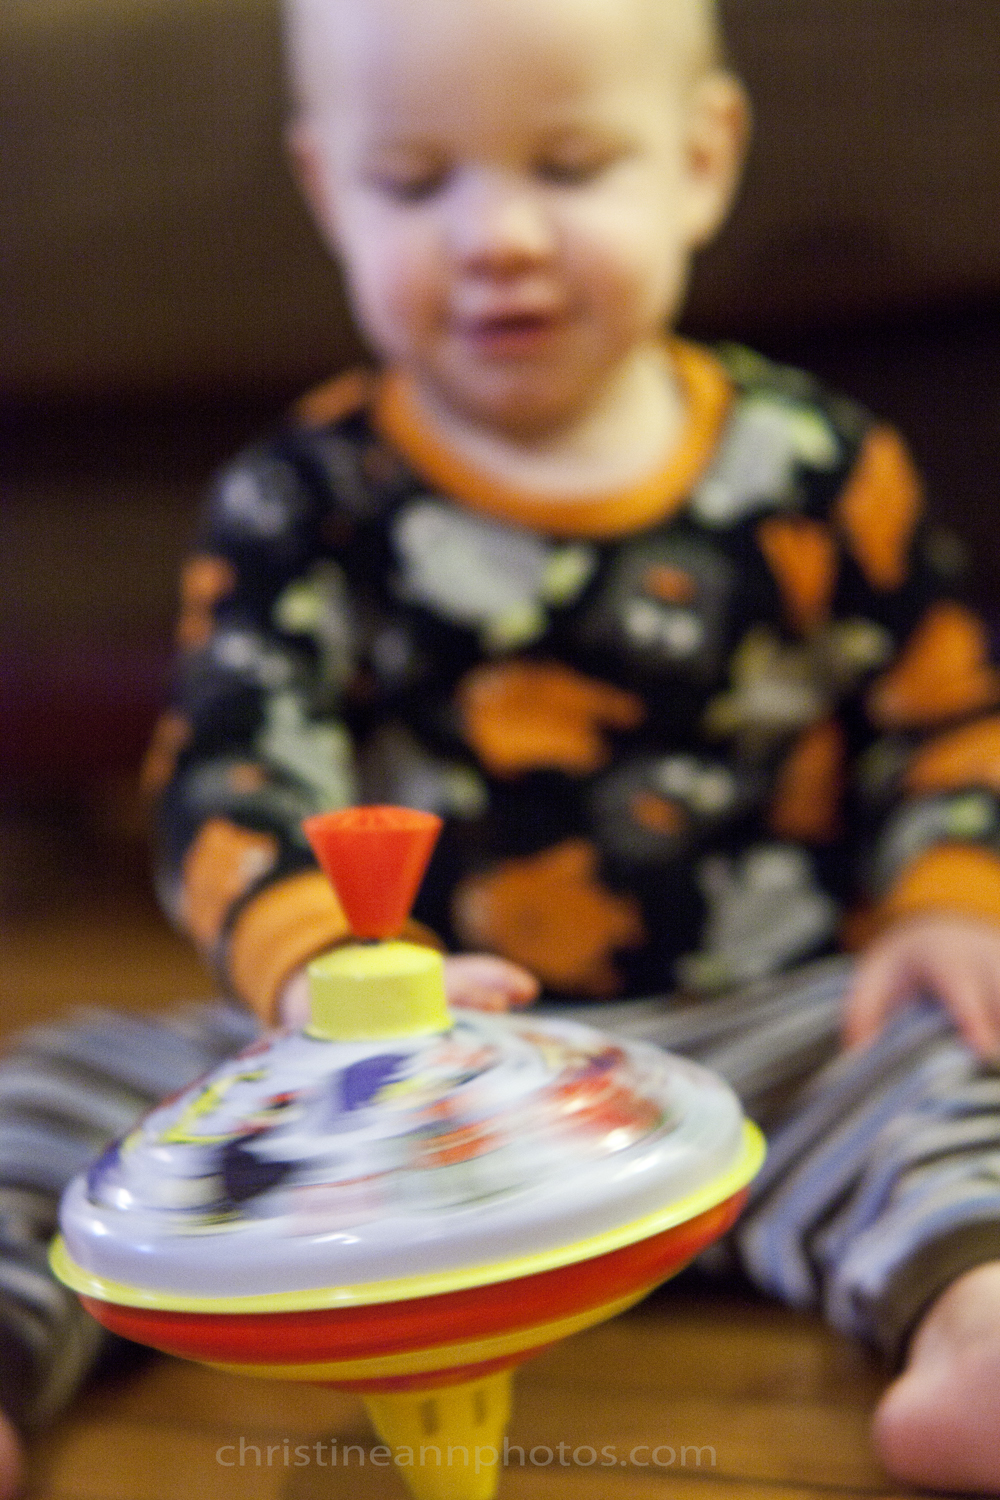
^Here is another photo with a low aperture of f/3.2. You can see where the focus lands (the kid in the middle with the sucker in the middle) and how it effects the rest of the image.. how the kid further away from the camera and closest to the camera are both blurred.

Hopefully this helps everyone understand aperture and how it effects a photo and helps people looking into the 85mm f/1.2L lens make purchasing decision. Personally I think f/1.2 is too low for most portraits. It’s just too unforgiving and leaves parts of the face out of focus )the nose, ears, hair, neck etc. I try to stay above f/2.2 at least for portraits usually unless there is low lighting.

There are a lot of other things that affect bokeh and how narrow the depth of field is. These images were all taken on a Canon Mark II 5D which has a full frame sensor which “enhances” the aperture more than a crop sensor would. If I put the same lens on my T2i (crop sensor) then the depth of field is less narrow/bigger so you do need to take into consideration what camera body you are using as to if you would get similar results. There are a few other factors that affect how narrow the depth of field is – 85mm has more bokeh than a smaller mm lens (for example if I used a 35mm 1.2, there would be more in focus and if I used it at 200mm there would be less in focus).. and how close you are standing to what/who you are photographing also impacts the image. So you should understand that this is not a cookie cutter blog post that will always be true for everyone but it should help you get a good idea of how an image shot at f/1.2 looks close up!

To see more images taken on an 85mm f/1.2L lens (without zooming in 🙂 ) check out that blog post http://wp.me/p3Jl3q-9a.

If you have any questions, don’t hesitate to ask!

-Christine Ann

Duluth Photographer Website
Duluth Senior Photographer
Duluth Photographer Facebook
Duluth Photographer Blog

Photos From 85mm 1.2L Lens.

Which lens you decide to use on your camera has a big impact on how the photo turns out. A big contendor in the photography world for people who are very invested in photography is the 85mm 1.2L lens by Canon. This is the first professional level lens I invested in and I am very fond of it :).
The first thing you have to decide when picking a lens is if you want a prime lens (does not zoom in and out) or a zoom lens (has a range of how close or far you can get to the subject by rotating the lens to zoom in and out). THere are advantages and disadvantages to each (perhaps a future blog post topic 🙂 ) but one of the best and most noteworthy features of the 85mm 1.2 lens is that the aperture can reach .. *drumroll* .. f/1.2! The lowest number you usually see on a zoom lens is f/2.8 so this is quite a big difference on the prime, however you do lose the ability to zoom in and out. The f/1.2 is amazing for when you want to get as much light into the camera as possible and also if you want a very small depth of field (meaning only one thing will be sharply in focus and everything else will be blurred).
The f/1.2 is so sensitive that on my full frame sensor camera body (how far 1.2 takes you depends on a handful of factors including your camera body), if I focus on someone’s nose, their eye will be out of focus. It’s a very very narrow depth of field and very unforgiving for in focus images! There is a learning curve to harnessing this power. I would not recommend using any new equipment at a shoot that you haven’t practiced with in advance. YOu will probably get some out of focus images when you start out with this lens. I try not to go to 1.2 anymore, personally. f/2 or higher is usually ideal but if there is low light or if I want a certain look I will bump it down lower.

Anyway, I wanted to make a blog post showing image examples of photos taken on the 85mm f/1.2L lens so people could take a look and maybe it could help people make more informed purchasing decisions.

I do need to explain that I reduced the image size significantly to post to the web. Standard web size is 900×600.. the originals are around 3800×5700 so they don’t reflect the same quality as they do out of the camera but I hope it gives a good idea.. especially since the originals are better :). If you would like to see a full resolution version of anything just ask in the comments! I am happy to post!

Anyway, without further ado….

family photography kids photos duluth mn in winter with snow and snowey trees
^f/3.5

senior photography duluth mn in fall with trees leaves branches winter gear minnesota
^f/2.8

Duluth MN family photography
^f/1.8

duluth mn bride wedding photography senior photos
^f/1.2 – wide open!

duluth-family-photographer-hermantown
f/1.8

blue eye toddler duluth mn children family seniors
^f/1.4 – close to wide open :)! If you’re shooting this low you must nail the focus spot!

portrait on 85mm canon lens of preschooler posing with hands on face
^f/2.5

duluth mn christmas tree and lights photography with bokeh at low aperture
f/1.4. I was able to take a photo with one fairly dim light on @ 1.4.. this low aperture also created a very nice bokeh effect on the Christmas tree.

depth of field christmas lights bokeh blur image samples 85mm lens comparison
^f/1.8 (This lens is great for Christmas lights!).

Duluth Minnesota family photography boy with rainboots playing in lake

summer duluth mn photography photographer family seniors wedding newborn
^f/2

family photography hermantown mn
^f/1.8

canon 85mm f/1.2 lens image samples
f/1.6. Notice how narrow the focus is.. the arm is in focus and his entire body is blurred.. there’s about a foot between what is in focus and what isn’t. If the aperture were higher (around f/4+) the arm and body would both be in focus.

rainbow lens flare children portraits duluth mn
^f/1.8

duluth mn winter photographs outdoors snow scarf
f/1.8. Loving how blurred the background is! Notice how even the front of the scarf is blurred.. 1.8 is not a very large depth of field.

duluth-minnesota-toddler-cake-smash-one-year-old-family-senior-photographer
f/1.8

1 year old cake smash balloons blue outfit tie duluth mn family photography
^Here’s one at f/1.2 – this is as low as it can go. I am going to do another blog post soon zooming in so you can see the eyes are in focus but even the nose is out of focus. It still looks okay zoomed out but if you zoom in you’ll see how sensitive the focus is.

Duluth MN family photographer kindergartener with hand on face pose portrait
^f/2.8

wedding photography hermantown mn
^Wide open at f/1.2. To do this shot over I would have used a higher aperture since her hair is blurred out but I still love this photo :).

bride portrait wedding photography duluth mn natural light photograph low aperture image sample
^Another photo taken at f/1.2. I’m trying to include a lot at 1.2 since a lot of people are curious about what photos like at that aperture.

senior photography portraits duluth mn
f/1.8 portrait

duluth minnesota senior photographer photos hiking trail
^f/1.4

family and kids photography duluth minnesota hermantown
^Here’s a shot taken at a higher aperture of f/4. As youc an see.. still plenty of lovely bokeh :).

duluth mn hermantown minnesota family photographer senior photography
^f/2.2

85mm 1.2 L lens image examples comparison
^f/2.2

f/2 aperture photo with low f-stop image samples
f/2

Preschooler in forest with trees photography duluth mn
^f/2.2

minnesota bride duluth wedding photographer
^This is a full res version of an image taken at f/1.2 – click on it to see full detail.

To see zoomed in versions of the photos to see how the depth of field looks up close at f/1.2 check out this article.

If you have any questions please don’t hesitate to ask!

-Christine Ann
Duluth MN Senior and Family Photographer Website
Duluth Photographer Blog
Duluth Senior and Family Photographer Facebook Account

How To Run An Action With A Layer Mask In Photoshop

Apply An Action Set And Using Layer Masks In Photoshop

Did you invest in some actions and now are not sure how to use the action in Photoshop?
Read on :).

First install the actions into Photoshop.

Once installed, click on the action set you want to run (you can run the individual action or an entire set – this highlights running a set but running them individually involves the same steps. So, anyway, click the action set, and hit the “play” button at the bottom of the palette.

Step 1. Highlight the action you want to run
Step 2. Hit “play”

How to run and open an action set in Photoshop

Once you run it, you will see a new icon appear in the layers palette (what is circled on the far right of the screen in the photo above).

_____

Activate Your Action

Since this is a set, there are numerous actions you can activate from here, however they are all consolidated into the one folder. To make them all visible just click the arrow next to the folder like this:

Make action set visible to run actions in Photoshop

_____

Select Your Action

Now there are several actions that you can see but none of them are being applied to the photo (your photo would look awful). Instead, you have to decide which ones you want applied to the photo and click the “box” next to each action. Once you click in the box an eye will appear. The eye means that action is now visible, if there is an empty box/no eye, that action is not applied to the photo.
For this blog post, I will choose “Film Haze” to apply.

How to make actions visible from an action set and apply to photos in photoshop

^Click the empty box to make the layer visible – an eye will appear.

_____

Apply Your Action
.. using a white or black paintbrush

Now that your action is visible and ready to be used there are 2 ways to apply it to the photo.
The first way is adjusting the opacity (what is circled in the upper right in the photo below). 0% opacity will make 0% of the action appear, 100% will apply it full force, and 50% is half strength (and so on). Even if the opacity is set to 100%, if the action is a layer mask you still may not see any change in the photo – which brings us to the next way to apply the action tothe photo. Many actions use a layer mask which means you have to “paint” it on (or off). The layer mask will either be black or white.

If the box that appears after you run the action is black, it means you won’t see a change and you will use a white paintbrush to apply the action (turn the paintbrush black to undo the action). If the box turned white it means it was applied to the entire image and you set your paintbrush to black to remove the action from where you do not want it visible. In the photo below, I selected the paintbrush, set it to black, and removed the action at 100% from the umbrella pole and the face and hair. I removed it at 50% from the jean jacket. In the area circled on the bottom right (in the photo below) you can see the pure black is where it is removed at 100% and at the bottom where the jean jacket is it looks grey, because the action is at half strength there.

Adjusting a Photoshop layer mask action to make it visible or hide it with paintbrush

I hope that helps to explain how to use a layer mask :).

Here is one more photo using an action I have from CoffeShop Blog which uses both white and black layer masks to help drive the point home (It’s done sloppily but just to help make what I did more noticeable

Use white and black paintbrush on layer masks 🙂 ).

A couple notes about the image:

1. I made the action is called “vignette” – it apllied a vignette to the image and I didn’t like how it looked so I made it invisible (see how there is no “eye” there – I unchecked it). When the action runs it automatically applies to the entire image (because the box is white) at 50%. If the box were black I would have to paint it on with a paintbrush. I also could have just reduced the opacity to 0 to make it invisible or greatly reduced it to make it less noticeable.
2. This layer is called “Urban Grit” – it basically sharpens and increases color wherever it is applied. When I ran the action, the box is black, meaning that it did not apply to the photo.. I had to paint it on with a white paintbrush.. I applied it on to the umbrella bar (you can see how the photo looks different where the umbrella bar is.. that is where I applied that action) – it is not visible anywhere else in the image. If I wanted to remove it I would turn the paintbrush black and paint over it to remove it. If I wanted to reduce the effect I would change the opacity on the paintbrush. If I only wanted to reduce it a little I would make the paintbrush 20% opacity, if I wanted to remove most of it I would turn it to around 80%.
3. The box was white when the action ran so it applied to the entire image. The action is a “color pop” action, which enhances the color wherever applied. I turned the brush black to remove from her face so the color enhanced to all the rest of the image.

If you want to learn how to apply your own layer mask to images to help with editing (you can layer a black and white image on top of a color image and reveal the photo below it to add color to certain spots, do face swaps, change skies, change backgroudns etcetc by layering your photo with whatever you want to add into your photo by using a layer mask – this is a very useful tool to help you with your editing – and extremely easy to do! Read how to do this in my Add a Layer Mask article!

-Christine Ann

Duluth Photographer Website
Duluth Photographer Facebook

Senior Rep Program

DULUTH MINNESOTA SENIOR REP PROGRAM
Senior Photography

Since this is my first year with a Senior Reps Program, I’ve decided to do a free session + free images for my senior reps! Apply by March 31st and be sure to share with anyone with a high school student graduating in 2015!

To read the details about it visit:
http://www.christineannphotos.com/senior-rep-program

To fill out the application:
http://www.christineannphotos.com/senior-rep-application

Duluth Minnesota Senior Reps Program MN Free Session

INFORMATION ABOUT BEING A REP:

This program is designed to benefit us both. A Senior rep helps promote Christine Ann Photography by suggesting to friends and parents looking for a Senior photographer, to check out Christine Ann Photography and see if we are a good fit. If they decide that we are and book and complete a session, the Senior rep gets rewarded!

If you become a rep, you get a free session and free disc of images. When you get a disc of images, you get a print release and a creative commons editing release (meaning you gain legal permission to edit the photos as long as you note you edited the photo and that I took the photo). Every session completed because of your referral earns you $25 (per referral – no limit!) which you may use to purchase prints or collect it directly to spend on whatever you’d like. All people you refer to me will receive 10% off their session fee and their disc fee.

WHAT IS REQUIRED TO BECOME A REP

You must:

.. be a Junior, graduating in 2015 and live in the Duluth Minnesota region (within 35 miles of Duluth/Hermantown). Homeschoolers are included in the Senior Rep program and may apply.

..have parental consent to do the session and sign a model release (the model release just allows me to post the images on my website/social media).

.. be willing to promote Christine Ann Photography and ideally be fairly active with social media

.. not dislike having your photos taken :).

DETAILS

There will only be a few reps selected and the rep position ends June 2015. Applications are due by April 30, 2014.

APPLY TO BE A SENIOR REP by clicking here.

Thanks everyone!

-Christine Ann

Duluth Senior Photographer Website

Duluth Senior Photographer Facebook

Duluth Minnesota Senior Rep Program

Duluth Minnesota Senior Rep Application

Why your photos are blurry (with image examples)

One long time mystery amongst people who take photos is “why are my photos blurry?”. The answer is much more simple than you probably realize but will take a moment to explain.

blurry photo due to slow shutter speed; article about why photos have motion blur
Photo from December 2010 😉 – camera settings this photo was taken at are listed later in this article.

There are 3 major components which determine how your photographs turn out.. one of those components is what your shutter speed is.

What is a shutter?
Picture a stage with curtains that open and close. This is, essentially, what a shutter is. It opens and closes (this is a video of a shutter opening and closing). The shutter is the sound you hear when you take photos – you can hear it open and close. Sometimes it opens and closes very fast and sometimes it opens and closes very slowly. When the “curtain” (shutter) is open, it captures ALL movement in the photo up until it closes. Hence, when it opens and closes fast it “freezes” the moment and does not capture any blur; when it opens and closes slowly, it captures a lot of movement.

The shutter is responsible for 2 things:

1. It contributes to how light or dark the photo is

2. It is the reason your photos turn out blurry or not blurry (*from motion blur – Photos being out of focus can make them blurry in an “out of focus” way which is not due to the shutter).

If you are getting motion blur in your photos there is one simple answer for it: Your shutter is staying open too long.

So, what causes the shutter to stay open for too long?

Low lighting.

Now that I’ve said that you’ve probably realized that most of your blurred photos were taken indoors or at night.

Why does it stay open long in low lighting? Because the longer the shutter is open, the more light it lets in. Photos NEED light. If there isn’t much light, your camera needs to do things to make sure it gets enough light, otherwise you will be left with a black photo.

The photo at the top of the page was taken at the following settings: f/3.2 ISO 640 Shutter speed 1/8 (aka too slow!!!!).. that means it was open for 1/8th of a second which sounds fast but it isn’t fast enough for kids who move around. I usually try to stay around at least 1/100, and ideally a little higher, when photographing kids (what speed you set changes based on your lens and what you are photographing; things that are sitting still can be photographed at a lower shutter speed but you still have to shoot fast enough to avoid camera shake from your hands unless you are using a tripod).

How to Avoid Motion Blur in Your Photography

The easiest and most simple way to avoid motion blur in your photos is to get more light! Take your photos outside or closer to a window. You can also just turn more lights on inside but then you might want to be aware of your white balance because a lot of photos taken indoors will have an orange/red tint due to incorrect white balance (<– article about that tint and how to avoid it).

The last option is to use your flash. Most professional photographers will agree that the flash built into your camera is not good and actually hurts your photos. My rule for using in-camera flash is only use it if the alternative is a super blurry or black photo. A photo with flash is better than a blurry or dark photo. The other option for flash is to buy an external flash – one you can take off the camera and diffuse it. This is the ideal option if you need to use flash (I will write more on this later!). I try to shoot outdoors as much as possible :).

If you own a DSLR there is another option for eliminating motion blur: Set your own settings and tell the shutter what its speed needs to be.

There are two modes in which you can do this:


TV Mode. TV mode is found on your dial and it is “shutter priority mode”. Shutter priority means that all other settings are formed around your shutter speed.. so you tell your camera what your shutter speed needs to be, and it figures everything else out for you. It is a good setting for people starting out with their DSLRs – however there can be consequences to this such as your camera may bump up your ISO, causing your photos to be grainy, or shoot at too high or low of an aperture, losing the “blur” effect or giving you too much of a blur effect.. however you can guarantee they won’t have motion blur 🙂 and sometimes you have to made decisions like that (ie I’ll have a grainy photo instead of a blurred photo) because when there’s not enough light, something’s gotta give.


M Mode (Manual Mode). This is ideal. This is the mode most professional photographers shoot in. You tell your camera exactly what the settings need to be and it shoots at that regardless of what it would want to do in auto mode. You set the shutter speed (if you’re getting motion blur you increase the shutter speed), you set the aperture, you set the ISO.. you can understand what is happening in the photo and what the outcome of the photo will be based on your settings, however it requires more knowledge than TV mode so it’s perfectly fine to start with TV mode and keep working towards M mode.

The fun part of understanding how the shutter affects your photos is that you can use it to intentionally capture motion blur and make some interesting photos! Leaving the shutter open on purpose is called Bulb Photography.

To do bulb photography you must put your camera on a tripod so it stays perfectly still (otherwise there will be camera shake which will hurt the photo) and then have the subject move around while you leave the shutter open and capture all the movement.

Here are some examples of the camera being on a tripod with the shutter left open:

Shutter speed explained, bulb photography examples, why are your photos blurry and have motion blur
f/3.2 ISO 6400, shutter: 1/25.

Untitled-1stamped
Notice in the bottom right photo you can see 2 red streaks in the background – those are the taillights of a car :).
Settings: f/11 ISO 500, shutter speed 4 seconds (shutter was open for 4 seconds).

IMG_3714zzzzzstamp
Settings: f/11 ISO 500, shutter speed 7 seconds (shutter was open for 7 seconds). I was wearing all black to minimize being seen and did additional editing to completely “disappear” from behind the sparkler otherwise you would see me as motion blur in the background :).

Why your photos have motion blur and are blurry with bulb photography examples
(My white balance is off in this photo which is why it has a red/orange tint).

Night time sky with stars and the moon astrophotography bulb exposure duluth mn minnesota
Most photos of the sky at night are done on a tripod with the shutter left open.. it allows the camera to pick up many stars. When I do exposures like this, the camera “sees” many more stars than I can.
nighttime sky in duluth minnesota mn bulb photography of stars and clouds and silhouette of a tree

—–
Fast shutter speed:
how to avoid motion blur in photos with a higher shutter speed with image examples
Just to contrast these photos with slow shutter speeds, here is an “action shot” frozen because of the fast shutter speed

ISO 100, f/9.0, shutter speed: 1/320 Please ignore the harsh lighting :p I only posted to show a photo taken with a fast shutter speed 🙂 she is mid-jump and there is no motion blur! At a low shutter speed there would be a ton of motion blur.

-Christine Ann
Duluth MN Senior Photographer Website
Facebook

Neckstrap vs Hand Strap – And How to Use Both Simotaneously

When we start out taking photos, most of us will use the standard neck strap that the camera comes with. As you get more and more into photography and start exploring what kind of accessories are out there you will stumble upon a hand/handstrap. Most people will buy it and try it and some will prefer it and some will yet still prefer the neck strap – it’s all personal preference.
For me – I like both. They both serve different purposes. Since a camera only has 2 slots to attach a strap to (top left and top right) you may think you need to choose one or the other however you don’t :).
I have both attached to my camera and use them interchangeably (photos below as to how this works).

Advantages of the neck strap:
*Do not have to worry about dropping the camera
*Camera is accessible at a moments notice
*Allows you to carry the camera around for long periods of time
*Keeps camera in front of you making it safer (unless you sling it over your shoulder to the side).
*It distributes the weight of your camera/lens across your neck or shoulder making it feel less heavy

Disadvantages:
*Large/bulky
*It can get in the way of both what you are doing  and also in front of the lens, blocking your shot (if it’s not around your neck)
* It can get uncomfortable (this can help be avoided by buying a padded neckstrap – links below for help deciding which to buy)
*You can underestimate how big your camera is or forget about it all together and bump it on stuff as you pass it by

Times I use the neck strap are when I’m on a walk or at an event and need the camera accessible but am taking a break from using it, when other people use my camera I make them put it on (haha), or if I’m worried I may drop the camera and need extra assurance of its safety.

Advantages of the hand strap:
Makes the camera more stable/less camera shake
Camera is easily accessible
Good for short breaks
It looks professional (not a major point here, but worth noting)

Disadvantages:
It puts the camera more at the side of your body while you walk, making it less safe/easier to bump
It is less safe/reliable than a neck strap (this is especially important to me the times I hand my camera to someone else.. I feel confident putting the neckstrap on someone but my heart races a little if it’s just the hand strap)
It can start to feel very heavy in your hand/arm
It gets in the way of the battery door – not a big deal and you do not need to remove it to access it (at least on my camera) but I do have to loosen it and swivel it around

I use the hand strap every time I am taking photos for stability and also to keep it safer. I also use it while we we move from spot to spot in short distances (long distances I use the neck strap or camera bag) – it gives me extra assurance it will not be dropped.

There is honestly no black and white answer to which is better. A lot of professionals use the hand strap and a lot use the neck strap (though if they use the neck strap they mostly invest in a padded neckstrap – more on that in a moment).  You’ll probably have to try both for yourself to determine which you prefer. I think there is a slight sway towards the hand straps but maybe hand strap users are just more vocal about it 🙂 who knows, but either way they are both common and both well liked by their users.

As for me I use both. Someone asked me how I am able to use both so I took some photos of my camera to help give a visual aid as to how my hand strap is designed and set up so that I can keep both attached for their different uses.

This is what my camera looks like with the neck strap and hand strap attached:
Hand strap and neck strap comparison on Canon Mark II 5D DSLR

Camera attachments explained and analyzed
handstrap vs neckstrap comparison and explanation on canon mark ii 5d DSLR and how to use both simultaneously pros and cons

handstrap vs neckstrap comparison and explaination on canon mark ii 5d DSLR and how to use both simultaneously pros and cons

Use handstrap and neckstrap simultaneously together and understand and explain how the hand strap works and where it attaches and mounts on camera DSLR

So as you can see from the photos the hand strap attaches to the top right neck strap insert and screws into the tripod socket (and the strap mounts into the strap insert attached to the hand strap hardware).  The neck strap then attaches to the top left neck strap insert on the camera and the strap insert attached to the left side of the hand strap – the best of both worlds!

Lastly I said I would link to some nice, reputable neck straps to upgrade from the default one that comes with the camera.  They are cushioned, padded, have pockets for memory cards, well designed and make it much  more comfortable to use a neck strap.  Here is one article that discusses the top 6 neck straps, tested and rated click here.  The two names I see the most are Black Rapid and Op Tech.

-Christine Ann
Duluth Photographer Website
Facebook