Clipping Mask Using Squijoo.

It seems there are some technical (possibly legal) technicalities with Squijoo at the moment, but many photographers have their templates saved and want to be able to use them.  I’m nervous about the site disappearing forever (it’s down right now) so I wanted to write a quick article about how to insert photos into the templates using the clipping mask!  You can read their article on it here, however right now all their images are down.

First, you  open the template, then using the move tool, drag and place the image directly over the picture mask layer.

PC Users: press Control+G (Photoshop CS and earlier) or Control+Alt+G (Photoshop CS2 and newer)

Mac Users: press Command+G (Photoshop CS and earlier) or Command+Option+G (Photoshop CS2 and newer).

The image will automatically clip and work perfectly in the template!

*Very important: Make sure that your photo is directly ONE layer on top of the layer named “picture mask”. The best way to do this is to first select the “picture mask” layer in your template >> then go to your photo and drag it into the template*.

-Christine
Duluth MN Portrait Photographer

Why Image Is Too Bright Or Dark And How To Fix It (Exposure Explained)

Let me start with a lesson that took me quite awhile to figure out:  Photography is all about light.
Primarily, how a photo is taken is all about how much light you are letting into the camera.  (Where the light is coming from is also important in regards to how the image looks but that is a topic for another day).

When you take a photograph you may notice that the image is sometimes very bright or very dark and you may wonder why this happens and how to fix it.  When a photo is very dark it is considered overexposed, when it is very bright, it is called overexposed, and when it is just right, it is called properly exposed.

Exposure is, basically, how much light the camera is letting in, and you control this entirely with your settings (ISO, aperture, and shutter speed are the three settings that control how much light enters the camera- learn more about these functions from this video about what ISO, aperture, and shutter speed are and how they work – the video that taught me about these many years ago!).

overexposed image with blown highlights the photo is too bright

f/2.2 1/400 ISO 100 taken at 85mm.  This photo is overexposed, meaning it is too bright. The camera needs less light in it to bring the exposure down.

^In the above image, the image is too bright, meaning too much light has entered the camera.  Details are lost in the whites.. the handles have ridges on them and the seat has texture but there is so much white in the image you can no longer see these details and it looks solid white.  This is especially difficult to edit because you’ve lost details you cannot retrieve – they’ve been blown away.  I can darken the image in Photoshop, however there are some details that are simply lost.  If I saw this happening while shooting I could easily fix this by adjusting my settings to let in less light by increasing the aperture to a higher number, or by increasing the shutter speed- either or both will fix this issue.

underexposed, dark images; why they are dark and how to fix it

f/2.2 1/4000 ISO 100 taken at 85mm.  This photo is underexposed, meaning the camera needs to let in more light to brighten up the image.

^The above image is underexposed.  It is very dark and needs more light let in in order to bring up the exposure.  (Now that we see the darker version, you can now see all the details that were lost int he above image – there are lines in the snow, ridges on the handlebars, texture on the seat, white pedals, and just so many details that were lost by the overexposure).  There are 3 ways we can let in more light.  We could lower the f/stop (the lens I used in these images can go down to f/1.2, but not all can go that low so it really depends on your lens capability), we could lower the shutter speed (this is the best option) because it is set to f/4000 there is a ton of wiggle room here.  We could go as low as 1/125 (it can go lower but I wouldn’t go lower than that or you risk camera shake); the longer the shutter is open, the more light it lets in.  Or, we could increase the ISO.  This is the least ideal option, when you have other options, because the higher the ISO number is, the more likely i t is to have grain/noise.  How high you can go with your ISO before getting noise depends very much on your camera.  On mine, I am very comfortable increasing it, but when I can easily lower my shutter speed instead, I will do that.  My ISO is always the last thing I’m willing to change.

If you want to retain details, it is better to underexpose an image because it preserves details vs blowing them out.  The risk, though, is that you tend to introduce noise in your images when increasing exposure in editing, especially if your ISO is high.  Really, there are disadvantages to overexposed and underexposed images and it is really ideal to get as close as possible to proper exposure.

properly exposed image it is not too dark or too bright

f/2.2 1/800 ISO 100 at 85mm.  This photo is properly exposed. The highlights are not too bright, the shadows are not too dark.\

^The above image is properly exposed (I think it is slightly overexposed but it is very close to where it needs to be and the details are not blown so I could edit it and get it about perfect).  As you can see it is neither too dark nor too bright.  You can still see the details in the seat and the handlebars.  You may notice some details are lost in the snow, but the thing about exposure is that you need to properly expose for the subject.  The backgrounds will sometimes be darker or brighter than your subject, and sometimes the only way to get both the subject and the background at the same level of light is to add flash to the image.

Silhouette due to how you exposure your image

I rarely use auto mode, but one exception is silhouettes.  To get a silhouette on auto mode, simply find a large bright window and have someone stand in front of it.  The camera will read all the light in the image and the settings it selects will make anything in front of it appear dark.  The only way to fix this issue is to manually tell the camera to let in a lot more light so the subject is not silhouetted (but then the window will be completely blown out because so much extra light is coming in) or to add a light on the subject to make them as bright as the window, then the exposure will be correct for both the subject and the window.

A great example of this is on a sunny day, when the sky is incredibly bright and someone is sitting in the shade.  If you expose the image for the person in the shade, the background will be very blown out because it is already brighter than the subject, and then you are increasing the exposure even further so the person is the correct level of brightness.  If you shine light on the subject or have them sit in the bright sun, they will be the same level of brightness as the sky and then the subject and the sky will  both show up correctly, but that all comes a little later.  For now, just worry about properly exposing for your subject. that the subject is neither too bright nor too dark; get as close as you can to the correct level of brightness.  One very important aspect of doing this is to understand how to read a histogram, which will tell you if you are blowing your highlights or blacks and losing detail in either.

I Now, if you are a beginner and shooting with auto mode (aka your camera is deciding what settings to use) you will run into these issues much more frequently because your camera is trying to figure out how much light is in the image.  If your image has a lot of sky or brightness (such as this snow) in it, the camera will thing there is a ton of light in the image, and underexpose.  This is why when someone sits in front of a window, they tend to be dark.

-Christine
Duluth MN Senior Portrait Photographer

Gilmore Girls

Gilmore Girls
Season 2 Episode 3
Red Light on the Wedding Night

Kirk: And here’s a sample of my black and white shots.
Lorelai: Wow Kirk I didn’t know you’re into photography!
Kirk: It’s my passion.
Lorelai: Have you ever shot a wedding before?
Kirk: Actually, this would be my first official wedding gig. Or photography gig, for that matter, but believe me, I’ve got the eye, and my Nikon is state of the art.
Max: I’ve got a Nikon, too. It’s an N64 with 3-D Matrix metering, 35-210 zoom. What have you got?
Kirk: It’s a Nikon.
Lorelai: I’ve got to tell you, Kirk, these are really good for amateur shots.
Kirk: Thanks. That’s me and my parents on vacation in the Berkshires.
Max: Nice looking family
Kirk: and those are some self-portraits
Lorelai: ah! Kirk you’re nude!
Kirk: nono, I’m wearing speedos, they’re kind of flesh-colored
Max: wait a minute I recognize this
Kirk: Nice photo, huh?
Max: This is V.J. Day NY 1945
Kirk: Right, I include it as an example of the excellence that I aspire to.
Lorelai: How much for your services?
Kirk: How about $150 an hour?
Lorelai: How about lunch and the cost of the film?
Kirk: You won’t be sorry.
Lorelai: Done.
Kirk: I thank you.
Lorelai: Bye.

:).

-Christine Ann

Duluth MN Senior Photographer

Comparing 50mm 1.8 Lens to 50mm 1.4 Lens With Side-By-Side Images With Same Settings

One of the first lenses I invested in is the Canon 50mm 1.8 lens. I do think this is a fantastic lens, especially when compared with the kit lens, and I use it without hesitation.
That said..
I also own a dreamy L lens. (You can see my lens comparison blog post here)

The L lens is amazing but very heavy. When my husband and I decided to go on a vacation backpacking overseas this summer, I hit a crossroads: Do I bring the 50mm 1.8 or the 85mm 1.2?

The 85mm is the superior lens however it is very heavy. However on a vacation I want the best quality.

The solution?

We invested in a 50mm 1.4 lens.

It’s not as nice as the 85mm 1.2 but nicer than the 50mm 1.8 – a great compromise.

The day I got it I was anxious to try it out and see what I thought. I wasn’t sure what to expect, but what I discovered really surprised me.

Based on my one test (I plan to do more!) the 1.4 seems greatly superior to the 1.4!

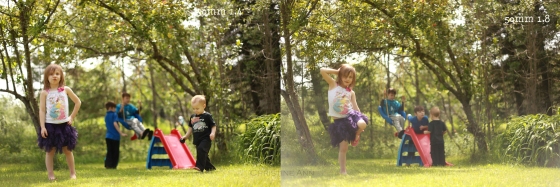
These are the test shots I did.. Keep in mind I sat at the same spot, used the same camera, with the same settings, with no lens hood and no filter on either lens & none of the photos are edited in any way except the text and size.  The only thing that changed is the lens.

Canon lens comparison of the 50mm 1.8 and 1.4 prime lenses

Left side is the 50mm 1.4 and the right side is the 50mm 1.8

Comparison of 50mm 1.8 and 50 mm 1.4 lenses

Left side is the 50mm 1.4 and the right side is the 50mm 1.8

So there are my side-by-side image comparisons using 2 different lenses – remember they were taken with all things equal and they are not edited in any way except for adding the text to the image and reducing the size of the image to post online.

If you’re well convinced that you would like a 50mm 1.4, here’s a link to the lens on Amazon.

I will try to do another round at a different location soon!

-Christine Ann
Duluth MN Family Photographer

Backdrop Stand Recommendations & Considerations [Photography]

In my photography hobby days I went to great lengths to attempt to use backdrops without using a backdrop stand.

I would drape a sheet over the back of the couch or staple/tape blankets to the wall..

All of this, becuase I was unaware of how cheap and easy a backdrop stand is to buy and use!

What do I use?

I use a stand from Cowboy Studio which is very versatile.

You can see the Cowboy Studio backdrop stand here.

9114 System (20′)

Height is adjustable from 2′ 7.5″ – 10′

Max width is 20 ft, minimum width is 6 ft, you can adjust from 6 ft, 10ft, 20ft

Cross bar consists of eight sections, making it simple to adjust the width

46.5″ long when closed

Crossbar has max width of 21’ 7” if using all 6 poles

How this works is this:

For $130 (the most expensive option of the ones discussed in this article, cheaper alternatives listed below) you get: 3 tripods (essentially that’s what they are), 6 poles that are each a few feet long, and 2 carrying bags. You use one tripod on each end and the third tripod can be used in the center for additional support.

The poles interlock with one another so that you can choose your width. The drawback is that the minimum width is 6 feet, which doesn’t sound too big but it can be when you take into account the tripod legs add additional width to it, making it require more like 8-9′ of space, minimum.

(Side note to anyone who is struggling with the minimum width – I found a way around this ;). The set comes with 6 poles, one of which has a hole to be used with the 3rd tripod in the center. If you use the pole with a hole, you can use an end tripod in the hole instead of in the center, and cut a few feet off the width).

I chose the backdrop set I did because it’s the most versatile and if I need to do a large group I can go up to 20′ without having to buy another set later.

Please keep in mind with this backdrop stand that there is a pole designed to go in the center when it’s at the maximum height. For this reason (combined with the fact it can’t likely hold a ton of weight) it’s not ideal for storing/carrying rolls around the pole. If I am using a roll, I leave the roll end on the ground and clamp the loose end to the pole :). Works perfect.

Choosing a backdrop stand for photography

The stand with all 3 tripods in use + all 6 poles.

If you want to cut some expense out, you can get just the 10 ft stand for $86 or the 12 ft stand for $9 more!

If this is still sounding too expensive for you here is a much cheaper and very versatile backdrop stand. While the above stand is extremely easy to travel with (fits in one “golf bag” sized bag), this stand is a little more versatile in that it has more width options and can go down to 5′ instead of 6. For $40 you can avoid duck tape goo on your walls and obnoxious shadowing on your backgrounds!
I went through so much peril attempting to use makeshift backdrop stands that if I had but known, I would have just bought the dang stand years ago, haha.
Oh well, live and learn.

I’d like to just note real quick here that there are 500 million other stands out there.. this is just what I’m familiar with!

Now if you need help figuring out what to buy to start with off-camera flash, give this article What Equipment You Need For Off Camera Flash Photography [With Links] a gander!

If you have any questions or other recommendations, such as what you use and why you like it, post in the comments!

-Christine
Duluth Family Photographer

Add A Person Into A Bubble – Photoshop Tutorial – Combine Two Photos Together

Adding A Person Into A Bubble – Combining Two Photos Together – Merging Two Photos – Photoshop Composite – Photoshop Tutorial

This is going to look long at a glance but it’s actually not hard to do at all.. it looks long because I took a screen shot of every move to help out beginners.. When I was trying to use Photoshop they would say “duplicate the layer”, assuming I knew how, and I didn’t.  So I prefer to be extra thorough :).

This is a tutorial on how to add two photos together.. in this one in particular, we’ll be adding a shot of me into a shot of a bubble.
This will be the final product:
Photographer taking photos in a bubble composite

These are the original images:

??????????????????????????
Photographer taking a photo

^That’s me BTW :).  Anyway, open both photos in Photoshop that you want to merge together.  Copy and paste the photo onto the other photo.. in this case I’m going to copy and paste the photo of me on top of the photo of the bubble.

Add-Person-Into-Bubble-Combine-Photsos-Photoshop-Layer-Mask-Tutorial (3)

^The photos are both from different cameras, and the bubble photo is smaller than the photo of me taking a picture (please ignore the lens cap :p I edited it out of the final edit!).  Anyway, so I need to make this file smaller.

Add-Person-Into-Bubble-Combine-Photsos-Photoshop-Layer-Mask-Tutorial (4)

^Back in the original file, I go to “Image” “Image size” and reduce the size of it and copy it again to bring over and paste.

Photoshop Beginner Tutorial

^Now it is smaller but it’s too small.. this is easy to work with though…

Adding Person Into Bubble

^Select the marquee tool and click and drag it over the image

How To Add Person Into A Bubble In Photoshop

^Now it is selected..

Combine 2 Images in Photoshop

^Right-click within the selection and select “free transform”

How To Use Photoshop Layer Mask

^Hold down the shift key which will retain the proportions of the image and click and drag the arrows to make the image bigger or smaller.

How To Use PS Layer Mask

^Next, be sure that the top layer is clicked on, then click the little square towards the bottom of the layers palette (the layer mask tool) and click it.

Composite Images In Photoshop

^You now have a layer mask on your top layer!  This will allow you to add and subtract from the top layer via the paintbrush.  Select your paintbrush and be sure its color is set to black.

Composite For Beginners
^Ensure your layer mask is clicked on and now you can paint on the image to make it disappear!

Composite In PS

^The image after painting with the black paint brush.  But now I’ve removed too much of the image and need to bring some of it back..

Photoshop Tutorial With Image Examples
^Turn your paintbrush white and paint wherever you’d like to bring the image back.
Using Layers in PS Beginners Tutorial

^Image after bringing back some of the image.. it still isn’t aligned perfectly because it’s hard to tell where the bubble is exactly.

How To Use Layers In Photoshop

^To gain the ability to see the bubble below it, reduce the opacity of the top layer.  The opacity determines how “see through” the top layer is.. by reducing the opacity we can see underneath it to better determine where the lines of the bubble are.

Put A Person In A Bubble In Photoshop

^At this point, you could be “done” if you wanted to be.. but if you want to perfect it more, there’s some additional steps.
First, reduce the opacity of your brush.. set it to around 5-15 and paint over very select spots to make it look more 3D (the paintbrush at such a low opacity will only take off a tiny bit at a time vs a lot at a time).  I chose to paint around the bubble (so there is less image on the outsides, so it’s strongest in the middle and most faded on the outside, helping it have the round appearance).  I also painted additionally off on the colorful lines of the bubble also to help show the shape of the bubble.

Using Opacity In Photoshop

PS Tutorial

^Now it’s decently aligned (I ended up cleaning it up again later..).  This is a really good time to “save as .psd” so if you need to come back to it later, you can.

Photoshop Tutorial

^Now, right click on your layer mask and select “apply layer mask”.

Layer Mask Tutorial

^Right click on your top layer and select “screen”.

Putting Person In Bubbles

^This was my final verdict on this edit.. top layer opacity 60% with a screen applied to it.  I still have a few things left to do..

Merging 2 Photos In Photoshop

^Right click on the top layer and select “flatten image”.

How To Combine Two Photos In Photoshop

^Right click on your layer and select “duplicate layer”.  This will create a second layer.

Layer Masks In Photoshop Tutorial

^Ensure the top layer is clicked on and click the dropdown arrow and select “overlay”.  This will help blend, sharpen, and increase colors.

Adding A Person Into A  Bubble Photoshop Layer Mask Tutorial

^I felt there were a few additional edits to be done so I took the final edit and layered it with the original, used the eraser tool to erase away some of the edges to give it more of a 3D look.  I used the burn tool around the diameter of the bubble and I also used Coffeshop Blog’s Perfect Portrait Action on this.. I used “Urban Grit” @ around 20% and “Eye Define” at around 50%.  If you do not know how to use layer masks with actions, I have a blog post explaining How To Run An Action With Layer Masks here.  I believe there is also a tutorial on Coffeshop Blog’s page.

Photographer taking photos in a bubble composite

^This is my final edit.  Not perfect & I think it’d look cooler if the photo I merged in were in color but oh well.. and hopefully this blog post gave you enough information to be able to do what you’re wanting to do!

If you have any additional tips or resources, leave them in the comments below :).

-Christine Ann
Duluth MN Photographer

How To Add Color To A Black & White Image With A Layer Mask/Photoshop Layers Explained

A Beginner’s Tutorial On How To Use Photoshop Layers, Layer Masks, And Bring Back Color To A Black And White Image (All-In-One!) With Image/Screenshot Examples
*Note:  This article might look long/hard but it’s because it’s written assuming you know nothing about how to use Photoshop so it’s just very thorough.. this is VERY easy and fast to do!

Many years ago my husband got Photoshop for me.  I was super excited.. I opened it up and was so overwhelmed I didn’t open it up again for another year!!!!  WHen I did open it up a year later, it was because I had seen an image on Facebook and someone noted on it “Edited with auto color in Photoshop”.  “Auto edit????  I can do that!”.  And I excitedly opened it back up.  Once it was re-opened I started playing around with it more and learning new things about it.  I was still very confused about how you could add color to a black and white image and my husband explained it like this: Imagine you have 2 photographs.. a color photograph, and a black and white version of the exact same photograph.  Imagine you put the black and white photograph on top of the color photograph and then take an eraser and erase away parts of the black and white image to reveal the color beneath it.  ta-da!  Like magic, I now understood the concept of Photoshop layering! The very first thing I learned how to do with layers was add a pop of color to a black and white image.  You can do it as I stated above (layer a bw image on top of a color image and use the eraser tool to erase away the bw image to reveal color) but the issue with doing it that way is.. what if you make a mistake?  What if you erase away too much?  You cannot go back to add the black and white back.  For that reason I want to teach everyone how to use a layer mask.  With a layer mask (VERY easy to do!!!!) you can remove parts of the top layer AND bring them back again!  And you can use it for endless different projects beyond a selective coloring/color pop image! I’m a very visual learner so that’s how I like to explain things as well.

Learn How To Do Color Pop

^STEP ONE:  Open The Image
We’ll start with what your image looks like when you open it in Photoshop:

Learn How To Do Selective Coloring

^STEP 2:  Duplicate Layer
This is the step where you layer 2 images on top of one another.. do do this by going to the layers palette, right click on your layer, and select “duplicate layer”.  You can also simply go to your menu on top of the screen and click “Layer>New>Layer From Background”.

Learn How To Do Layers

^STEP 3:  Turn The Top Layer Black And White
Make sure your top layer is highlighted in the layers palette and then turn your image black and white :).  You now have a black and white image on top, and a color image on bottom.

Learn How To Do Layer Mask

^STEP 4:  Add A Layer Mask
This is where you add the layer mask I was mentioning earlier.. this mask will allow you to remove parts of the black and white image as well as bring back parts of the black and white image.

Photoshop Color Pop

^STEP 5:  Select A Black Paintbrush
Your layers palette should now look like this.. the white box next to your bw image is the layer mask.  You will use the black paintbrush to remove the black and white image, and the white paintbrush to bring back the black and white image.

How to add color to black and white photos in photoshop

^STEP 6:  Verify Your Layer Mask Is Selected
If you have anything other than the layer mask selected, this will not work and the paintbrush will work normally (adding a white or black streak on the image).

Selective Color with Image Examples

^STEP 7:  Paint Anywhere You’d Like To Add Color Take your paintbrush and paint anywhere you’d like to add color!  It’s that easy!  If you run over the lines, it’s okay.. you can turn it back to black and white which we address in the next step.

Screenshots to show how to use Photoshop to do selective coloring

STEP 8:  Select The White Paintbrush To Bring Back The Black And White Image
Change the color of your paintbrush to white and paint over anywhere you did not want to bring the color back.  It helps to scroll in very close to the image, use a brush that isn’t 100% soft, and make the edges as clean as possible.  It looks very sloppy when the color runs outside the lines.

screenshots to show how to do color pop in photoshop

^The image after cleaning it up with the white paintbrush (again verify that your layer mask is clicked on!).

adding color to black and white images

^STEP 9:  (Optional Step):  Reduce The Opacity/Strength Of The Colors
I always feel that bringing back the full strength of color in an image is just too intense/harsh.  For this reason I like to make it sort of a blend of half black and white/half color.. this tones down the coloring a lot and makes it look much more gentle and blends better.  (This is just my opinion and what you like may be different!  I compare a full strength color pop image to a partial strength color pop image here if you’d like to compare for yourself).

Using Opacity To Decrease Colors

^This is the image with the coloring reduced by 50%.. it blends much better.

I’d like to make a quite note that the above images are not ones that I would choose to do.. They are only edited this way for the purposes of this article.  If I brought back color to anything I would choose the boots but for the purposes of this article I wanted to choose something that was easy to see and overall I just prefer this photo in color :).

I really hope this helps you all learn some more about how to use layers in Photoshop and how to add color to a black and white image!

-Christine Ann

Duluth MN Photographer

Photo Comparisons of the 50mm 1.8 and the 85mm 1.2 Lens

Awhile back I did a comparison of lenses.  When I did the comparison I honestly had no idea what the results would be but I really wanted to know how much the lens matter.  When I did my test I concluded that a better lens on a crop sensor body makes a big impact, but a cheaper lens on a full frame sensor doesn’t have a lot of difference between it and a nicer lens.  Like.. my crop sensor + nice lens photos were similar to my full frame sensor + nice lens photos.
Then one night I was taking some photos and I started on my 50 then switched to the 85.  When I went to cull the photos, I could noticably tell when I switched lenses so now I am coming to realize that the lens does make a noticeable difference.  Although, that said, I still fell confident and comfortable using my 50mm.. so I don’t think my photos are doomed or anything if I use it ;).
Anyway I just thought I would show the photo comparison from 50mm to 85mm so you can see what I mean!

So this is where I noticed the quality difference.. on the top is the 50mm and on the bottom is the 85mm.  These are SOOC.. I do think I could edit the one on the top to  look a little more 3D and give it more pow but SOOC you can tell that the 85 has the advantage.

85mm 1.2 vs 50mm 1.8 image comparison
_____

Now these next photos (below) are both from the 50 MM.  It’s the same photo.  The photo on the top is SOOC and the photo on the bottom is edited.  The photo on the very bottom (third one down) is from the 85mm however, it has an advantage/difference because it was shot at f/2.2 and these were shot at f/3.2.  So while it does have more bokeh, you need to take that into account :).

85mm 1.2 vs 50mm 1.8 image comparison
{The above photos are from the 50mm, taken at f/3.2 with unedited and edited examples and below is a similar angle from the 85mm taken at f/2.2}.
85mm 1.2 vs 50mm 1.8 image comparison
^85mm SOOC.

So there you have it.  My conclusions?  The 85mm 1.2 is better.. (I should dang well hope so for the massive price difference) ;).  BUT the 50mm is still pretty amazing and doesn’t embarrass side-by-side comparisons.  If the lens were horrible or significantly inferior, it would be much more obvious.. like in the blog post I link to earlier in the page.. when you compare the kit lens to even the 50mm, it doesn’t stand a chance.  The kit lens is hands-down awful and it is very obvious when you compare the photos (noteL  if you are shooting with the kit lens – the lens that came with your camera – quickly invest in the 50mm 1.8!).  Even though I have an L lens at my disposal I don’t hesitate to use my 50mm when necessary.  I do think the difference between lenses is a lot less noticeable on a full frame sensor, though, and that is important to note.  On a crop sensor the difference between lenses is much  more obvious (these were all taken on a full frame sensor).  So, to reiterate, if you are on a crop sensor, investing in a nicer lens will have more impact for you!  However, you can and should be able to get great photos off your 50mm on a crop sensor too.  I get much better photos off my T2i (crop sensor camera) + 50mm lens now than I did 2 years ago.. the equipment is the same but I just know a lot more now and can use them better.

At the end of the day you can have the best or worst equipment but if you know how to use them (or don’t know how to use them) the equipment won’t do much for you.  I remember the day I got my full frame sensor camera and while I did notice a change in quality, I was disappointed that my photos weren’t instantly and magically like the esteemed photographers whom I so admire.  That takes a lot of time and lot of practice to get to.. there are 5 million things that go into a great photo and equipment is a mere fraction of the equation.  (That was a disappointing realization, haha, but I am proud that when I produce great photos it’s because of my knowledge and not my camera and makes me admire talented photographers that much more 🙂 ).

Anyway, I did most of these “sleeping toddler” photos on the 50mm.  If you’d like to see the full blog post click here.  All of them except the last 2 are from the 50mm.  You should be able to get great photos on your 50 and if you aren’t, it isn’t the lens, my friends.  A nice lens is always nice to have and I strongly believe in giving your photos every edge possible, especially  if you are a professional who charges people for them.  So my advice is work towards getting a nice lens but in the mean time, it isn’t essential to have one.  Keep learning, growing, practicing, and doing what you can with what you have.. you’ll keep improving and gain knowledge so that when you do get the equipment you want, you will be able to make the most of it.  I’ve had my L lens for almost 2 years and I’m just recently starting to get where I’ve wanted to be since I started on my photography journey!

Welp I am stepping off the soapbox now!  haha.  I hope this blog post helps people to decide if they want to invest in a more expensive lens or not!

-Christine Ann
Duluth Family Photographer

What Equipment You Need For Off Camera Flash Photography [With Links]

For many years I put off working with a flash.  The few times I did the photos looked kind of .. bad.. and unnatural and I just couldn’t get the results I wanted so I pretty much just avoided it.  One day  I was thinking about how other photographers get stunning photos with a flash and that there is a way to do it, and I wanted to figure out how.. and so began my journey into learning off camera flash.

A lot of others are in the same position I was in and don’t know where to start.  For this reason I’d like to share my “start up” kit.  This is valuable information to be sharing because it was no easy task to figure out exactly what I needed and what is compatible with what.

What do you need to do off camera flash?

1.  A flash
2.  A Stand
3.  Triggers
4.  A diffuser

This is it!  This is the bear minimum to accomplish off camera flash (well for the bear minimum you can remove diffuser as you don’t “need” it but.. trust me, you really want it..).

1.  A Flash – $259.00 – I started with a Canon Speedlite 430 EX II.  I love this light and it is a great place to start.  You can shoot in manual or ETTL, you can rotate the flash to aim it in any direction you want – behind you, up to the ceiling, against the wall, or straight on.  This is great because  it’s nice to  have the option to bounce the flash vs shooting it straight on, but that’s a topic for another day :).  This flash is a slave only so if you ever want to shoot with 2 flashes you will need to get the Speedlite 580 to control the 430 but if you only need one flash the 430 does the job.
A great (cheaper) alternative to the Canon Speedlites is the Yongnuo brand (around $70).  I haven’t used these yet but I frequent many photography forums and a ton of people have great things to say about them!  I may get a Yongnuo as  a master flash to connect with my Speedlite.

2.  Light Stand – $27.95 – that is the light stand I bought.. it’s a great stand :).  It goes up to about 6′ high and as low as maybe around 2′.  It comes with an umbrella attachment which is essential for the softbox I use but also good for using umbrellas which are nice to use when you want something light and portable.  It also comes with an umbrella 🙂 although I rarely use it.
Another option for a light stand is buying a simple hot shoe stand – about $10 including shipping.  this is a very simple way to move the flash around the room!

3.  Triggers – $82.89 – These are the triggers I use.  I have a Canon Mark II 5D and a Canon 430 EX II Speedlite.  These triggers seem pretty universal but you’ll want to verify that they are compatible with your camera and light.  They are wireless and are compatible with the Speedlite.. I have no complaints :)!  It took me a lot of research to figure out which triggers to buy!  I didn’t start with wireless triggers.. the first trigger I bought was a cord which connected to the flash from the camera and it works very well, but I am liking the freedom of wireless (although dislike how many batteries I’m going through nowadays).  There are cheaper cords but I wanted something long enough to be able to move around away from the camera so I invested in a longer cord.  I really like having a cord and wireless trigger in case the wireless trigger ever stops working I have a reliable backup.  Or if I don’t want to set up the wireless triggers I can use it faster :).

4.  A Diffuser – $169.90 – A diffuser is something the light shoots through to make it softer/more spread out and less harsh/direct.  When you shoot straight on it can be too much light and very harsh so a diffuser really  helps.  I started out using the umbrella that came with my stand and upgraded to one that is a 50×50 softbox.  There are tons of diffuser options though and different shapes and sizes.  You can choose circular ones, octogons, squares, rectangles.. the shape you choose will affect your photography so maybe do some reasearch on this before you pick something.  This diffuser I chose attaches to the light stand via the umbrella port.  There are also translucent umbrellas, silver umbrellas, softboxes, and PMS or you can simply aim the flash towards a white wall and bounce it.
If you buy a 5-in-1 reflector (we’ll discuss that in a minute) it comes with a diffuser in it so one option would be to shoot the flash through the diffuser that comes with the reflector.  I haven’t tried this, personally, but it seems like it would work well.

That’s all you really “need” to start doing off-camera flash!  However if all your light is coming from one direction you will find some shadowing occurring at times.. for this reason it’s really nice to have 2 flashes or a flash and a large reflector.  This is the setup I use.. (flash + reflector).

What you need to add a reflector to your off camera flash setup:

1.  A Reflector – $14.80 – I use a 48″ circular reflector but there are many different sizes and shapes to choose from.

2.  A Light Stand – $27.95 –  I use the same stand for my reflector as I do my flash, I just added a boom onto it :).

3.  A Boom – 29.95 – It’s essentially an “arm” that attaches to your stand and you can add a reflector to it.  The arm is adjustable and accommodates my 48″ reflector as well as my smaller sized one (22″).

I was taking some practice shots tonight and these are taken mostly with 1 430 ex speedlite behind a 50×50 softbox off to my left side.  There is a reflector off to the right and it did reflect some light but I didn’t have it aimed to directly reflect light, so while it made some fill, it didn’t make it to its maximum capacity.

what equipment you need to do off camera flash photography

off camera flash lighting equipment list with links

list of lighting equipment for off camera flash
learn about off camera flash equipment with reflectors
off-camera-flash-with-diffuser
^
  this photo was just taken with a softbox and no reflector.. I am sitting in front of the diffuser (you can see my reflection in the eyes!).

Duluth MN Headshot Photograph

So there it is!  Everything I needed to really seriously get into off camera flash.  This is a great place to start however as you “master” the art of one flash, you’ll want to start adding in more 🙂 and upgrading equipment.

Hope this helps someone [or lots of people..] out!

-Christine Ann

Duluth MN Photographer Website
Facebook