Why Image Is Too Bright Or Dark And How To Fix It (Exposure Explained)

Let me start with a lesson that took me quite awhile to figure out:  Photography is all about light.
Primarily, how a photo is taken is all about how much light you are letting into the camera.  (Where the light is coming from is also important in regards to how the image looks but that is a topic for another day).

When you take a photograph you may notice that the image is sometimes very bright or very dark and you may wonder why this happens and how to fix it.  When a photo is very dark it is considered overexposed, when it is very bright, it is called overexposed, and when it is just right, it is called properly exposed.

Exposure is, basically, how much light the camera is letting in, and you control this entirely with your settings (ISO, aperture, and shutter speed are the three settings that control how much light enters the camera- learn more about these functions from this video about what ISO, aperture, and shutter speed are and how they work – the video that taught me about these many years ago!).

overexposed image with blown highlights the photo is too bright

f/2.2 1/400 ISO 100 taken at 85mm.  This photo is overexposed, meaning it is too bright. The camera needs less light in it to bring the exposure down.

^In the above image, the image is too bright, meaning too much light has entered the camera.  Details are lost in the whites.. the handles have ridges on them and the seat has texture but there is so much white in the image you can no longer see these details and it looks solid white.  This is especially difficult to edit because you’ve lost details you cannot retrieve – they’ve been blown away.  I can darken the image in Photoshop, however there are some details that are simply lost.  If I saw this happening while shooting I could easily fix this by adjusting my settings to let in less light by increasing the aperture to a higher number, or by increasing the shutter speed- either or both will fix this issue.

underexposed, dark images; why they are dark and how to fix it

f/2.2 1/4000 ISO 100 taken at 85mm.  This photo is underexposed, meaning the camera needs to let in more light to brighten up the image.

^The above image is underexposed.  It is very dark and needs more light let in in order to bring up the exposure.  (Now that we see the darker version, you can now see all the details that were lost int he above image – there are lines in the snow, ridges on the handlebars, texture on the seat, white pedals, and just so many details that were lost by the overexposure).  There are 3 ways we can let in more light.  We could lower the f/stop (the lens I used in these images can go down to f/1.2, but not all can go that low so it really depends on your lens capability), we could lower the shutter speed (this is the best option) because it is set to f/4000 there is a ton of wiggle room here.  We could go as low as 1/125 (it can go lower but I wouldn’t go lower than that or you risk camera shake); the longer the shutter is open, the more light it lets in.  Or, we could increase the ISO.  This is the least ideal option, when you have other options, because the higher the ISO number is, the more likely i t is to have grain/noise.  How high you can go with your ISO before getting noise depends very much on your camera.  On mine, I am very comfortable increasing it, but when I can easily lower my shutter speed instead, I will do that.  My ISO is always the last thing I’m willing to change.

If you want to retain details, it is better to underexpose an image because it preserves details vs blowing them out.  The risk, though, is that you tend to introduce noise in your images when increasing exposure in editing, especially if your ISO is high.  Really, there are disadvantages to overexposed and underexposed images and it is really ideal to get as close as possible to proper exposure.

properly exposed image it is not too dark or too bright

f/2.2 1/800 ISO 100 at 85mm.  This photo is properly exposed. The highlights are not too bright, the shadows are not too dark.\

^The above image is properly exposed (I think it is slightly overexposed but it is very close to where it needs to be and the details are not blown so I could edit it and get it about perfect).  As you can see it is neither too dark nor too bright.  You can still see the details in the seat and the handlebars.  You may notice some details are lost in the snow, but the thing about exposure is that you need to properly expose for the subject.  The backgrounds will sometimes be darker or brighter than your subject, and sometimes the only way to get both the subject and the background at the same level of light is to add flash to the image.

Silhouette due to how you exposure your image

I rarely use auto mode, but one exception is silhouettes.  To get a silhouette on auto mode, simply find a large bright window and have someone stand in front of it.  The camera will read all the light in the image and the settings it selects will make anything in front of it appear dark.  The only way to fix this issue is to manually tell the camera to let in a lot more light so the subject is not silhouetted (but then the window will be completely blown out because so much extra light is coming in) or to add a light on the subject to make them as bright as the window, then the exposure will be correct for both the subject and the window.

A great example of this is on a sunny day, when the sky is incredibly bright and someone is sitting in the shade.  If you expose the image for the person in the shade, the background will be very blown out because it is already brighter than the subject, and then you are increasing the exposure even further so the person is the correct level of brightness.  If you shine light on the subject or have them sit in the bright sun, they will be the same level of brightness as the sky and then the subject and the sky will  both show up correctly, but that all comes a little later.  For now, just worry about properly exposing for your subject. that the subject is neither too bright nor too dark; get as close as you can to the correct level of brightness.  One very important aspect of doing this is to understand how to read a histogram, which will tell you if you are blowing your highlights or blacks and losing detail in either.

I Now, if you are a beginner and shooting with auto mode (aka your camera is deciding what settings to use) you will run into these issues much more frequently because your camera is trying to figure out how much light is in the image.  If your image has a lot of sky or brightness (such as this snow) in it, the camera will thing there is a ton of light in the image, and underexpose.  This is why when someone sits in front of a window, they tend to be dark.

-Christine
Duluth MN Senior Portrait Photographer

Gilmore Girls

Gilmore Girls
Season 2 Episode 3
Red Light on the Wedding Night

Kirk: And here’s a sample of my black and white shots.
Lorelai: Wow Kirk I didn’t know you’re into photography!
Kirk: It’s my passion.
Lorelai: Have you ever shot a wedding before?
Kirk: Actually, this would be my first official wedding gig. Or photography gig, for that matter, but believe me, I’ve got the eye, and my Nikon is state of the art.
Max: I’ve got a Nikon, too. It’s an N64 with 3-D Matrix metering, 35-210 zoom. What have you got?
Kirk: It’s a Nikon.
Lorelai: I’ve got to tell you, Kirk, these are really good for amateur shots.
Kirk: Thanks. That’s me and my parents on vacation in the Berkshires.
Max: Nice looking family
Kirk: and those are some self-portraits
Lorelai: ah! Kirk you’re nude!
Kirk: nono, I’m wearing speedos, they’re kind of flesh-colored
Max: wait a minute I recognize this
Kirk: Nice photo, huh?
Max: This is V.J. Day NY 1945
Kirk: Right, I include it as an example of the excellence that I aspire to.
Lorelai: How much for your services?
Kirk: How about $150 an hour?
Lorelai: How about lunch and the cost of the film?
Kirk: You won’t be sorry.
Lorelai: Done.
Kirk: I thank you.
Lorelai: Bye.

:).

-Christine Ann

Duluth MN Senior Photographer

What Equipment You Need For Off Camera Flash Photography [With Links]

For many years I put off working with a flash.  The few times I did the photos looked kind of .. bad.. and unnatural and I just couldn’t get the results I wanted so I pretty much just avoided it.  One day  I was thinking about how other photographers get stunning photos with a flash and that there is a way to do it, and I wanted to figure out how.. and so began my journey into learning off camera flash.

A lot of others are in the same position I was in and don’t know where to start.  For this reason I’d like to share my “start up” kit.  This is valuable information to be sharing because it was no easy task to figure out exactly what I needed and what is compatible with what.

What do you need to do off camera flash?

1.  A flash
2.  A Stand
3.  Triggers
4.  A diffuser

This is it!  This is the bear minimum to accomplish off camera flash (well for the bear minimum you can remove diffuser as you don’t “need” it but.. trust me, you really want it..).

1.  A Flash – $259.00 – I started with a Canon Speedlite 430 EX II.  I love this light and it is a great place to start.  You can shoot in manual or ETTL, you can rotate the flash to aim it in any direction you want – behind you, up to the ceiling, against the wall, or straight on.  This is great because  it’s nice to  have the option to bounce the flash vs shooting it straight on, but that’s a topic for another day :).  This flash is a slave only so if you ever want to shoot with 2 flashes you will need to get the Speedlite 580 to control the 430 but if you only need one flash the 430 does the job.
A great (cheaper) alternative to the Canon Speedlites is the Yongnuo brand (around $70).  I haven’t used these yet but I frequent many photography forums and a ton of people have great things to say about them!  I may get a Yongnuo as  a master flash to connect with my Speedlite.

2.  Light Stand – $27.95 – that is the light stand I bought.. it’s a great stand :).  It goes up to about 6′ high and as low as maybe around 2′.  It comes with an umbrella attachment which is essential for the softbox I use but also good for using umbrellas which are nice to use when you want something light and portable.  It also comes with an umbrella 🙂 although I rarely use it.
Another option for a light stand is buying a simple hot shoe stand – about $10 including shipping.  this is a very simple way to move the flash around the room!

3.  Triggers – $82.89 – These are the triggers I use.  I have a Canon Mark II 5D and a Canon 430 EX II Speedlite.  These triggers seem pretty universal but you’ll want to verify that they are compatible with your camera and light.  They are wireless and are compatible with the Speedlite.. I have no complaints :)!  It took me a lot of research to figure out which triggers to buy!  I didn’t start with wireless triggers.. the first trigger I bought was a cord which connected to the flash from the camera and it works very well, but I am liking the freedom of wireless (although dislike how many batteries I’m going through nowadays).  There are cheaper cords but I wanted something long enough to be able to move around away from the camera so I invested in a longer cord.  I really like having a cord and wireless trigger in case the wireless trigger ever stops working I have a reliable backup.  Or if I don’t want to set up the wireless triggers I can use it faster :).

4.  A Diffuser – $169.90 – A diffuser is something the light shoots through to make it softer/more spread out and less harsh/direct.  When you shoot straight on it can be too much light and very harsh so a diffuser really  helps.  I started out using the umbrella that came with my stand and upgraded to one that is a 50×50 softbox.  There are tons of diffuser options though and different shapes and sizes.  You can choose circular ones, octogons, squares, rectangles.. the shape you choose will affect your photography so maybe do some reasearch on this before you pick something.  This diffuser I chose attaches to the light stand via the umbrella port.  There are also translucent umbrellas, silver umbrellas, softboxes, and PMS or you can simply aim the flash towards a white wall and bounce it.
If you buy a 5-in-1 reflector (we’ll discuss that in a minute) it comes with a diffuser in it so one option would be to shoot the flash through the diffuser that comes with the reflector.  I haven’t tried this, personally, but it seems like it would work well.

That’s all you really “need” to start doing off-camera flash!  However if all your light is coming from one direction you will find some shadowing occurring at times.. for this reason it’s really nice to have 2 flashes or a flash and a large reflector.  This is the setup I use.. (flash + reflector).

What you need to add a reflector to your off camera flash setup:

1.  A Reflector – $14.80 – I use a 48″ circular reflector but there are many different sizes and shapes to choose from.

2.  A Light Stand – $27.95 –  I use the same stand for my reflector as I do my flash, I just added a boom onto it :).

3.  A Boom – 29.95 – It’s essentially an “arm” that attaches to your stand and you can add a reflector to it.  The arm is adjustable and accommodates my 48″ reflector as well as my smaller sized one (22″).

I was taking some practice shots tonight and these are taken mostly with 1 430 ex speedlite behind a 50×50 softbox off to my left side.  There is a reflector off to the right and it did reflect some light but I didn’t have it aimed to directly reflect light, so while it made some fill, it didn’t make it to its maximum capacity.

what equipment you need to do off camera flash photography

off camera flash lighting equipment list with links

list of lighting equipment for off camera flash
learn about off camera flash equipment with reflectors
off-camera-flash-with-diffuser
^
  this photo was just taken with a softbox and no reflector.. I am sitting in front of the diffuser (you can see my reflection in the eyes!).

Duluth MN Headshot Photograph

So there it is!  Everything I needed to really seriously get into off camera flash.  This is a great place to start however as you “master” the art of one flash, you’ll want to start adding in more 🙂 and upgrading equipment.

Hope this helps someone [or lots of people..] out!

-Christine Ann

Duluth MN Photographer Website
Facebook

Photos Taken At f/1.2 Aperture (With Zoomed In Examples)

Lenses today have the capability to have a much lower aperture than ever before. While this is beneficial in some areas, it is detrimental in others and you don’t want to be surprised by what the detriments are! The biggest detriment is how incredibly narrow its depth of field is. If I focus on someone’s nose, their eyes will be out of focus.. and.. yes.. this has totally happened to me :p. It’s taken me awhile to get a feel for it, and even now I sometimes underestimate it. Most people don’t/won’t notice it but photographers have “trained eyes” and it’s hard for us not to notice :).
If you aren’t sure what depth of field is, 
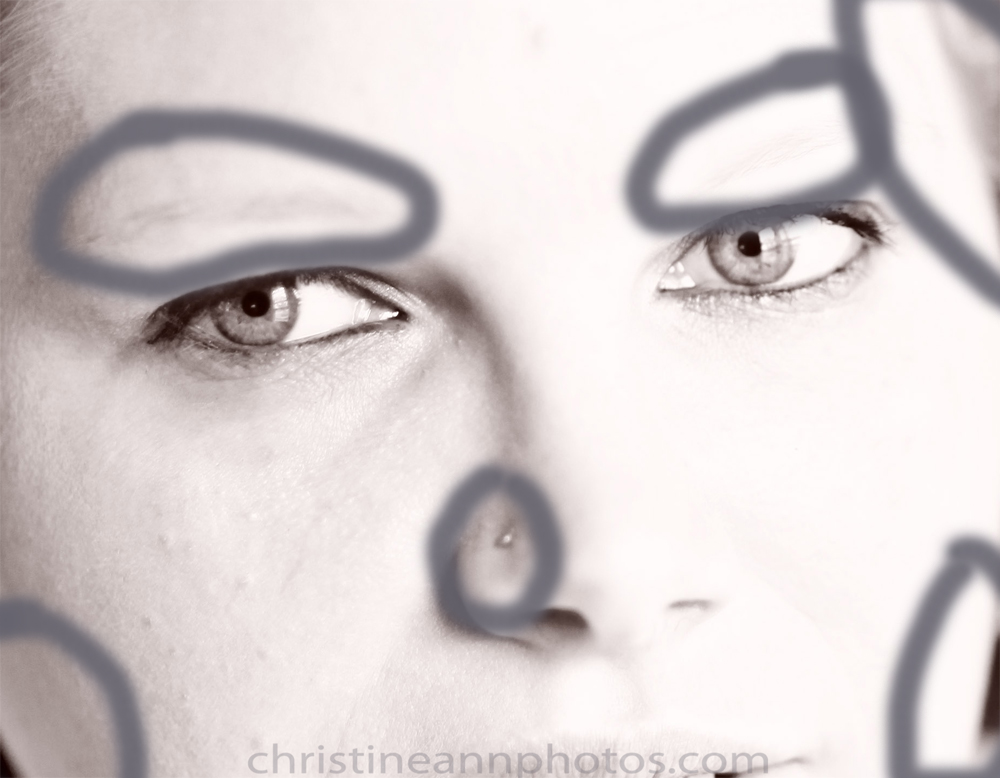
sums it up perfectly. Essentially, it’s just how big the area that is in focus is. Aperture also plays a role in exposure but that’s a blog post for a different day.
Anyway, I am excited to own a lens that can go as low as f/1.2 😀 and I know people want to know what that looks like and how to work with it so I thought it would be helpful to post some images zoomed in on.
As always, I resize my images for the web which causes them to “blur” a little bit.. I am happy to post full resolution versions if it’s important to you to see the details, just let me know in the comments!

I have a couple samples to break down here. We’ll start with this bride. These photos were all taken at f/1.2 so it’s a great one to use as a sample.
bride portrait wedding photography duluth mn natural light photograph low aperture image sample
^This is the original photo.

close up of bride's face to show depth of field at f/1.2
^Closeup of the photo. You can see how some spots appear in focus and some are out of focus. The eye closest to the camera is what the focus was set to. If you look up at the eyebrow above it, even that is out of focus, because f/1.2 is SO narrow.

duluth-mn-wedding-photographer-hermantown
^Circled the spots that are noticably out of focus/blurred as a result of using such a lower f-stop. If I had made it more like f/4+ the entire face would be in focus.

_____

wedding photographer depth of field blog post
^Another photo of the bride at f/1.2

close up of image to show a narrow depth of field and how it effects an image
^Close up of the face.. you can see where it is in focus and out of focus.

bride wedding photography in duluth mn showing depth of field close up
^Out of focus areas are circled.

_____

cake smash in duluth MN with low aperture at f/1.2 narrow depth of field
Here’s another photo taken at f/1.2. Generally you’re supposed to get the eyes in focus but on this photo the focus is landing on the lips. THe depth of field is so narrow that the lips are in focus and the eyes are out of focus.

duluth photographer cake smash depth of field image example
^Notice where the focus is landing in the photo (on the lips) and how the eyes are out of focus due to the narrow depth of field.

_____

narrow depth of field image example from family photographer Christine Ann
^Here is another photo with a low aperture of f/3.2. You can see where the focus lands (the kid in the middle with the sucker in the middle) and how it effects the rest of the image.. how the kid further away from the camera and closest to the camera are both blurred.

Hopefully this helps everyone understand aperture and how it effects a photo and helps people looking into the 85mm f/1.2L lens make purchasing decision. Personally I think f/1.2 is too low for most portraits. It’s just too unforgiving and leaves parts of the face out of focus )the nose, ears, hair, neck etc. I try to stay above f/2.2 at least for portraits usually unless there is low lighting.

There are a lot of other things that affect bokeh and how narrow the depth of field is. These images were all taken on a Canon Mark II 5D which has a full frame sensor which “enhances” the aperture more than a crop sensor would. If I put the same lens on my T2i (crop sensor) then the depth of field is less narrow/bigger so you do need to take into consideration what camera body you are using as to if you would get similar results. There are a few other factors that affect how narrow the depth of field is – 85mm has more bokeh than a smaller mm lens (for example if I used a 35mm 1.2, there would be more in focus and if I used it at 200mm there would be less in focus).. and how close you are standing to what/who you are photographing also impacts the image. So you should understand that this is not a cookie cutter blog post that will always be true for everyone but it should help you get a good idea of how an image shot at f/1.2 looks close up!

To see more images taken on an 85mm f/1.2L lens (without zooming in 🙂 ) check out that blog post http://wp.me/p3Jl3q-9a.

If you have any questions, don’t hesitate to ask!

-Christine Ann

Duluth Photographer Website
Duluth Senior Photographer
Duluth Photographer Facebook
Duluth Photographer Blog

Senior Rep Program

DULUTH MINNESOTA SENIOR REP PROGRAM
Senior Photography

Since this is my first year with a Senior Reps Program, I’ve decided to do a free session + free images for my senior reps! Apply by March 31st and be sure to share with anyone with a high school student graduating in 2015!

To read the details about it visit:
http://www.christineannphotos.com/senior-rep-program

To fill out the application:
http://www.christineannphotos.com/senior-rep-application

Duluth Minnesota Senior Reps Program MN Free Session

INFORMATION ABOUT BEING A REP:

This program is designed to benefit us both. A Senior rep helps promote Christine Ann Photography by suggesting to friends and parents looking for a Senior photographer, to check out Christine Ann Photography and see if we are a good fit. If they decide that we are and book and complete a session, the Senior rep gets rewarded!

If you become a rep, you get a free session and free disc of images. When you get a disc of images, you get a print release and a creative commons editing release (meaning you gain legal permission to edit the photos as long as you note you edited the photo and that I took the photo). Every session completed because of your referral earns you $25 (per referral – no limit!) which you may use to purchase prints or collect it directly to spend on whatever you’d like. All people you refer to me will receive 10% off their session fee and their disc fee.

WHAT IS REQUIRED TO BECOME A REP

You must:

.. be a Junior, graduating in 2015 and live in the Duluth Minnesota region (within 35 miles of Duluth/Hermantown). Homeschoolers are included in the Senior Rep program and may apply.

..have parental consent to do the session and sign a model release (the model release just allows me to post the images on my website/social media).

.. be willing to promote Christine Ann Photography and ideally be fairly active with social media

.. not dislike having your photos taken :).

DETAILS

There will only be a few reps selected and the rep position ends June 2015. Applications are due by April 30, 2014.

APPLY TO BE A SENIOR REP by clicking here.

Thanks everyone!

-Christine Ann

Duluth Senior Photographer Website

Duluth Senior Photographer Facebook

Duluth Minnesota Senior Rep Program

Duluth Minnesota Senior Rep Application

Understanding The Why of Why Your Photo Turned Out Well.

Random late-night thought.. A friend of mine implied that people who take nice photos have nice equipment. This is a common thought and yes nice equipment helps and yes most people who take nice photos are very invested into photography and therefore own nice equipment but when you have nice equipment you also need to understand how to use it! And we all have heard of the iphone fashion shoot, showing us you can still take nice photos with less nice equipment.
Anyways the whole point of this blog post is to explain something important: Anyone can and very likely will capture the occasional stunning image based on pure luck. A professional understands how to make the stunning image happen on purpose. I am truly amazed by all the consideration that goes into a photo before taking it if you are looking at it with a trained eye!
Some things to take into consideration before taking a photo: your camera settings, your background/location, the direction the person you are taking photos of is facing, where the light is coming from and where the light is landing on your person you are photographing, where the sun is at in the sky, how the person/people are posed, how cropped into the image you are/how close or far away you are from the people/the background-to-person ratio, the angle of your camera, how the image is composed, what the focal point is, keeping lines parallel, keeping open space even, if you are using a flash or not. etc.
You can still get nice photos by shooting wherever you want without taking these things into consideration but the question is: can you replicate the nice images you get on purpose? I was taking photos for many years before starting a business. I never knew when the right time to become a business was. In retrospect, I think the right time was when I finally understood the many many elements that go into a photo so that I knew exactly where to place people and how to make sure I wasn’t riding just on luck. It also took awhile (and lots and lots of practice) to train my eyes!
I remember the first time I learned the rule of composition concerning “parallels” (keep your lines parallel) I decided to practice and it was so awkward for me to try paying attention to parallel lines in the image! Now it’s just totally natural and instinctual. I also missed many details like an unbuttoned button or a collar not folded down nicely. Now I notice stuff like that pretty easily :).
So train your eyes to notice the details, start paying attention to your photos and take note of what you like about the image and do not like. Pay attention to how the light was hitting the person you photographed and what time of the day it was and what your settings were set to. This is all pretty awkward at first but it all comes with practice! It’s like when you first learned how to type.. super awkward and uncomfortable and now it’s just a natural instinct!

IMG_8006astamped

This photo could have gone horribly wrong had I positioned them at a different spot.. but because of the knowledge I have accumulated, I understand how to position people for the best results.

IMG_8033aastamp2

-Christine Ann
www.christineannphotos.com
www.facebook.com/christineannphotos
Duluth Minnesota/Superior Wisconsin Photographer

How to Capture A Sparkler’s Movement Tutorial (/How to do bulb photography).

With 4th of July recently coming and going, you may be seeing photos around of people drawing pictures with a sparkler and wonder how it is done.

Untitled-1stamped

What you need: a tripod, a camera on which you can leave the shutter open for various lengths of time, a remote clicker, and a black outfit (if you don’t want to be seen in the background).

Set your camera on the tripod, set it to BULB mode (different on all cameras, you will have to refer to your manual if you do not know. One typical way is that you set your camera to M and then make your shutter speed as slow as possible.. once it gets maxed out to “as slow as possible” it will say BULB. My camera has a B setting on the settings wheel to get there, so all cameras are different). Once the camera is on the tripod in bulb mode, determine exactly where you want to stand. Mark the spot! Set the camera to Manual Focus, then manually focus on the spot you are standing because the camera will have a hard time auto focusing in the dark). Once the focus is set, then press down on your remote clicker, do a few trial runs to figure out the best settings. My settings for the above photos were around f/16, ISO 640, 4 second shutter speed. I also worked at f/11 ISO 500. Other settings will definitely work too that’s just what I chose to do. My camera also handles high ISOs quite well so I don’t get scared to bump it up though as a general rule I prefer keeping it much lower. Once the camera is on the tripod, the focus is set, and the settings are right, stand in the spot, activate the shutter and move the sparkler around in the shapes you want and when you are done let go. That’s it!

When a shutter is open it captures all movement that occurs while it is open (this is why it needs to be on a tripod! If your hands move at all the camera will capture the movement of the camera). The tricky part is that while it is open it is also absorbing light.. so if you leave it open too long the photo can be blown out if you have streetlights around you especially.

You see in the lower right photo there is a red light streak behind it, that is the taillight of a car driving by.. so this idea works for lots of different things!

Oh and I recommend wearing black because I was wearing pink at first and you can see me pretty easily standing behind the sparklers (as you can see in the lower left-hand corner photo). I later changed to black and the problem was solved. The other adjustment I made is I was initially working with a streetlight behind me and I later figured out was sort of ruining the photos. I moved to a spot about 10 feet away and it solved that problem 🙂 .

My favorite shot of the night I ended up compositing 2 shots together 🙂 and then editing a couple little blurbs in the background so that it all looked totally black/dark.

IMG_3714zzzzzstamp

Remember if you are writing a word you have to write it backwards! 😮 . It is both easier than it sounds AND harder than it sounds haha.

Oh and if I have one more tip for everyone.. buy the big huge sparklers and maximize your time much better!

-Christine Ann
http://www.christineannphotos.com
“like” me on Facebook 🙂 ! https://www.facebook.com/christineannphotos
Duluth Minnesota Photographer

Duluth Minnesota.

Just a test run to see if I prefer this blog format to my prior one.

This seems to be pretty iconic for Duluth area so I thought I’d post my take of it. I took the photo during the parade of lights, which – by the way – is amazing!

Duluthstamp

-Christine Ann
www.christineannphotos.com
www.facebook.com/christineannphotos
Duluth Minnesota/Superior Wisconsin Photographer

Tips for Photographing a Solar Eclipse or Sunset

I was super excited to get some photos of an eclipse and then it disappeared right behind that cloud just as it was starting! Big bummer 😦 .. but I do like the photos I managed to get.

A few tips if you want to get the best photos possible of an eclipse:

1. Try to use a low ISO. This is true for every photo you will ever take: ISO creates grain in your images, so try to keep this number as low as possible. Sometimes it is necessary though because a higher number means your image will be better lit. Many photos taken indoors look grainy because of the ISO wanting to be high to accommodate for the low light.
2. Shoot with a higher aperture! A lot of people agree around f/8 is a good area. Higher f-stops will create a big giant blob of light around the sun and give you a little wiggle room in case your focus is off which it might be because cameras have a hard time focusing on the sun.
3. You may need to manually focus vs auto focus.. for this reason a tripod may be handy so you know your focus is right each time but is not necessary for a solar eclipse or sunset.
4. Wear sunglasses if you are looking through the eyehole! The lens essentially magnifies the sun so it can hurt your eyes more than usual. The lens should ideally also have a uv filter on it. Some people also claim that taking photos into the sun can hurt your camera.. I don’t know for certain whether or not this is true but I can say that based on my research on it I feel comfortable shooting into the sun, especially when it is towards the end of the day and very gentle.

IMG_6247zstamp
^This photo was taken at f/32 1/2000 ISO 800. When you take photos of a sunset it is highly recommended to shoot at at least f/8. My photos turned out much better at a higher f-stop. My ISO is pretty high and it really should be much lower.

IMG_6145stamp
^This photo is taken at f/5 1/250 ISO 200. Raising the f-stop after this helped the photo immensely.

Eclipsestamp
Annnnd one more eclipse photo.