Telephoto Distortion and Perspective and How It Affects Your Images

Guest blog post from Christopher Fisher – my husband and occasional second shooter for large groups and weddings :).

Telephoto Distortion and zooming with your feet

Photographers often talk about “zooming with their feet”. If they are using a fixed lens or their telephoto lens and it cannot capture the size of subject they desire, they just move [with their feet] closer or further away from their subject.  To the new photographer, they may not realize that zooming with their feet might compromise the composition of their photo.  While the subject might be brought to size, the background will look significantly different.

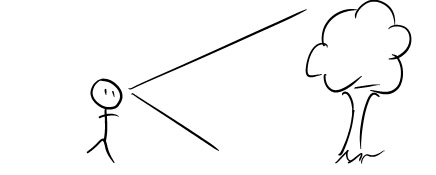
This difference is due to an effect called telephoto distortion. A human eye (or a camera) is a small fixed point to which an image is projected. This can be visualized in the below diagram:

Image1

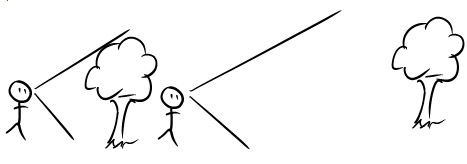
While a tree may be several times the size of a person, the image of a tree is focused into a single point:  the human eye or camera lens. If the person walks closer to the tree, the subject appears larger. If the human being walks away from the tree, the subject appears smaller.
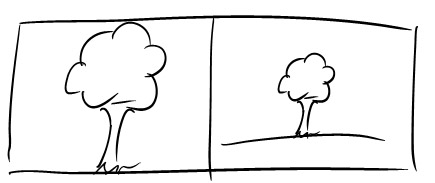
Image2

Look at the different figures. In the first figure, only a small section of the tree is visible. In the second figure, the entire height of the tree and more can be seen. Let’s see what each figure will see from the eye’s perspective.

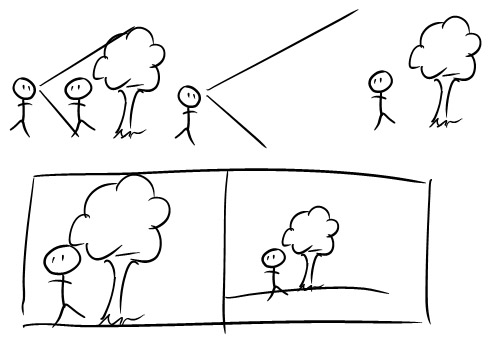
Image3

Now let’s add a second subject:

Image4
-Post by Christopher Fisher

-Christine Ann Photography
Duluth MN Photographer Website
Facebook

1 Tip Which Will Improve Your Color Pop/Selective Color Images

I frequent many photography forums and one topic that comes up often is “color selection” or “color pop” edits.  This is when you have a black and white images and you bring back color on just a couple select spots.  These images are not often well received by lot of pros.  I am amongst this group 🙂 but they do have their place :).
I think the worst part about color selection is just how harsh the color is in the image.  It doesn’t flow well.  This is when I created my own way of doing color selection photos, where you just bring back about half of the color instead of all the color.  It makes a huge difference!  And I definitely much prefer the subtle color to the sharp, vivid color.

How do you accomplish this?  If you are layering a color image over a black and white image and erasing, then erase away at around 30-40% opacity.
If you are using a layer mask, set your paintbrush to around 30-40% opacity.  tada!  Very simple indeed.  This will make a huge difference in how the photo looks after you edit it.

One other tip I have is to pick just one focal point to selective color..a lot of people go a little crazy with their brush and bring back half the image so it’s half color and half black and white.  This looks a bit odd and unnatural and also there is no real concept behind it.  Usually you want to color pop something with meaning or symbolism or a concept (not always but like usually just an item vs a shirt).  In the sample image I am posting here I decided to have 2 color pops so they would balance each other out more but notice the items I picked were small so it doesn’t overwhelm the photo.  I believe my opacity for this image was around 30%.. to do it again I  might bump it up a bit higher, but you get the idea.

This is the image at 100% opacity.. this is the full color image brought back to the black and white image, and this is what most photographers who do color pop do:
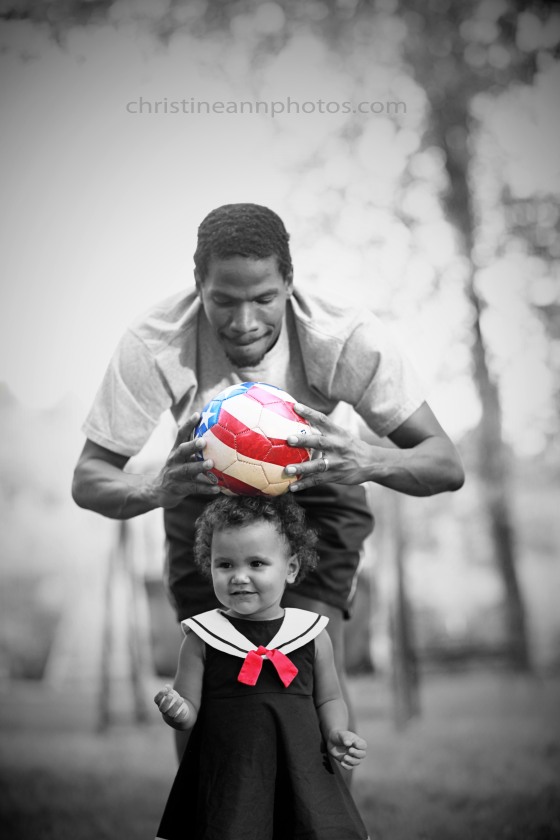
IMG_3908zzzzstamped

^ Color brought back at full strength.

And the photo shown below is the same image with the color brought back around 30% opacity.  It might even be more like 20%. It is a little bit dull but it looks so much less distracting and more natural.. I much prefer it to the full color photo.

IMG_3908bwstamped
^Color brought back around 20-30% strength.

For one more example I’ll show one brought back around 50% opacity.
Selective coloring color pop how to improve technique with image example

^Color brought back around 50% strength. This is my favorite edit of the three (I might tone it down a notch but overall the color isn’t too overbearing and “sharp” and it blends much better than at full strength – in my opinion anyway!).

As with all things in photography, which is better is subjective.  Surely there are people who prefer the first to the second.  If you do like the first you could even play around with bringing back the color around 70%-80% so it’s just not so vivid and contrasting.  While I’m not a huge fan of color pop photos, I do find myself much more receptive to them when done in a more subtle manner, just thought/style I would share with everyone :).

-Christine Ann
Duluth Minnesota Photographer
Website
Facebook
Unedited Photos from T2i + 50mm Lens.

This blog is specifically dedicated to showing images straight from the T2i + 50mm lens.  This is the combo I used for a few years before upgrading to the Mark II 5D + 85mm 1.2L lens.  I got the upgrade about 2 years ago (a little less..) and have barely touched my T2i since (though I do still use the 50mm sometimes).  I picked up my T2i for the first time in a couple years and was surprised by how much better of photos I could get off it than I was ever able to before.  I could not have intentionally gotten as clear and nice of photos (though I did get some lucky ones!) when I used this combo about 2 years ago.  The equipment didn’t change, but I have :).  And I speculate if I pick it up in 2 more years they’ll be even better.  This isn’t to say you can’t get “nicer” photos on nicer equipment, but I recently compared photos from the Mark II 5d + 85mm 1.2L lens to photos on the Mark II 5D + 50mm 1.8 lens to photos on the T2i + 50mm 1.8 lens (IE:  $3,000 camera + $2,000 lens to $3,000 camera + $100 lens to $700 camera + $100 lens) and the results were not all that different from one another.  I was incredibly surprised!  You can see the image comparisons here:  https://christineannphotos.wordpress.com/2013/10/20/photos-taken-with-canon-rebel-t2i-50mm-1-8-lens/ keeping in mind they are unedited and you need to click them to see the full detail of each photo.
The point in all this is that if your photos are out of focus or not sharp it is almost definitely you and not your equipment.  I read a post from someone who has sent back the same 50mm 1.8 lens used in this blog post 2 times, got it a third time and was wondering if she should send it back again or get a different lens all together.  I can assure everyone it was not the lens any of those 3 times, it’s a lack of understanding how to use your camera and how/where to pose people and why.   You can give an artist crappy supplies and they can make something beautiful; you can give someone who is not an artist high end supplies and they will not be able to do much with it.  Focus your energy on practicing, improving, and learning how to use the equipment you have and how to edit.  My one piece of advice regarding equipment is that the kit lens is junk and if you only own a kit lens, it’s time to at least upgrade to the 50mm 1.8.. it is around $100 and you will see a quality improvement!  That is one thing my test shots did show.. a noticeable difference in quality regarding the kit lens to 50mm lens.  Anyway these are some images I have gotten off the T2i in the last couple months (most being from the last few days specifically for some blogs I want to do on starter equipment) they are unedited and I could further improve them by doing some editing 🙂 but then you wouldn’t know what is due to the equipment and what is due to the editing so I will leave them alone.

Unedited images from the T2i + 50mm lens  *CLICK EACH IMAGE FOR FULL DETAIL*:

IMG_5160zzstamp
*Click images for full detail.. the thumbnails look fuzzier than they are*.
IMG_5149crop2stamp
*Click images for full detail*
IMG_5536zzstamp
*Click images for full detail*
t2i50 (2)stamp_z-2
*Click images for full detail*.
IMG_5444stamp
*Click images for full detail.. the thumbnails look fuzzy*.
IMG_5109zzzstamp
*Click images for full detail*.
IMG_5108zzstamp
*Click images for full detail*.

t2i50mmstampzz

*Click images for full detail*.

t2i50 (3stamp)

*Click images for full detail*.

IMG_5441zzstamp

-Christine Ann
Christine Ann Photography Web Site
Christine Ann Photography Facebook

This one thing may be ruining your photos (with image comparison).

There is one thing that we all start off doing that may be ruining your photographs: using the on-camera pop-up flash.
I thought it might be beneficial for people learning about photography to see image comparisons of photos taken with natural sunlight (in front of a window or outside) vs photos taken with the on-camera pop-up flash. Most professional photographers overwhelmingly prefer shooting with natural light however we all own external flashes and diffusers for the times where natural light just isn’t working or happening. I think we all start out using it and over years of experience and learning come to realize there are better alternatives. Some things that the on camera pop-up flash does: it creates horrible shadows! Both behind the person you are photographing and also oftentimes under their chin, depending on their angle. It creates these tiny pin-lights in the eyes (the reflection in the eyes is a tiny little dot in the pupil). It makes people squint and blink. Children complain about it hurting their eyes and it just all around looks mostly unnatural. The hair gets mega-highlighted and colors look shiny and overly textured/vibrant.

Alternatives to pop-up flash:
The best alternative: find great sources of natural light – usually in front of a window or in the shade outside.
Another great alternative: Buy a lens with a low aperture. They go down as low as f/1.2! You can handle most situations with this ability but your focus will have to be perfect (Note shooting at f/1.2 is usually not wise because of how shallow your depth of field becomes.. but it’s a nice option to have and I have shot at 1.2 before – not professionally – but for my own photos). Low aperture lenses tend to be very costly. There is one cheap lens that every photographer should own which is the 50mm f/1.8 lens. It’s around $100 and is very great for the price. It is made of plastic and you’ll want to upgrade to a very nice lens eventually but if you are a hobbiest and still learning the 1.8 is a great great option for you!!!! (And is WAY better than the kit lens which also may be ruining your photos if you are using it..).
If you do need flash, you can purchase an off-camera (external) flash and learn to bounce the light and/or diffuse it (ideal! And what professionals do).
If you find none of these are good alternatives for you right now, there are two other options. Option 1 is buying a pop-up flash diffuser. I have not tried one so I can’t vouch for it but I imagine it would help. Option 2 is changing your settings in camera and lowering the strength of the flash (not all cameras can do this but it’s worth looking into and trying out!).

Please note that if you compare flash with natural light in a spot where natural light is not good, the photo taken with a flash will usually look better. Part of learning about photography is developing an eye for and understanding of where the natural light is the best. Studio lighting can be amazing however mastering it takes a lot of time and money. Most photos, however, can be taken with natural light and most people prefer the look of it (though not everyone does, photography is entirely subjective!).

All of these photographs were taken on the same camera: Canon Rebel T2i and all were taken within the last month except the very last one which was taken back in December.

Natural light photograph, taken in front of a window. Notice now nice the reflections in their eyes are and how natural and soft everything is.

IMG_4848stamp
Natural light photograph.
IMG_5094zstamp
Natural light photograph.
IMG_6329softerstamp
Natural light photograph.
IMG_2799zstamp

___________________________________________________
___________________________________________________

Photos taken with on-camera pop-up flash – notice the tiny little pin-light being reflected in the pupil and how the hair is super shiny and the shadows being cast behind them and under the chin as well.
On-camera pop-up flash.
IMG_2860zstamp
On-camera pop-up flash.
IMG_2908stamp
On-camera pop-up flash.
IMG_3993stamp

Some people may prefer the flash photos, some prefer the natural light ones, and neither one is wrong, but it is good to be able to know how various things – such as your light source – will affect a photo!

-Christine Ann
www.christineannphotos.com
www.facebook.com/christineannphotos
Duluth Minnesota Photographer

Duluth Minnesota.

Just a test run to see if I prefer this blog format to my prior one.

This seems to be pretty iconic for Duluth area so I thought I’d post my take of it. I took the photo during the parade of lights, which – by the way – is amazing!

Duluthstamp

-Christine Ann
www.christineannphotos.com
www.facebook.com/christineannphotos
Duluth Minnesota/Superior Wisconsin Photographer

Tips for Photographing a Solar Eclipse or Sunset

I was super excited to get some photos of an eclipse and then it disappeared right behind that cloud just as it was starting! Big bummer 😦 .. but I do like the photos I managed to get.

A few tips if you want to get the best photos possible of an eclipse:

1. Try to use a low ISO. This is true for every photo you will ever take: ISO creates grain in your images, so try to keep this number as low as possible. Sometimes it is necessary though because a higher number means your image will be better lit. Many photos taken indoors look grainy because of the ISO wanting to be high to accommodate for the low light.
2. Shoot with a higher aperture! A lot of people agree around f/8 is a good area. Higher f-stops will create a big giant blob of light around the sun and give you a little wiggle room in case your focus is off which it might be because cameras have a hard time focusing on the sun.
3. You may need to manually focus vs auto focus.. for this reason a tripod may be handy so you know your focus is right each time but is not necessary for a solar eclipse or sunset.
4. Wear sunglasses if you are looking through the eyehole! The lens essentially magnifies the sun so it can hurt your eyes more than usual. The lens should ideally also have a uv filter on it. Some people also claim that taking photos into the sun can hurt your camera.. I don’t know for certain whether or not this is true but I can say that based on my research on it I feel comfortable shooting into the sun, especially when it is towards the end of the day and very gentle.

IMG_6247zstamp
^This photo was taken at f/32 1/2000 ISO 800. When you take photos of a sunset it is highly recommended to shoot at at least f/8. My photos turned out much better at a higher f-stop. My ISO is pretty high and it really should be much lower.

IMG_6145stamp
^This photo is taken at f/5 1/250 ISO 200. Raising the f-stop after this helped the photo immensely.

Eclipsestamp
Annnnd one more eclipse photo.