1 Tip Which Will Improve Your Color Pop/Selective Color Images

I frequent many photography forums and one topic that comes up often is “color selection” or “color pop” edits.  This is when you have a black and white images and you bring back color on just a couple select spots.  These images are not often well received by lot of pros.  I am amongst this group 🙂 but they do have their place :).
I think the worst part about color selection is just how harsh the color is in the image.  It doesn’t flow well.  This is when I created my own way of doing color selection photos, where you just bring back about half of the color instead of all the color.  It makes a huge difference!  And I definitely much prefer the subtle color to the sharp, vivid color.

How do you accomplish this?  If you are layering a color image over a black and white image and erasing, then erase away at around 30-40% opacity.
If you are using a layer mask, set your paintbrush to around 30-40% opacity.  tada!  Very simple indeed.  This will make a huge difference in how the photo looks after you edit it.

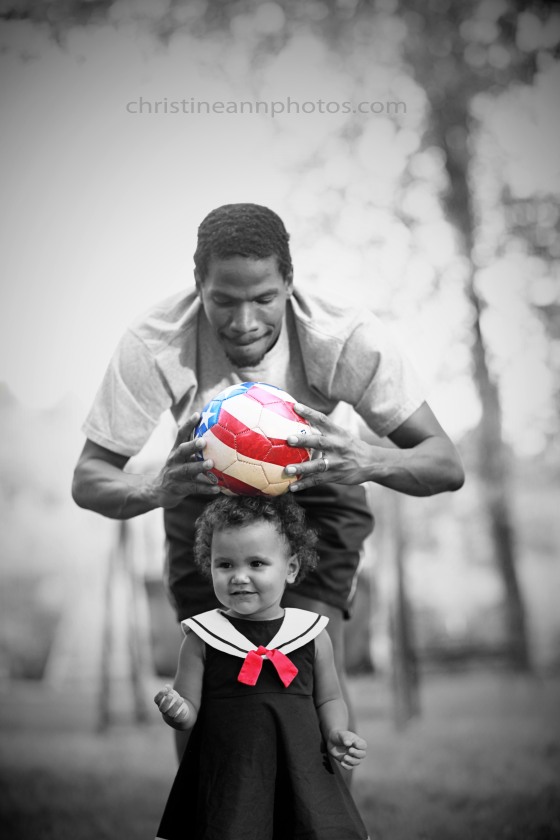
One other tip I have is to pick just one focal point to selective color..a lot of people go a little crazy with their brush and bring back half the image so it’s half color and half black and white.  This looks a bit odd and unnatural and also there is no real concept behind it.  Usually you want to color pop something with meaning or symbolism or a concept (not always but like usually just an item vs a shirt).  In the sample image I am posting here I decided to have 2 color pops so they would balance each other out more but notice the items I picked were small so it doesn’t overwhelm the photo.  I believe my opacity for this image was around 30%.. to do it again I  might bump it up a bit higher, but you get the idea.

This is the image at 100% opacity.. this is the full color image brought back to the black and white image, and this is what most photographers who do color pop do:

IMG_3908zzzzstamped

^ Color brought back at full strength.

And the photo shown below is the same image with the color brought back around 30% opacity.  It might even be more like 20%. It is a little bit dull but it looks so much less distracting and more natural.. I much prefer it to the full color photo.

IMG_3908bwstamped
^Color brought back around 20-30% strength.

For one more example I’ll show one brought back around 50% opacity.
Selective coloring color pop how to improve technique with image example

^Color brought back around 50% strength. This is my favorite edit of the three (I might tone it down a notch but overall the color isn’t too overbearing and “sharp” and it blends much better than at full strength – in my opinion anyway!).

As with all things in photography, which is better is subjective.  Surely there are people who prefer the first to the second.  If you do like the first you could even play around with bringing back the color around 70%-80% so it’s just not so vivid and contrasting.  While I’m not a huge fan of color pop photos, I do find myself much more receptive to them when done in a more subtle manner, just thought/style I would share with everyone :).

-Christine Ann
Duluth Minnesota Photographer
Website
Facebook
Understanding The Why of Why Your Photo Turned Out Well.

Random late-night thought.. A friend of mine implied that people who take nice photos have nice equipment. This is a common thought and yes nice equipment helps and yes most people who take nice photos are very invested into photography and therefore own nice equipment but when you have nice equipment you also need to understand how to use it! And we all have heard of the iphone fashion shoot, showing us you can still take nice photos with less nice equipment.
Anyways the whole point of this blog post is to explain something important: Anyone can and very likely will capture the occasional stunning image based on pure luck. A professional understands how to make the stunning image happen on purpose. I am truly amazed by all the consideration that goes into a photo before taking it if you are looking at it with a trained eye!
Some things to take into consideration before taking a photo: your camera settings, your background/location, the direction the person you are taking photos of is facing, where the light is coming from and where the light is landing on your person you are photographing, where the sun is at in the sky, how the person/people are posed, how cropped into the image you are/how close or far away you are from the people/the background-to-person ratio, the angle of your camera, how the image is composed, what the focal point is, keeping lines parallel, keeping open space even, if you are using a flash or not. etc.
You can still get nice photos by shooting wherever you want without taking these things into consideration but the question is: can you replicate the nice images you get on purpose? I was taking photos for many years before starting a business. I never knew when the right time to become a business was. In retrospect, I think the right time was when I finally understood the many many elements that go into a photo so that I knew exactly where to place people and how to make sure I wasn’t riding just on luck. It also took awhile (and lots and lots of practice) to train my eyes!
I remember the first time I learned the rule of composition concerning “parallels” (keep your lines parallel) I decided to practice and it was so awkward for me to try paying attention to parallel lines in the image! Now it’s just totally natural and instinctual. I also missed many details like an unbuttoned button or a collar not folded down nicely. Now I notice stuff like that pretty easily :).
So train your eyes to notice the details, start paying attention to your photos and take note of what you like about the image and do not like. Pay attention to how the light was hitting the person you photographed and what time of the day it was and what your settings were set to. This is all pretty awkward at first but it all comes with practice! It’s like when you first learned how to type.. super awkward and uncomfortable and now it’s just a natural instinct!

IMG_8006astamped

This photo could have gone horribly wrong had I positioned them at a different spot.. but because of the knowledge I have accumulated, I understand how to position people for the best results.

IMG_8033aastamp2

-Christine Ann
www.christineannphotos.com
www.facebook.com/christineannphotos
Duluth Minnesota/Superior Wisconsin Photographer