Neckstrap vs Hand Strap – And How to Use Both Simotaneously

When we start out taking photos, most of us will use the standard neck strap that the camera comes with. As you get more and more into photography and start exploring what kind of accessories are out there you will stumble upon a hand/handstrap. Most people will buy it and try it and some will prefer it and some will yet still prefer the neck strap – it’s all personal preference.
For me – I like both. They both serve different purposes. Since a camera only has 2 slots to attach a strap to (top left and top right) you may think you need to choose one or the other however you don’t :).
I have both attached to my camera and use them interchangeably (photos below as to how this works).

Advantages of the neck strap:
*Do not have to worry about dropping the camera
*Camera is accessible at a moments notice
*Allows you to carry the camera around for long periods of time
*Keeps camera in front of you making it safer (unless you sling it over your shoulder to the side).
*It distributes the weight of your camera/lens across your neck or shoulder making it feel less heavy

Disadvantages:
*Large/bulky
*It can get in the way of both what you are doing  and also in front of the lens, blocking your shot (if it’s not around your neck)
* It can get uncomfortable (this can help be avoided by buying a padded neckstrap – links below for help deciding which to buy)
*You can underestimate how big your camera is or forget about it all together and bump it on stuff as you pass it by

Times I use the neck strap are when I’m on a walk or at an event and need the camera accessible but am taking a break from using it, when other people use my camera I make them put it on (haha), or if I’m worried I may drop the camera and need extra assurance of its safety.

Advantages of the hand strap:
Makes the camera more stable/less camera shake
Camera is easily accessible
Good for short breaks
It looks professional (not a major point here, but worth noting)

Disadvantages:
It puts the camera more at the side of your body while you walk, making it less safe/easier to bump
It is less safe/reliable than a neck strap (this is especially important to me the times I hand my camera to someone else.. I feel confident putting the neckstrap on someone but my heart races a little if it’s just the hand strap)
It can start to feel very heavy in your hand/arm
It gets in the way of the battery door – not a big deal and you do not need to remove it to access it (at least on my camera) but I do have to loosen it and swivel it around

I use the hand strap every time I am taking photos for stability and also to keep it safer. I also use it while we we move from spot to spot in short distances (long distances I use the neck strap or camera bag) – it gives me extra assurance it will not be dropped.

There is honestly no black and white answer to which is better. A lot of professionals use the hand strap and a lot use the neck strap (though if they use the neck strap they mostly invest in a padded neckstrap – more on that in a moment).  You’ll probably have to try both for yourself to determine which you prefer. I think there is a slight sway towards the hand straps but maybe hand strap users are just more vocal about it 🙂 who knows, but either way they are both common and both well liked by their users.

As for me I use both. Someone asked me how I am able to use both so I took some photos of my camera to help give a visual aid as to how my hand strap is designed and set up so that I can keep both attached for their different uses.

This is what my camera looks like with the neck strap and hand strap attached:
Hand strap and neck strap comparison on Canon Mark II 5D DSLR

Camera attachments explained and analyzed
handstrap vs neckstrap comparison and explanation on canon mark ii 5d DSLR and how to use both simultaneously pros and cons

handstrap vs neckstrap comparison and explaination on canon mark ii 5d DSLR and how to use both simultaneously pros and cons

Use handstrap and neckstrap simultaneously together and understand and explain how the hand strap works and where it attaches and mounts on camera DSLR

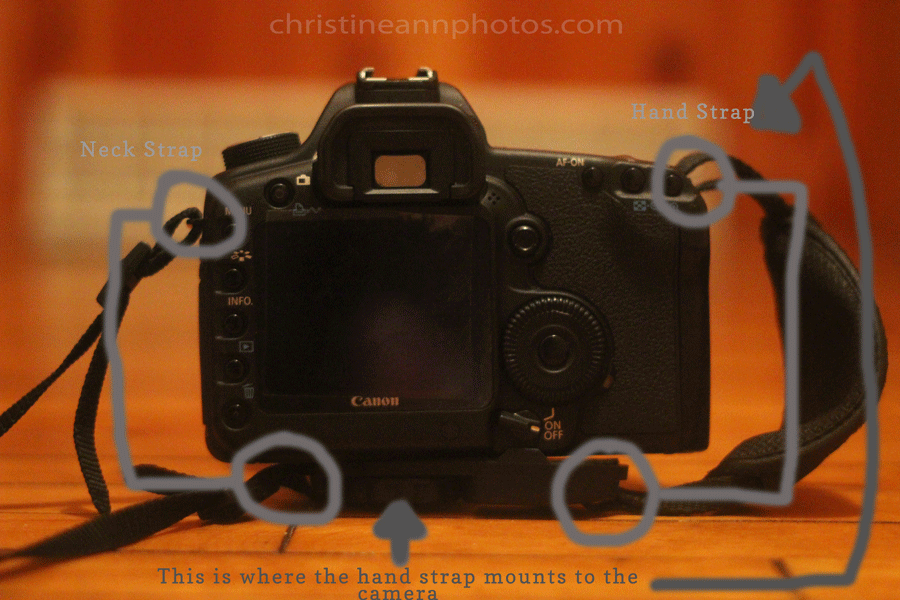
So as you can see from the photos the hand strap attaches to the top right neck strap insert and screws into the tripod socket (and the strap mounts into the strap insert attached to the hand strap hardware).  The neck strap then attaches to the top left neck strap insert on the camera and the strap insert attached to the left side of the hand strap – the best of both worlds!

Lastly I said I would link to some nice, reputable neck straps to upgrade from the default one that comes with the camera.  They are cushioned, padded, have pockets for memory cards, well designed and make it much  more comfortable to use a neck strap.  Here is one article that discusses the top 6 neck straps, tested and rated click here.  The two names I see the most are Black Rapid and Op Tech.

-Christine Ann
Duluth Photographer Website
Facebook

This one thing may be ruining your photos (with image comparison).

There is one thing that we all start off doing that may be ruining your photographs: using the on-camera pop-up flash.
I thought it might be beneficial for people learning about photography to see image comparisons of photos taken with natural sunlight (in front of a window or outside) vs photos taken with the on-camera pop-up flash. Most professional photographers overwhelmingly prefer shooting with natural light however we all own external flashes and diffusers for the times where natural light just isn’t working or happening. I think we all start out using it and over years of experience and learning come to realize there are better alternatives. Some things that the on camera pop-up flash does: it creates horrible shadows! Both behind the person you are photographing and also oftentimes under their chin, depending on their angle. It creates these tiny pin-lights in the eyes (the reflection in the eyes is a tiny little dot in the pupil). It makes people squint and blink. Children complain about it hurting their eyes and it just all around looks mostly unnatural. The hair gets mega-highlighted and colors look shiny and overly textured/vibrant.

Alternatives to pop-up flash:
The best alternative: find great sources of natural light – usually in front of a window or in the shade outside.
Another great alternative: Buy a lens with a low aperture. They go down as low as f/1.2! You can handle most situations with this ability but your focus will have to be perfect (Note shooting at f/1.2 is usually not wise because of how shallow your depth of field becomes.. but it’s a nice option to have and I have shot at 1.2 before – not professionally – but for my own photos). Low aperture lenses tend to be very costly. There is one cheap lens that every photographer should own which is the 50mm f/1.8 lens. It’s around $100 and is very great for the price. It is made of plastic and you’ll want to upgrade to a very nice lens eventually but if you are a hobbiest and still learning the 1.8 is a great great option for you!!!! (And is WAY better than the kit lens which also may be ruining your photos if you are using it..).
If you do need flash, you can purchase an off-camera (external) flash and learn to bounce the light and/or diffuse it (ideal! And what professionals do).
If you find none of these are good alternatives for you right now, there are two other options. Option 1 is buying a pop-up flash diffuser. I have not tried one so I can’t vouch for it but I imagine it would help. Option 2 is changing your settings in camera and lowering the strength of the flash (not all cameras can do this but it’s worth looking into and trying out!).

Please note that if you compare flash with natural light in a spot where natural light is not good, the photo taken with a flash will usually look better. Part of learning about photography is developing an eye for and understanding of where the natural light is the best. Studio lighting can be amazing however mastering it takes a lot of time and money. Most photos, however, can be taken with natural light and most people prefer the look of it (though not everyone does, photography is entirely subjective!).

All of these photographs were taken on the same camera: Canon Rebel T2i and all were taken within the last month except the very last one which was taken back in December.

Natural light photograph, taken in front of a window. Notice now nice the reflections in their eyes are and how natural and soft everything is.

IMG_4848stamp
Natural light photograph.
IMG_5094zstamp
Natural light photograph.
IMG_6329softerstamp
Natural light photograph.
IMG_2799zstamp

___________________________________________________
___________________________________________________

Photos taken with on-camera pop-up flash – notice the tiny little pin-light being reflected in the pupil and how the hair is super shiny and the shadows being cast behind them and under the chin as well.
On-camera pop-up flash.
IMG_2860zstamp
On-camera pop-up flash.
IMG_2908stamp
On-camera pop-up flash.
IMG_3993stamp

Some people may prefer the flash photos, some prefer the natural light ones, and neither one is wrong, but it is good to be able to know how various things – such as your light source – will affect a photo!

-Christine Ann
www.christineannphotos.com
www.facebook.com/christineannphotos
Duluth Minnesota Photographer