1 Tip Which Will Improve Your Color Pop/Selective Color Images

I frequent many photography forums and one topic that comes up often is “color selection” or “color pop” edits.  This is when you have a black and white images and you bring back color on just a couple select spots.  These images are not often well received by lot of pros.  I am amongst this group 🙂 but they do have their place :).
I think the worst part about color selection is just how harsh the color is in the image.  It doesn’t flow well.  This is when I created my own way of doing color selection photos, where you just bring back about half of the color instead of all the color.  It makes a huge difference!  And I definitely much prefer the subtle color to the sharp, vivid color.

How do you accomplish this?  If you are layering a color image over a black and white image and erasing, then erase away at around 30-40% opacity.
If you are using a layer mask, set your paintbrush to around 30-40% opacity.  tada!  Very simple indeed.  This will make a huge difference in how the photo looks after you edit it.

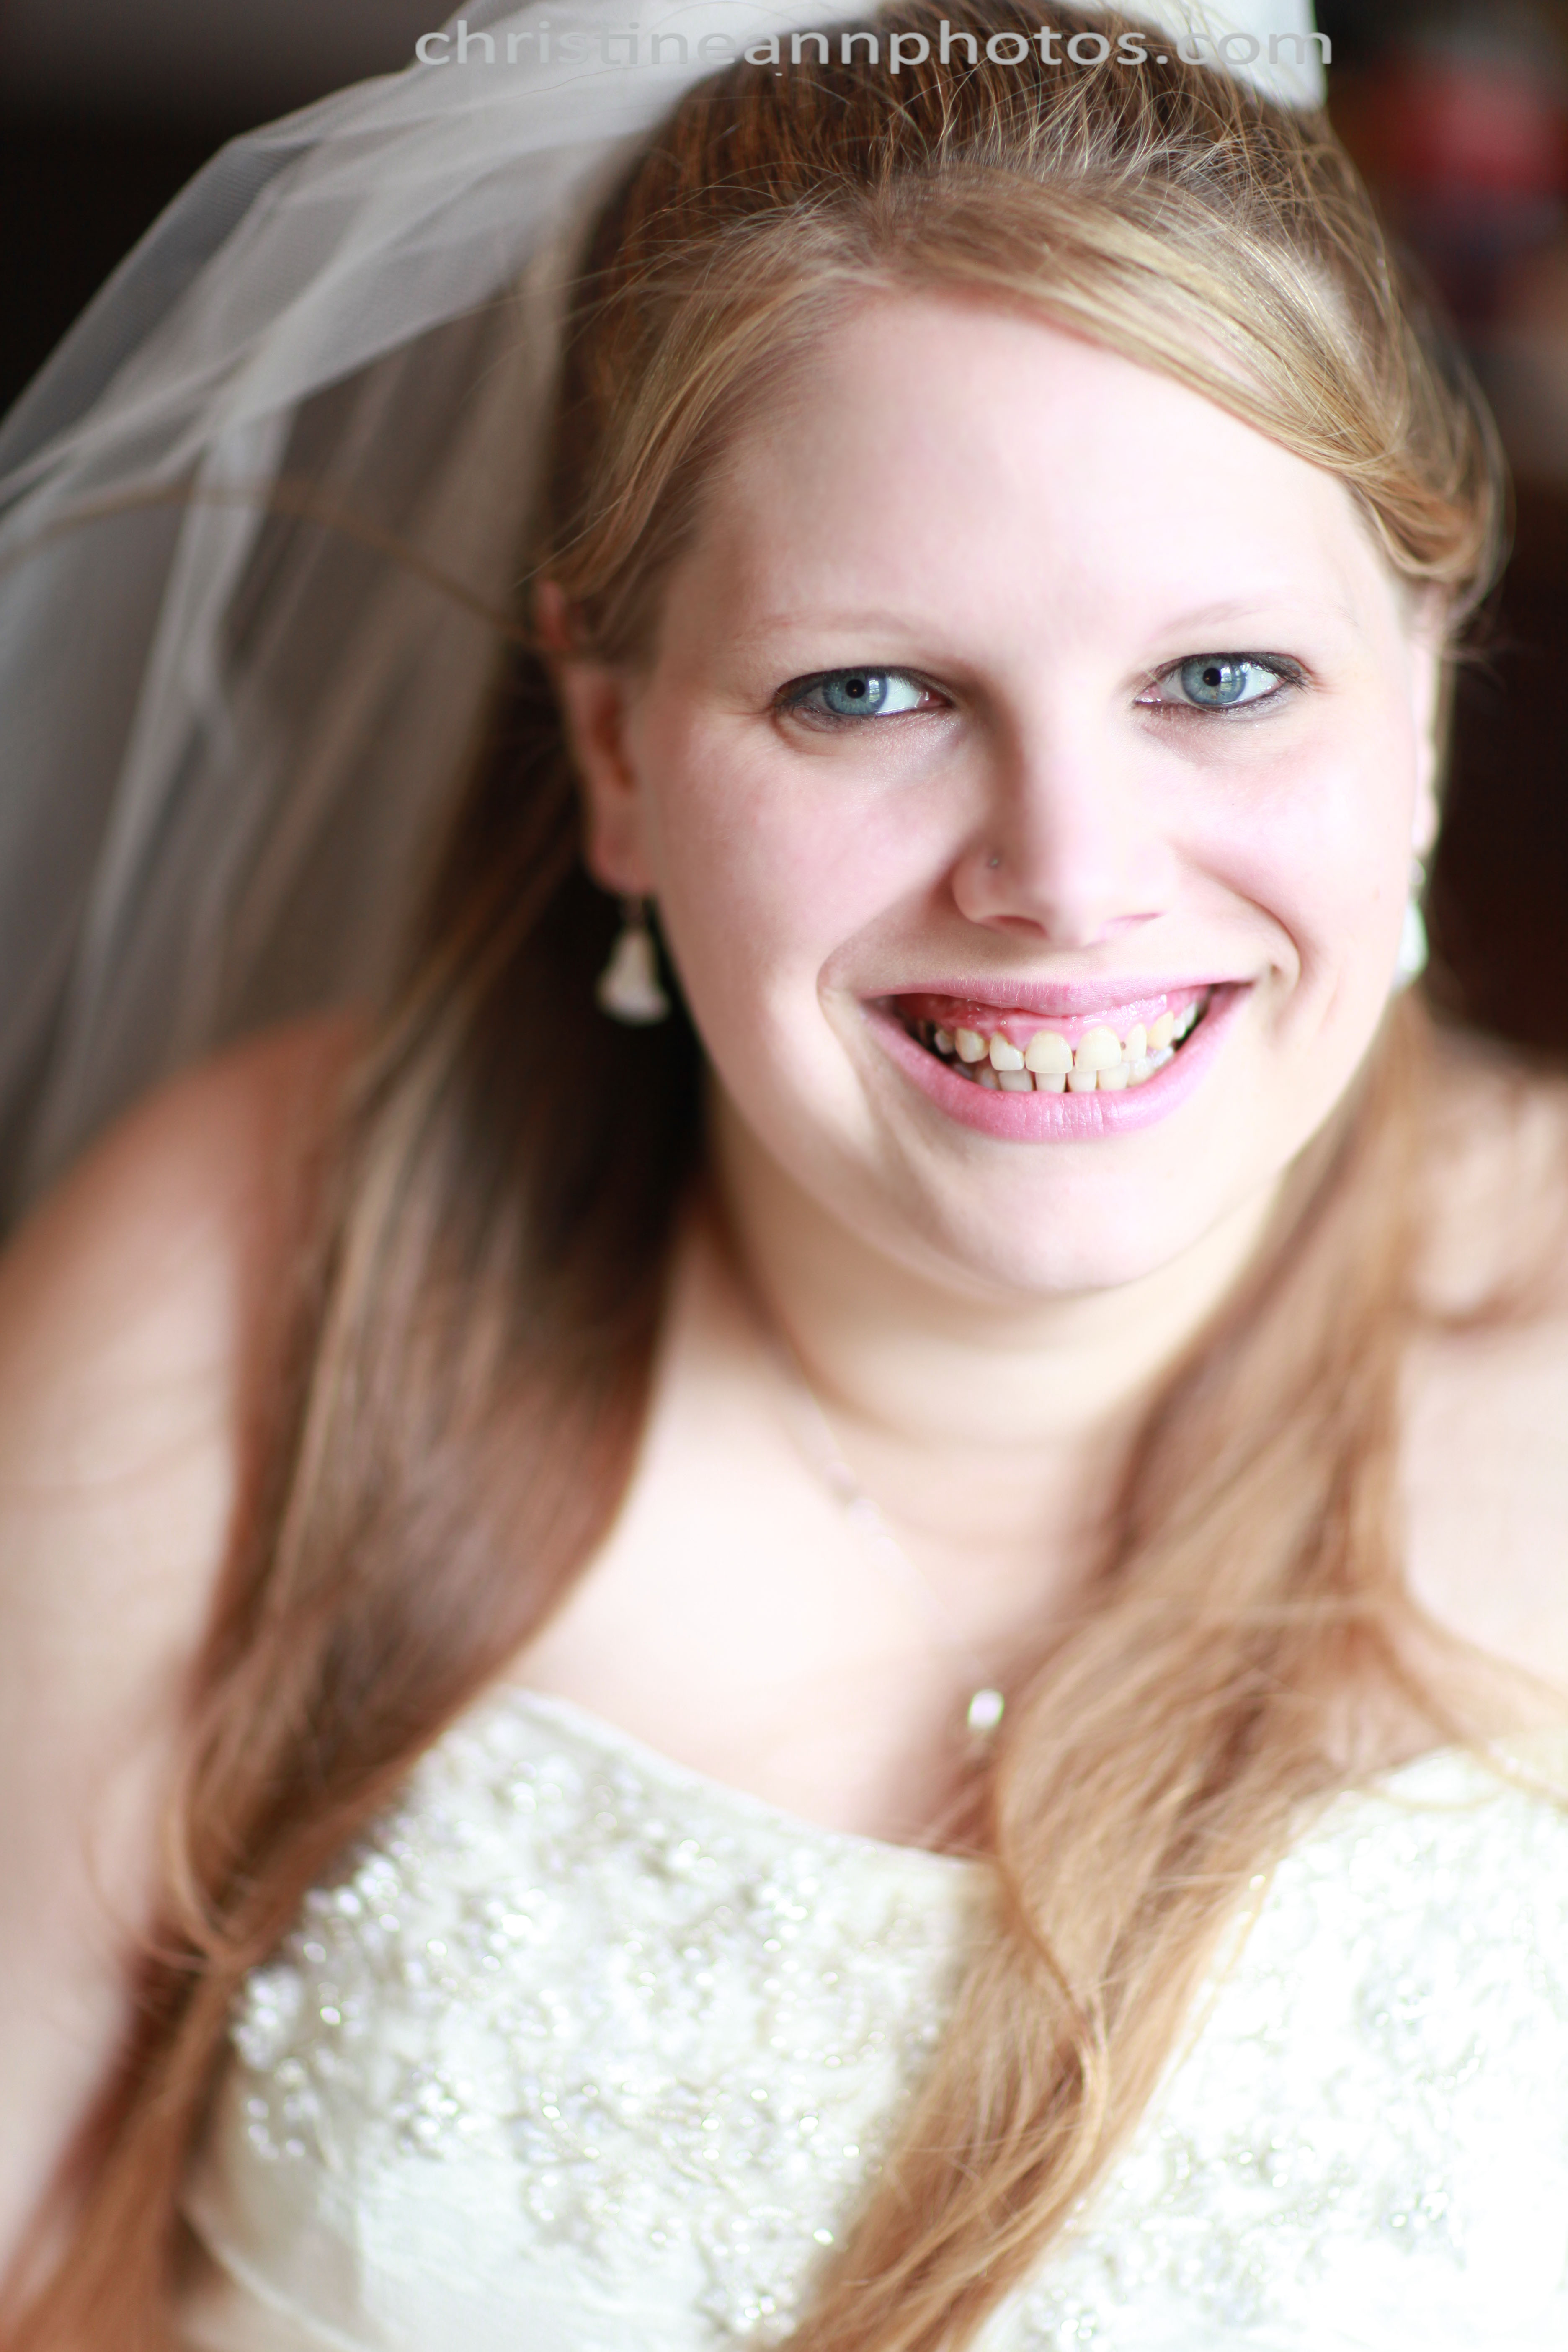
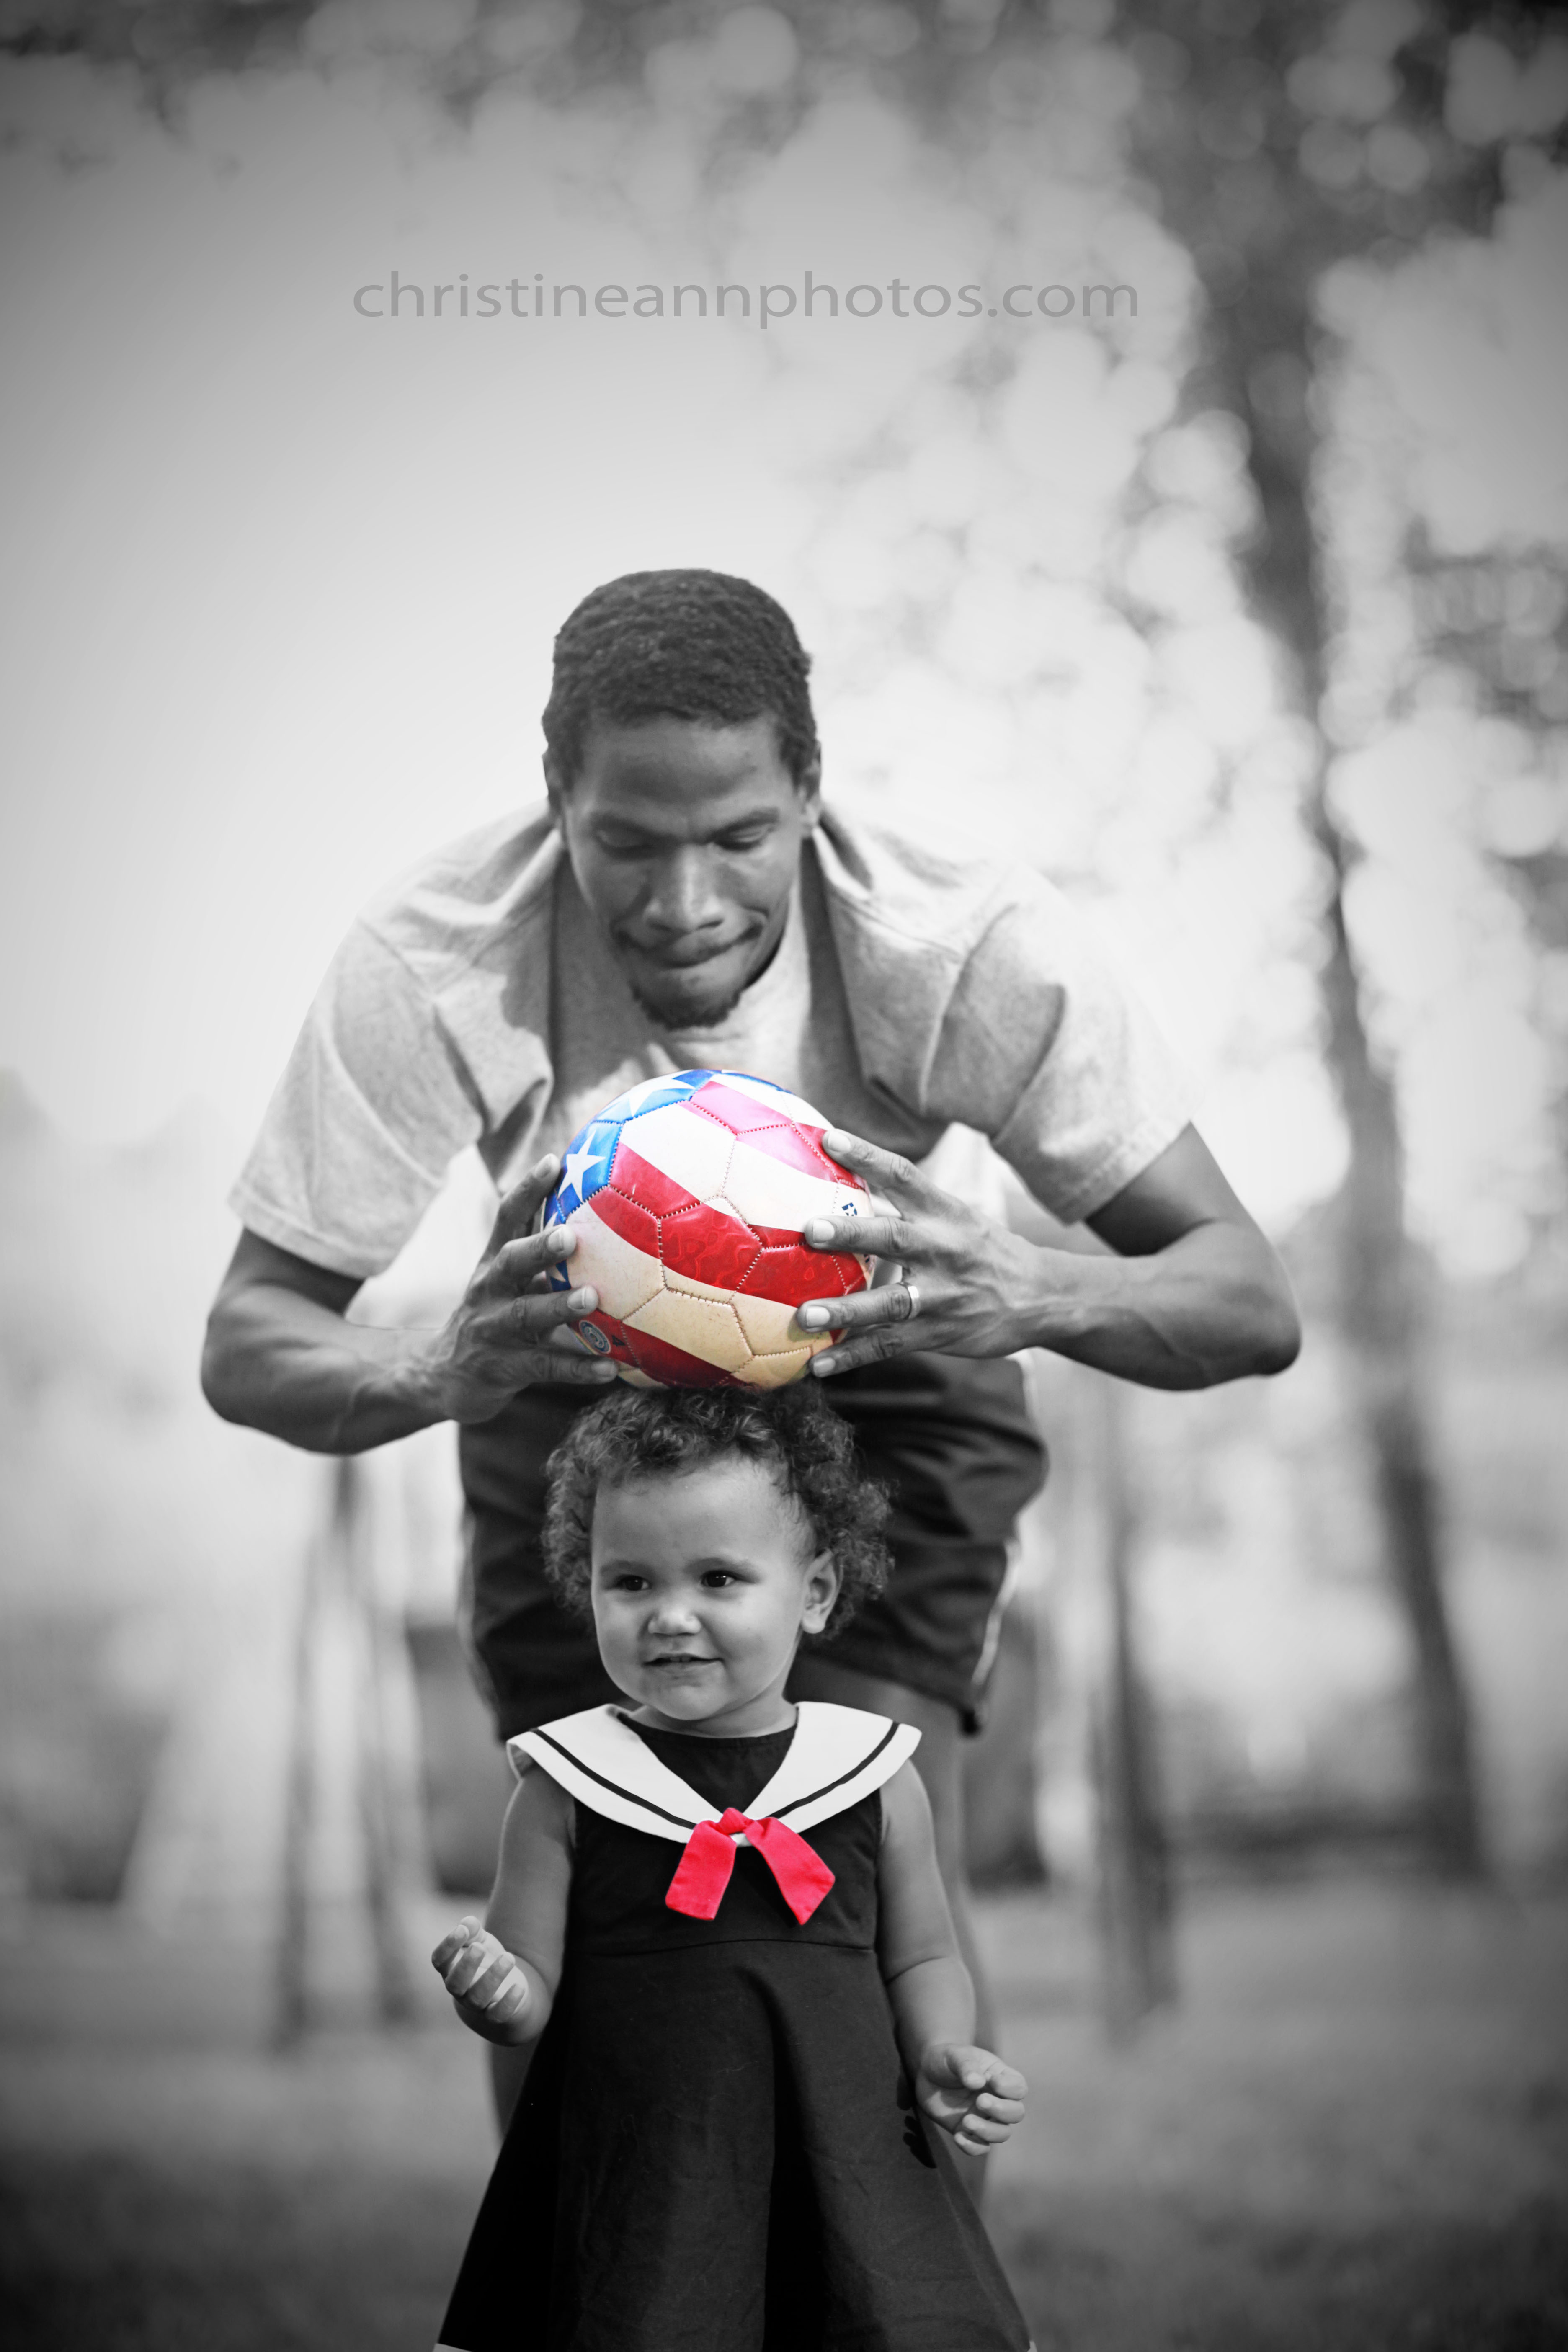
One other tip I have is to pick just one focal point to selective color..a lot of people go a little crazy with their brush and bring back half the image so it’s half color and half black and white.  This looks a bit odd and unnatural and also there is no real concept behind it.  Usually you want to color pop something with meaning or symbolism or a concept (not always but like usually just an item vs a shirt).  In the sample image I am posting here I decided to have 2 color pops so they would balance each other out more but notice the items I picked were small so it doesn’t overwhelm the photo.  I believe my opacity for this image was around 30%.. to do it again I  might bump it up a bit higher, but you get the idea.

This is the image at 100% opacity.. this is the full color image brought back to the black and white image, and this is what most photographers who do color pop do:

IMG_3908zzzzstamped

^ Color brought back at full strength.

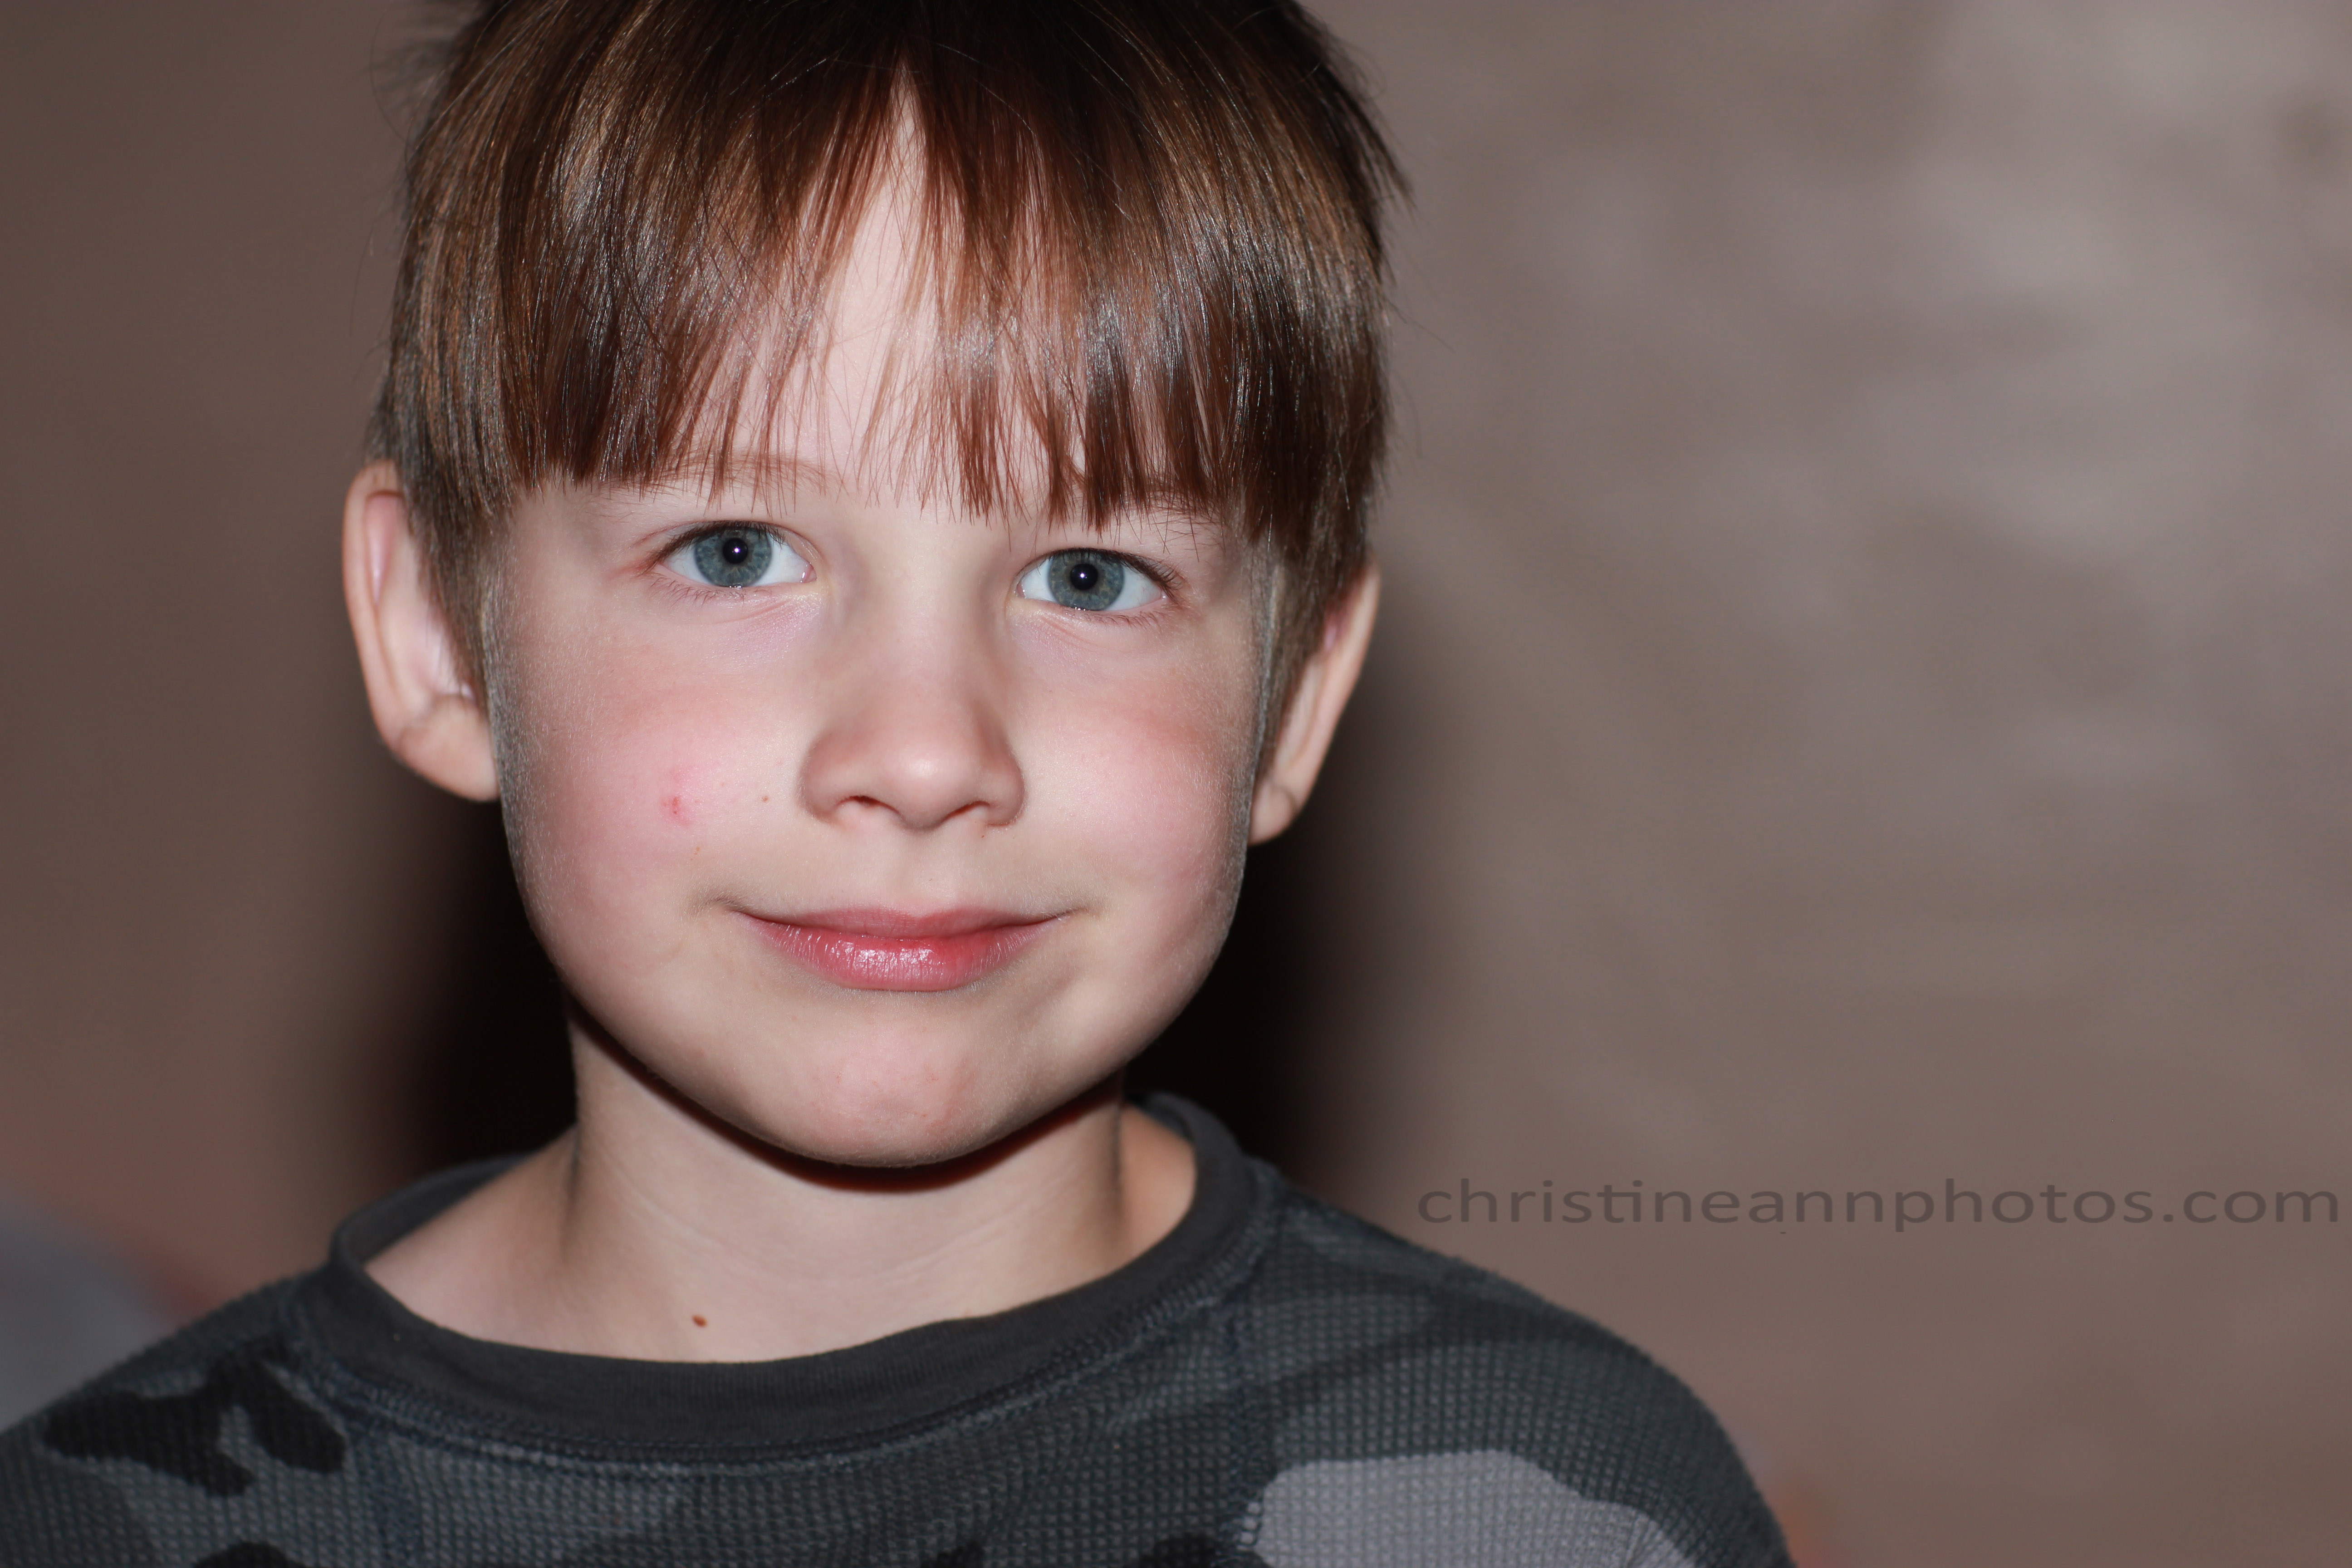
And the photo shown below is the same image with the color brought back around 30% opacity.  It might even be more like 20%. It is a little bit dull but it looks so much less distracting and more natural.. I much prefer it to the full color photo.

IMG_3908bwstamped
^Color brought back around 20-30% strength.

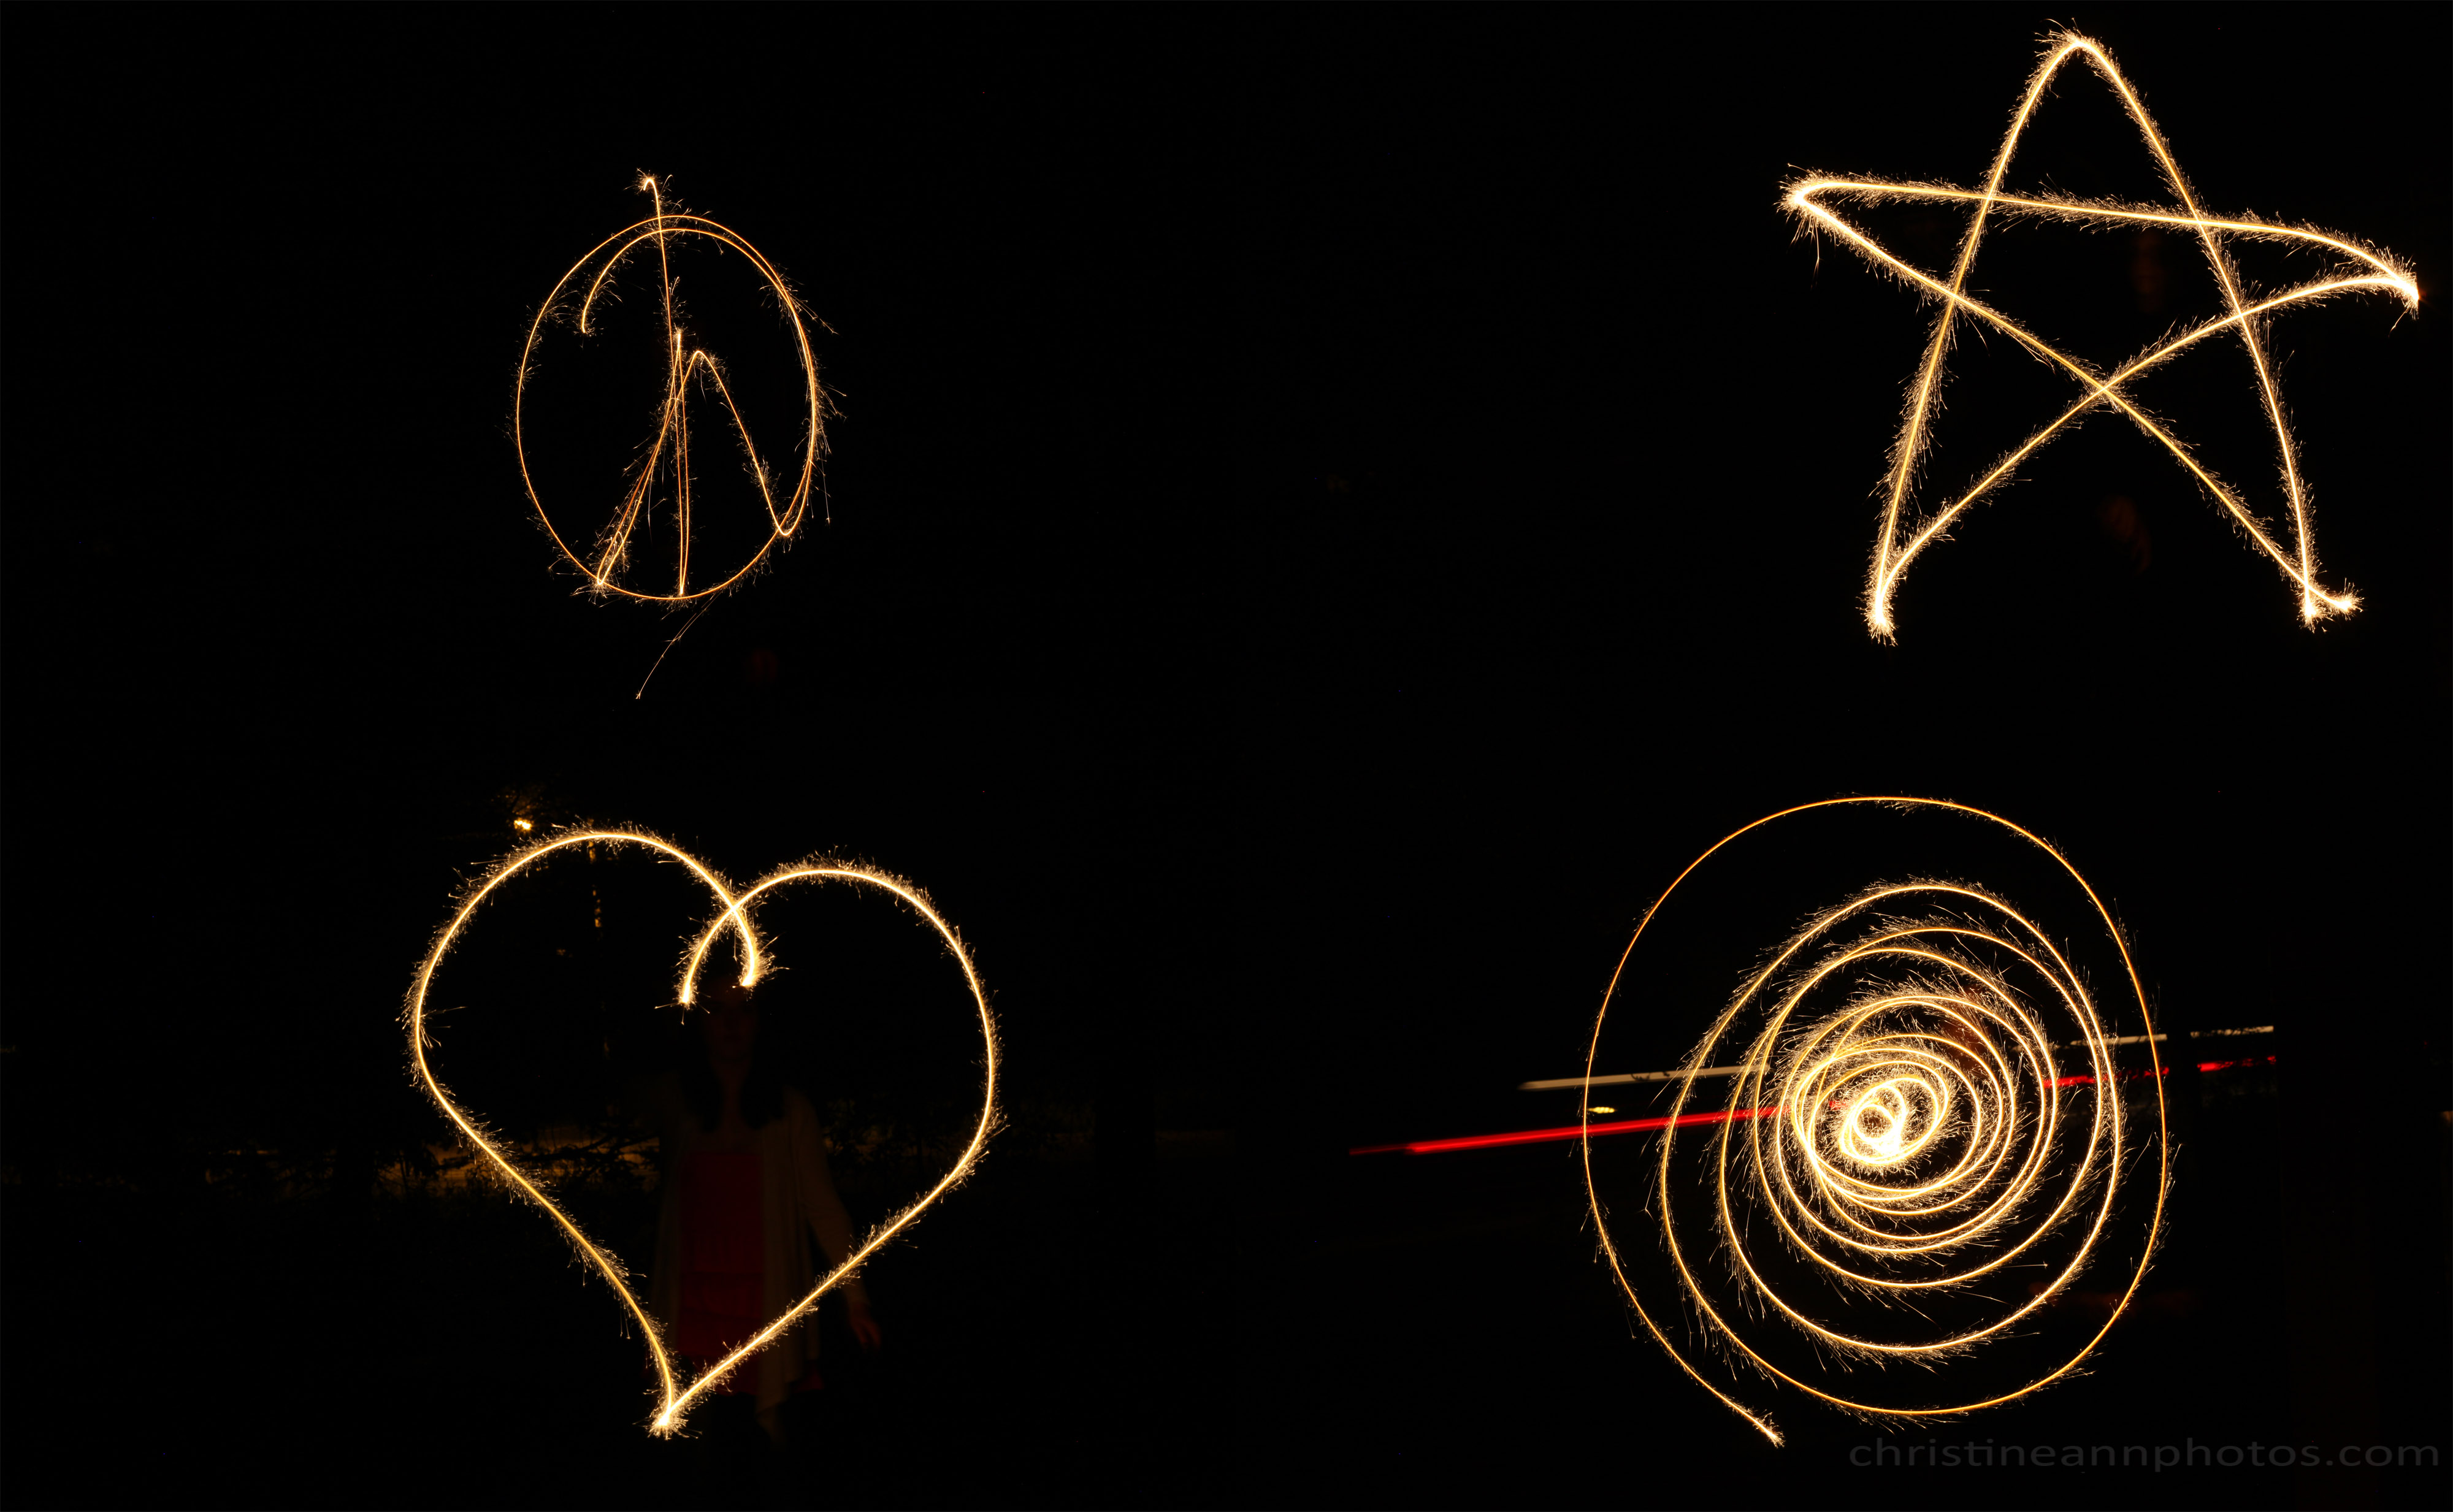
For one more example I’ll show one brought back around 50% opacity.
Selective coloring color pop how to improve technique with image example

^Color brought back around 50% strength. This is my favorite edit of the three (I might tone it down a notch but overall the color isn’t too overbearing and “sharp” and it blends much better than at full strength – in my opinion anyway!).

As with all things in photography, which is better is subjective.  Surely there are people who prefer the first to the second.  If you do like the first you could even play around with bringing back the color around 70%-80% so it’s just not so vivid and contrasting.  While I’m not a huge fan of color pop photos, I do find myself much more receptive to them when done in a more subtle manner, just thought/style I would share with everyone :).

-Christine Ann
Duluth Minnesota Photographer
Website
Facebook

Unedited Photos from T2i + 50mm Lens.

This blog is specifically dedicated to showing images straight from the T2i + 50mm lens.  This is the combo I used for a few years before upgrading to the Mark II 5D + 85mm 1.2L lens.  I got the upgrade about 2 years ago (a little less..) and have barely touched my T2i since (though I do still use the 50mm sometimes).  I picked up my T2i for the first time in a couple years and was surprised by how much better of photos I could get off it than I was ever able to before.  I could not have intentionally gotten as clear and nice of photos (though I did get some lucky ones!) when I used this combo about 2 years ago.  The equipment didn’t change, but I have :).  And I speculate if I pick it up in 2 more years they’ll be even better.  This isn’t to say you can’t get “nicer” photos on nicer equipment, but I recently compared photos from the Mark II 5d + 85mm 1.2L lens to photos on the Mark II 5D + 50mm 1.8 lens to photos on the T2i + 50mm 1.8 lens (IE:  $3,000 camera + $2,000 lens to $3,000 camera + $100 lens to $700 camera + $100 lens) and the results were not all that different from one another.  I was incredibly surprised!  You can see the image comparisons here:  https://christineannphotos.wordpress.com/2013/10/20/photos-taken-with-canon-rebel-t2i-50mm-1-8-lens/ keeping in mind they are unedited and you need to click them to see the full detail of each photo.
The point in all this is that if your photos are out of focus or not sharp it is almost definitely you and not your equipment.  I read a post from someone who has sent back the same 50mm 1.8 lens used in this blog post 2 times, got it a third time and was wondering if she should send it back again or get a different lens all together.  I can assure everyone it was not the lens any of those 3 times, it’s a lack of understanding how to use your camera and how/where to pose people and why.   You can give an artist crappy supplies and they can make something beautiful; you can give someone who is not an artist high end supplies and they will not be able to do much with it.  Focus your energy on practicing, improving, and learning how to use the equipment you have and how to edit.  My one piece of advice regarding equipment is that the kit lens is junk and if you only own a kit lens, it’s time to at least upgrade to the 50mm 1.8.. it is around $100 and you will see a quality improvement!  That is one thing my test shots did show.. a noticeable difference in quality regarding the kit lens to 50mm lens.  Anyway these are some images I have gotten off the T2i in the last couple months (most being from the last few days specifically for some blogs I want to do on starter equipment) they are unedited and I could further improve them by doing some editing 🙂 but then you wouldn’t know what is due to the equipment and what is due to the editing so I will leave them alone.

Unedited images from the T2i + 50mm lens  *CLICK EACH IMAGE FOR FULL DETAIL*:

IMG_5160zzstamp
*Click images for full detail.. the thumbnails look fuzzier than they are*.
IMG_5149crop2stamp
*Click images for full detail*
IMG_5536zzstamp
*Click images for full detail*
t2i50 (2)stamp_z-2
*Click images for full detail*.
IMG_5444stamp
*Click images for full detail.. the thumbnails look fuzzy*.
IMG_5109zzzstamp
*Click images for full detail*.
IMG_5108zzstamp
*Click images for full detail*.

t2i50mmstampzz

*Click images for full detail*.

t2i50 (3stamp)

*Click images for full detail*.

IMG_5441zzstamp

-Christine Ann
Christine Ann Photography Web Site
Christine Ann Photography Facebook

When to Become A Professional Photographer.

With DSLRs becoming very widespread and photography becoming increasingly popular, many of us have been left to wonder things like “When should I start a business?” or “Am I ready to start a business?”.  I feel the answer to these questions is very situational and there is no way to address everyone’s unique situations however I do have some things for consideration that you can assess to help you decide if you think you are.

1.  Are your good photos “lucky” or intentional?  We all get lucky shots.. the question is when you take a great photo, is it luck or did you plan out the position, location, camera settings, angle etc and take that photo on purpose?  Could you take that same great photo again?  You  need to understand why your photos are turning out well and what hurts them and makes them turn out bad.  What if you have a lucky session and then someone else wants a similar style to it and you have no idea how you did it?  The main way to learn these things is through experience and research.  One example:  taking photos at 3 PM with the sun high in the sky and harsh lighting and then taking photos in that sunlight will make the person have squinty eyes and harsh shadows.  Have you learned things like this?  Do you know how to handle this situation to fix this problem?  (Move to the shade, add some fill light, or schedule the session for a later hour in the day).

2.  Do people want to hire you?  Don’t hinge too much on this because my experience was that people said they love the photos I take however after I became a business people said things like “now we can hire you to do our photos!”.  I don’t think people even realized they could have done this before I was a business.  However it’s still a good thing to consider (but don’t let it stop you either if no one has asked you..!).  Have people made comments about wanting to hire you or asking if you would do photos for them?  Or even do you just get a lot of positive feedback on photos you take?  This is a good sign that people like what you’re doing :).

3.  Can you shoot with manual settings?  Do not leave it up to auto mode to determine your settings!  Auto mode has no qualms about going to 1600 ISO and f/8!  Things like this can & sooner or later will ruin your photos.  On auto you may be photographing children and your camera may be going to 1/100 shutter speed causing motion blur.  You need to be able to accommodate this and know how to increase your shutter speed, and how to lower your ISO.  Knowing your manual settings you can handle all situations and make sure the camera is doing what you want it to.

4.  Do you have a strong portfolio?  You don’t want to launch with 10 photos of your own kids ;).  Make sure you have a legit portfolio that portrays your style and diversity and reflects the type of shoots you want to do.

5.  Do you have a passion & love for photography?  To be frank, statistically, most photography businesses are going to fail.  The ones that succeed are the ones with passionate, driven photographers, who want to spend time getting better and reaching more people.  Your passion is what will drive you to learn more and do better and fight for your business.  It isn’t easy to start a business and you need that passion behind you!

One final thing to consider in regards to starting a business is that once you become a business then you have to begin gaining clients.  You aren’t one day a business with tons of people wanting to hire you :).  It takes time.  Most of what I have read says at least 2 years and up to 5 years to gain a good client base.  If your main reason for not wanting to start a business is you don’t have time then consider launching anyway (if you do have at least *some* time anyway..) because you probably won’t have tons of business right away anyway!

If you think you’re ready check out this Step-By-Step Guide For Starting A Photography Business to get an idea of what to do next!

-Christine

http://www.christineannphotos.com
http://www.facebook.com/christineannphotos

This one thing may be ruining your photos (with image comparison).

There is one thing that we all start off doing that may be ruining your photographs: using the on-camera pop-up flash.
I thought it might be beneficial for people learning about photography to see image comparisons of photos taken with natural sunlight (in front of a window or outside) vs photos taken with the on-camera pop-up flash. Most professional photographers overwhelmingly prefer shooting with natural light however we all own external flashes and diffusers for the times where natural light just isn’t working or happening. I think we all start out using it and over years of experience and learning come to realize there are better alternatives. Some things that the on camera pop-up flash does: it creates horrible shadows! Both behind the person you are photographing and also oftentimes under their chin, depending on their angle. It creates these tiny pin-lights in the eyes (the reflection in the eyes is a tiny little dot in the pupil). It makes people squint and blink. Children complain about it hurting their eyes and it just all around looks mostly unnatural. The hair gets mega-highlighted and colors look shiny and overly textured/vibrant.

Alternatives to pop-up flash:
The best alternative: find great sources of natural light – usually in front of a window or in the shade outside.
Another great alternative: Buy a lens with a low aperture. They go down as low as f/1.2! You can handle most situations with this ability but your focus will have to be perfect (Note shooting at f/1.2 is usually not wise because of how shallow your depth of field becomes.. but it’s a nice option to have and I have shot at 1.2 before – not professionally – but for my own photos). Low aperture lenses tend to be very costly. There is one cheap lens that every photographer should own which is the 50mm f/1.8 lens. It’s around $100 and is very great for the price. It is made of plastic and you’ll want to upgrade to a very nice lens eventually but if you are a hobbiest and still learning the 1.8 is a great great option for you!!!! (And is WAY better than the kit lens which also may be ruining your photos if you are using it..).
If you do need flash, you can purchase an off-camera (external) flash and learn to bounce the light and/or diffuse it (ideal! And what professionals do).
If you find none of these are good alternatives for you right now, there are two other options. Option 1 is buying a pop-up flash diffuser. I have not tried one so I can’t vouch for it but I imagine it would help. Option 2 is changing your settings in camera and lowering the strength of the flash (not all cameras can do this but it’s worth looking into and trying out!).

Please note that if you compare flash with natural light in a spot where natural light is not good, the photo taken with a flash will usually look better. Part of learning about photography is developing an eye for and understanding of where the natural light is the best. Studio lighting can be amazing however mastering it takes a lot of time and money. Most photos, however, can be taken with natural light and most people prefer the look of it (though not everyone does, photography is entirely subjective!).

All of these photographs were taken on the same camera: Canon Rebel T2i and all were taken within the last month except the very last one which was taken back in December.

Natural light photograph, taken in front of a window. Notice now nice the reflections in their eyes are and how natural and soft everything is.

IMG_4848stamp
Natural light photograph.
IMG_5094zstamp
Natural light photograph.
IMG_6329softerstamp
Natural light photograph.
IMG_2799zstamp

___________________________________________________
___________________________________________________

Photos taken with on-camera pop-up flash – notice the tiny little pin-light being reflected in the pupil and how the hair is super shiny and the shadows being cast behind them and under the chin as well.
On-camera pop-up flash.
IMG_2860zstamp
On-camera pop-up flash.
IMG_2908stamp
On-camera pop-up flash.
IMG_3993stamp

Some people may prefer the flash photos, some prefer the natural light ones, and neither one is wrong, but it is good to be able to know how various things – such as your light source – will affect a photo!

-Christine Ann
www.christineannphotos.com
www.facebook.com/christineannphotos
Duluth Minnesota Photographer

Understanding The Why of Why Your Photo Turned Out Well.

Random late-night thought.. A friend of mine implied that people who take nice photos have nice equipment. This is a common thought and yes nice equipment helps and yes most people who take nice photos are very invested into photography and therefore own nice equipment but when you have nice equipment you also need to understand how to use it! And we all have heard of the iphone fashion shoot, showing us you can still take nice photos with less nice equipment.
Anyways the whole point of this blog post is to explain something important: Anyone can and very likely will capture the occasional stunning image based on pure luck. A professional understands how to make the stunning image happen on purpose. I am truly amazed by all the consideration that goes into a photo before taking it if you are looking at it with a trained eye!
Some things to take into consideration before taking a photo: your camera settings, your background/location, the direction the person you are taking photos of is facing, where the light is coming from and where the light is landing on your person you are photographing, where the sun is at in the sky, how the person/people are posed, how cropped into the image you are/how close or far away you are from the people/the background-to-person ratio, the angle of your camera, how the image is composed, what the focal point is, keeping lines parallel, keeping open space even, if you are using a flash or not. etc.
You can still get nice photos by shooting wherever you want without taking these things into consideration but the question is: can you replicate the nice images you get on purpose? I was taking photos for many years before starting a business. I never knew when the right time to become a business was. In retrospect, I think the right time was when I finally understood the many many elements that go into a photo so that I knew exactly where to place people and how to make sure I wasn’t riding just on luck. It also took awhile (and lots and lots of practice) to train my eyes!
I remember the first time I learned the rule of composition concerning “parallels” (keep your lines parallel) I decided to practice and it was so awkward for me to try paying attention to parallel lines in the image! Now it’s just totally natural and instinctual. I also missed many details like an unbuttoned button or a collar not folded down nicely. Now I notice stuff like that pretty easily :).
So train your eyes to notice the details, start paying attention to your photos and take note of what you like about the image and do not like. Pay attention to how the light was hitting the person you photographed and what time of the day it was and what your settings were set to. This is all pretty awkward at first but it all comes with practice! It’s like when you first learned how to type.. super awkward and uncomfortable and now it’s just a natural instinct!

IMG_8006astamped

This photo could have gone horribly wrong had I positioned them at a different spot.. but because of the knowledge I have accumulated, I understand how to position people for the best results.

IMG_8033aastamp2

-Christine Ann
www.christineannphotos.com
www.facebook.com/christineannphotos
Duluth Minnesota/Superior Wisconsin Photographer

How to Capture A Sparkler’s Movement Tutorial (/How to do bulb photography).

With 4th of July recently coming and going, you may be seeing photos around of people drawing pictures with a sparkler and wonder how it is done.

Untitled-1stamped

What you need: a tripod, a camera on which you can leave the shutter open for various lengths of time, a remote clicker, and a black outfit (if you don’t want to be seen in the background).

Set your camera on the tripod, set it to BULB mode (different on all cameras, you will have to refer to your manual if you do not know. One typical way is that you set your camera to M and then make your shutter speed as slow as possible.. once it gets maxed out to “as slow as possible” it will say BULB. My camera has a B setting on the settings wheel to get there, so all cameras are different). Once the camera is on the tripod in bulb mode, determine exactly where you want to stand. Mark the spot! Set the camera to Manual Focus, then manually focus on the spot you are standing because the camera will have a hard time auto focusing in the dark). Once the focus is set, then press down on your remote clicker, do a few trial runs to figure out the best settings. My settings for the above photos were around f/16, ISO 640, 4 second shutter speed. I also worked at f/11 ISO 500. Other settings will definitely work too that’s just what I chose to do. My camera also handles high ISOs quite well so I don’t get scared to bump it up though as a general rule I prefer keeping it much lower. Once the camera is on the tripod, the focus is set, and the settings are right, stand in the spot, activate the shutter and move the sparkler around in the shapes you want and when you are done let go. That’s it!

When a shutter is open it captures all movement that occurs while it is open (this is why it needs to be on a tripod! If your hands move at all the camera will capture the movement of the camera). The tricky part is that while it is open it is also absorbing light.. so if you leave it open too long the photo can be blown out if you have streetlights around you especially.

You see in the lower right photo there is a red light streak behind it, that is the taillight of a car driving by.. so this idea works for lots of different things!

Oh and I recommend wearing black because I was wearing pink at first and you can see me pretty easily standing behind the sparklers (as you can see in the lower left-hand corner photo). I later changed to black and the problem was solved. The other adjustment I made is I was initially working with a streetlight behind me and I later figured out was sort of ruining the photos. I moved to a spot about 10 feet away and it solved that problem 🙂 .

My favorite shot of the night I ended up compositing 2 shots together 🙂 and then editing a couple little blurbs in the background so that it all looked totally black/dark.

IMG_3714zzzzzstamp

Remember if you are writing a word you have to write it backwards! 😮 . It is both easier than it sounds AND harder than it sounds haha.

Oh and if I have one more tip for everyone.. buy the big huge sparklers and maximize your time much better!

-Christine Ann
http://www.christineannphotos.com
“like” me on Facebook 🙂 ! https://www.facebook.com/christineannphotos
Duluth Minnesota Photographer

Importance of Understanding How to Take Photos with Manual Settings.

AutoVsManualstamp

After posting “Why Photographers Hate the Words “Your Camera Takes Such Nice Photos” yesterday I thought I would do another version of it today. Yesterday’s blog was a reference to choosing the angle and background etc, today I want to refer to understanding camera settings. You can do so much in camera! I have a billion examples of auto vs manual and things you can do in M that you cannot do in auto. For example you can capture the slight movement of a dog’s tail to show that it is wagging. You can prevent a photo from blurring when the people in it are moving. You can have a better chance at photos in low lighting. You can insert artistic twists to things by “blowing out” (giving it a really washed out/white look which is fun to do sometimes) or enhancing colors or whatever it is you want to do. In auto mode you just have to hope it works out. In Manual you know you can make it work out! Here is a photo example of auto vs manual. I am not saying the manual version is better (I personally think it is but not everyone would agree.. just a matter of taste) but what I am saying is that you can gain a lot by spending some one on one time with your camera and some tutorials to ensure you get the images to look the way you want them to! Neither of these photos are edited.. both are right out of the camera.

-Christine Ann
Duluth Minnesota Photographer
http://www.christineannphotos.com
“like” me on Facebook 🙂 ! https://www.facebook.com/christineannphotos

Why Photographers Hate the Words “Your Camera Takes Nice Photos”.

Today I was photographing some flowers and my kids asked me why I was taking them in the spot I was. The reason was because it put greenery in the background and the lighting was hitting the spot nicely. I considered the background, how the light hit it and caused reflections, I set my camera settings manually to what I thought would capture the image best. I kept the flowers far enough ahead of the background to cause a nice blur. I decided which camera and lens to use for the shot. I applied knowledge about composition and which rules I would want to follow and not follow (and why). I positioned myself at the right angle to hit it in the right direction. After my kids asked me about why I was photographing at that spot I decided to try a shot at a spot I wouldn’t usually choose to illustrate that yes you may have a nice camera that helps you take nice images but you are still responsible for a large portion of how the image turns out.

The photo I took using my knowledge:
IMG_6010stamp

The photo I shot in a spot I wouldn’t choose with the knowledge I have, though I did manually set the settings to good settings which gave it any nice quality it does have as far as the coloring and vibrance goes:
IMG_6020stamp

Both images are right out of the camera and unedited.

This is why photographers hate the words “your camera takes such nice photos”. If you’ve developed an eye for the “right” spots, you can get great images off less nice cameras.. if you have not developed an eye for the right spots, a nice camera isn’t going to help you much, at least not consistently/predictably 🙂 .

-Christine Ann
Hermantown Minnesota Photographer

http://www.christineannphotos.com/
www.facebook.com/christineannphotos